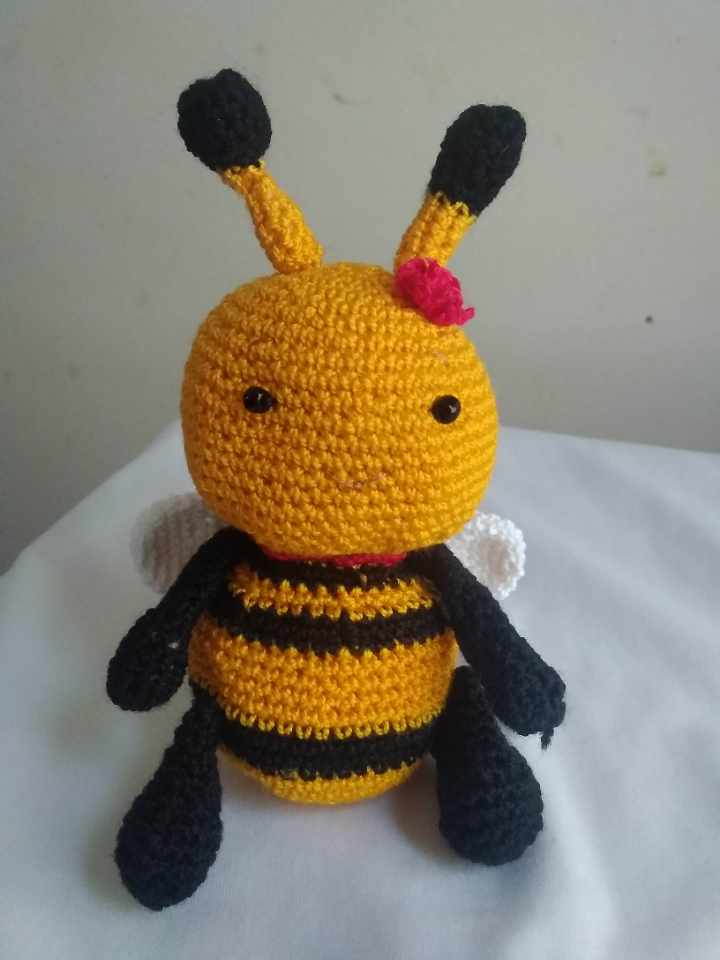
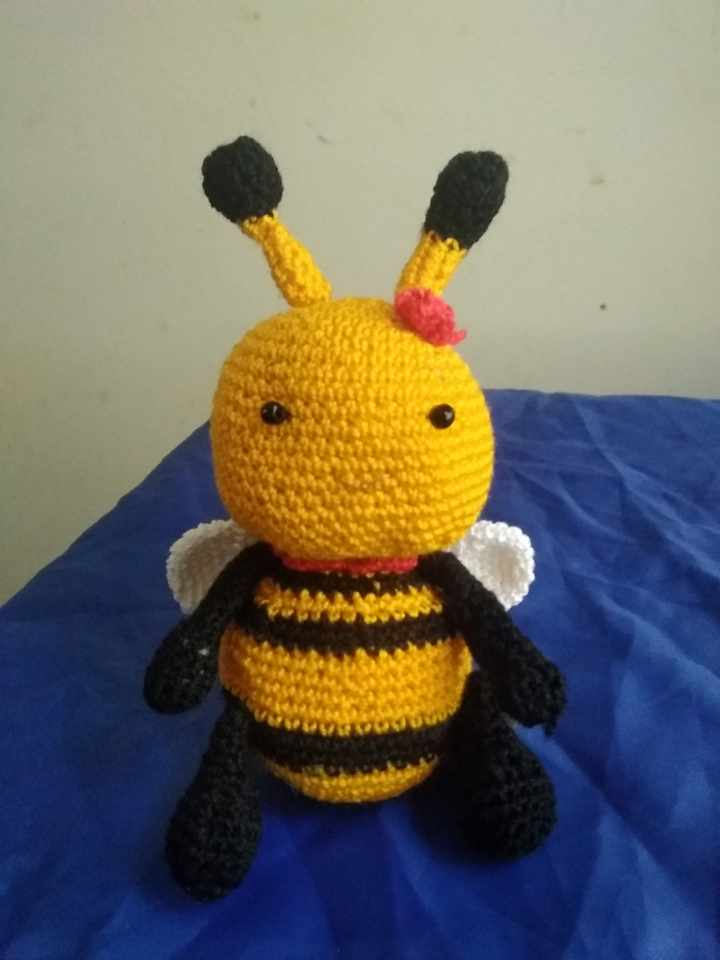
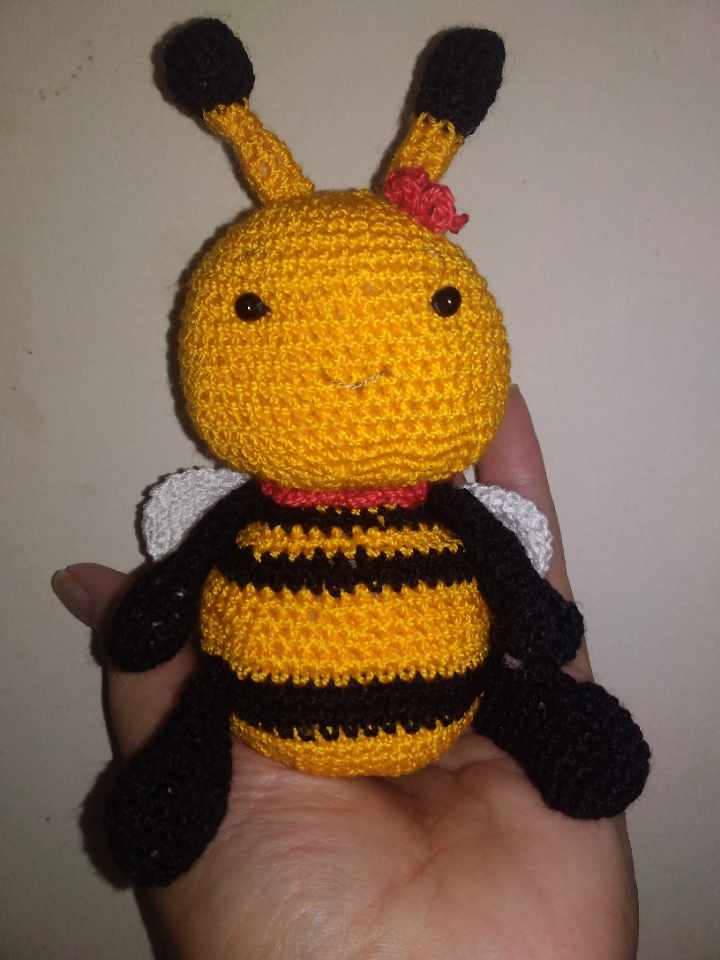
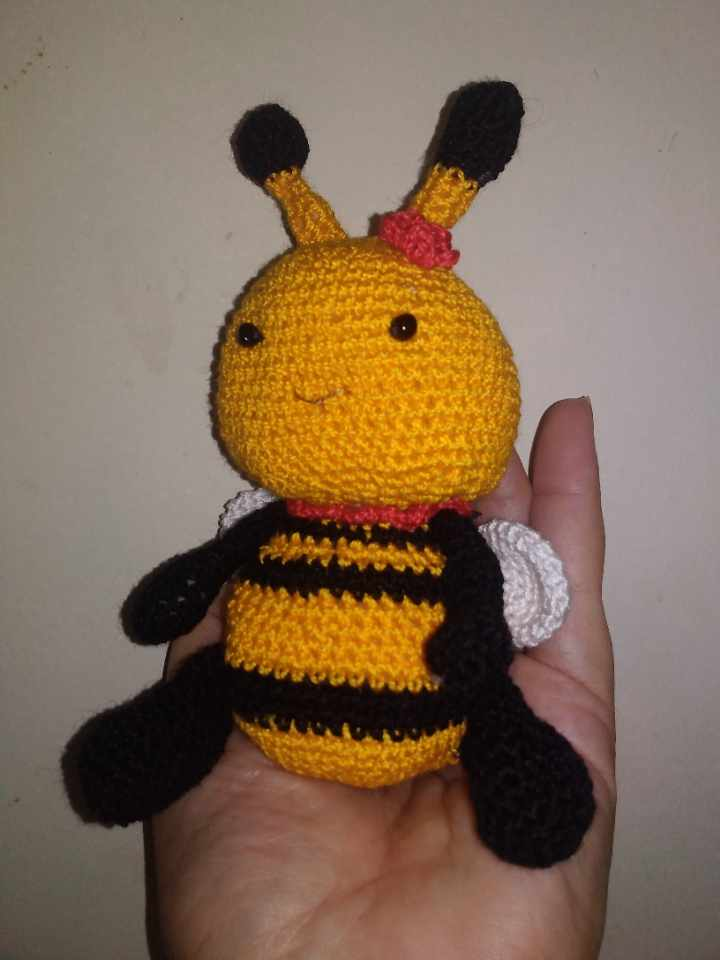
DIYHub August Contest🐝 My crochet honey bee🐝🍯

Saludos hivers, el mes pasado se celebró el Día Mundial de las Abejas por lo que @diyhub lanzo su concurso en honor a esos insectos recolectores de polen y nos proporcionan la tan valiosa y deliciosa miel con la que podemos endulzar muchos postres; pero más allá de ello estamos las abejas trabajadoras incansables de esta plataforma #hive las cuales cada día aportamos un granito más de arena para que esta colmena permanezca sólida.
Greetings hivers, last month was celebrated World Bee Day so @diyhub launched its contest in honor of those insects that collect pollen and provide us with the so valuable and delicious honey with which we can sweeten many desserts; but beyond that we are the tireless worker bees of this platform #hive which every day we contribute one more grain of sand so that this hive remains solid.
Mi participación para el concurso es por supuesto una abeja en crochet con la técnica del amigurumis que no es más que tejer a fin de crear un adorable peluche de hilo, combinando colores, relleno y si se quiere tela, todo es cuestión de personalizar la creación; en este caso, solo podrán observar hilo de crochet, a esta abejita le he llamado Miel, espero les agrade mi idea.
My entry for the contest is of course a crochet bee with the amigurumis technique which is nothing more than knitting in order to create an adorable stuffed toy, combining colors, stuffing and if you want fabric, everything is a matter of customizing the creation; in this case, you can only see crochet thread, I have called this bee Miel, I hope you like my idea.
Materiales🐝🐝
Crochet de color amarillo intenso, negro, blanco y rojo.
Relleno
Aguja para crochet
Aguja lanera
Dos mostacillas en color negro
Hilo de coser en color marrón claro y aguja.
Materials🐝🐝
Intense yellow, black, white and red crochet.
Stuffing
Crochet needle
Wool needle
Two black beads
Light brown sewing thread and needle.
Elaboración/Elaboration🐝🐝
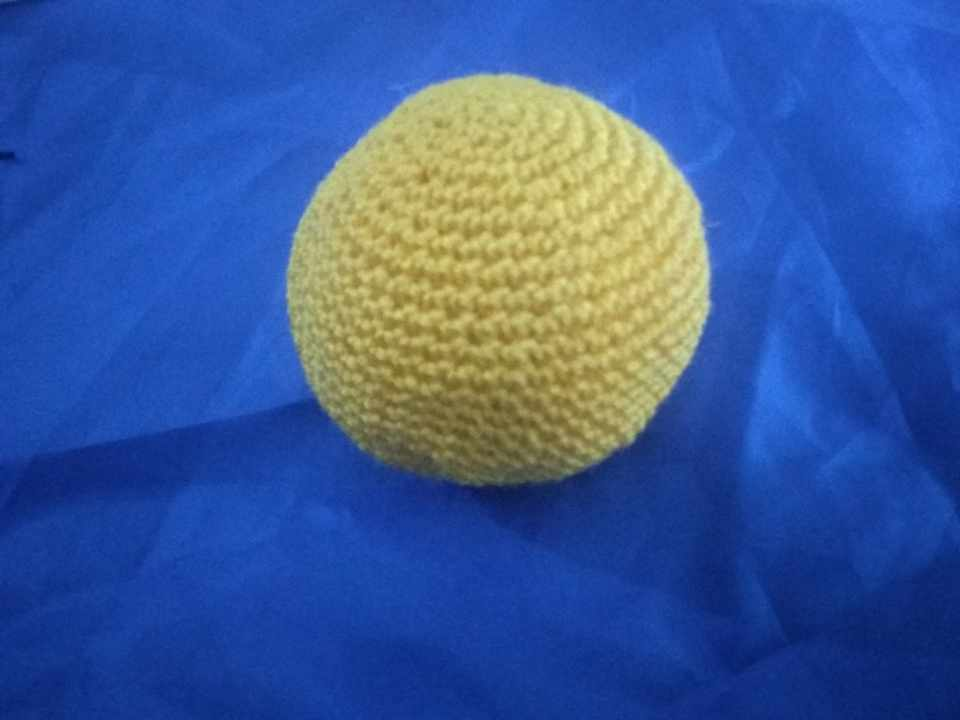
Lo primero que vamos a elaborar es la cabeza y para ello usaremos el hilo de color amarillo. Comenzamos con un anillo mágico de 6 puntos bajos, cerramos el anillo y vamos a elaborar otra vuelta de aumentos con la que concluiremos 12 puntos, a partir de la vuelta número tres iniciamos con aumentos así que será un punto y un aumento (recordemos que esta técnica se trabaja con puntos bajos) consiguiendo así 18 puntos, en las siguientes vueltas serán 2 puntos más un aumento, 3 puntos más un aumento, 4 puntos más un aumento, 5 puntos más un aumento, 6 puntos más un aumento; obteniendo 24, 30, 36, 42 y 48 puntos respectivamente. Las siguientes 2 vueltas serán de 48 puntos cada una, en la vuelta que sigue serán 7 puntos más un aumento con un total de 54 puntos y luego de ello levantamos 8 vueltas de 54 puntos cada una.
The first thing we are going to make is the head and for this we will use the yellow yarn. We start with a magic ring of 6 single crochet stitches, we close the ring and we are going to make another round of increases with which we will finish 12 stitches, from the third round we start with increases so it will be one stitch and one increase (remember that this technique is worked with single crochet stitches) obtaining 18 stitches, in the following rounds will be 2 stitches plus one increase, 3 stitches plus one increase, 4 stitches plus one increase, 5 stitches plus one increase, 6 stitches plus one increase; obtaining 24, 30, 36, 42 and 48 stitches respectively. The following 2 rows will be of 48 stitches each, in the next row will be 7 stitches plus an increase for a total of 54 stitches and after that we pick up 8 rows of 54 stitches each.
En esta próxima vuelta comenzamos a disminuir para darle forma circular a nuestra pieza, así que hacemos 7 puntos y una disminución logrando 48 puntos, luego 2 puntos y disminución con un total de 36 puntos, seguidamente 4 puntos y disminución obteniendo 30 puntos, continuamos en la otra vuelta con 3 puntos y disminución con un total de 24 puntos, en la siguiente vuelta 2 puntos y disminución con un total de 18 puntos. Es aquí donde rematamos dejando hebra larga para introducir el relleno y luego con la aguja lanera cerramos, obteniendo lo que es la cabeza.
In this next round we begin to decrease to give circular shape to our piece, so we make 7 stitches and a decrease achieving 48 stitches, then 2 stitches and decrease with a total of 36 stitches, then 4 stitches and decrease obtaining 30 stitches, we continue in the next round with 3 stitches and decrease with a total of 24 stitches, in the next round 2 stitches and decrease with a total of 18 stitches. It is here where we finish off leaving long yarn to introduce the filling and then with the wool needle we close, obtaining what is the head.
Aquí vamos a elaborar las antenas que como ven en la imagen son dos, por lo que comenzamos a trabajar con el color negro haciendo un anillo mágico de 6 puntos, luego en la próxima vuelta hacemos solo aumentos para lograr 12 puntos, seguidamente 2 vueltas de 12 puntos cada una, en la otra vuelta hacemos disminuciones para llegar nuevamente a obtener 6 puntos, aquí rellenamos. Incorporamos el hilo de color amarillo y levantamos 6 vueltas de 6 puntos cada una, al final terminamos con punto deslizado y dejamos hebra larga para coser a la cabeza.
Here we are going to elaborate the antennas that as you can see in the image are two, so we start working with the black color making a magic ring of 6 stitches, then in the next round we make only increases to obtain 12 stitches, then 2 rounds of 12 stitches each, in the other round we make decreases to obtain again 6 stitches, here we fill in. We incorporate the yellow yarn and raise 6 rows of 6 stitches each, at the end we finish with slipped stitch and leave long yarn to sew to the head.
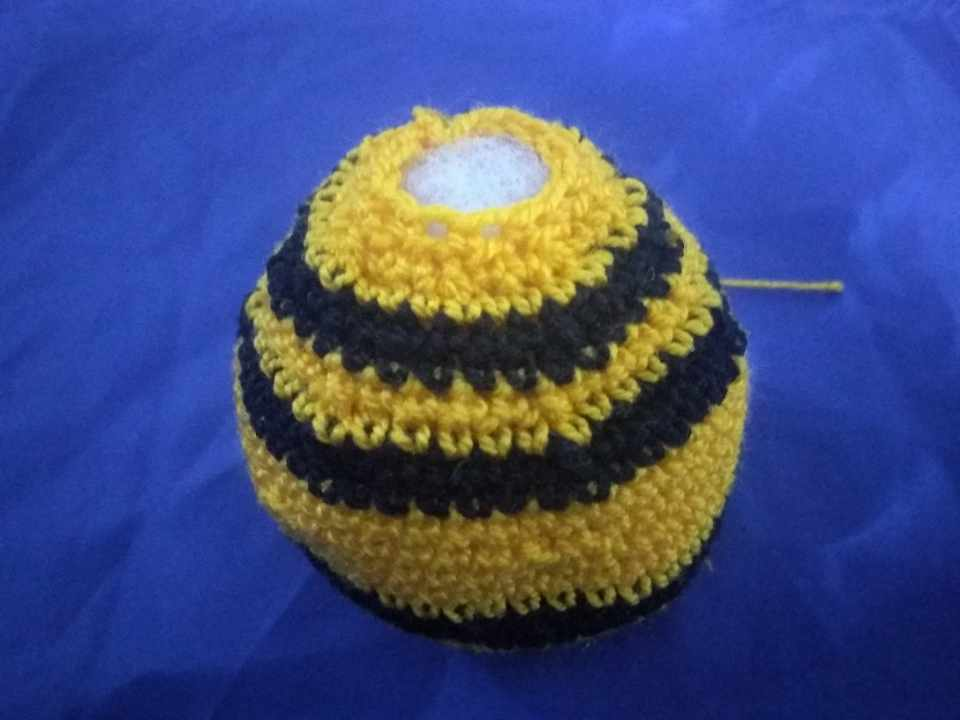
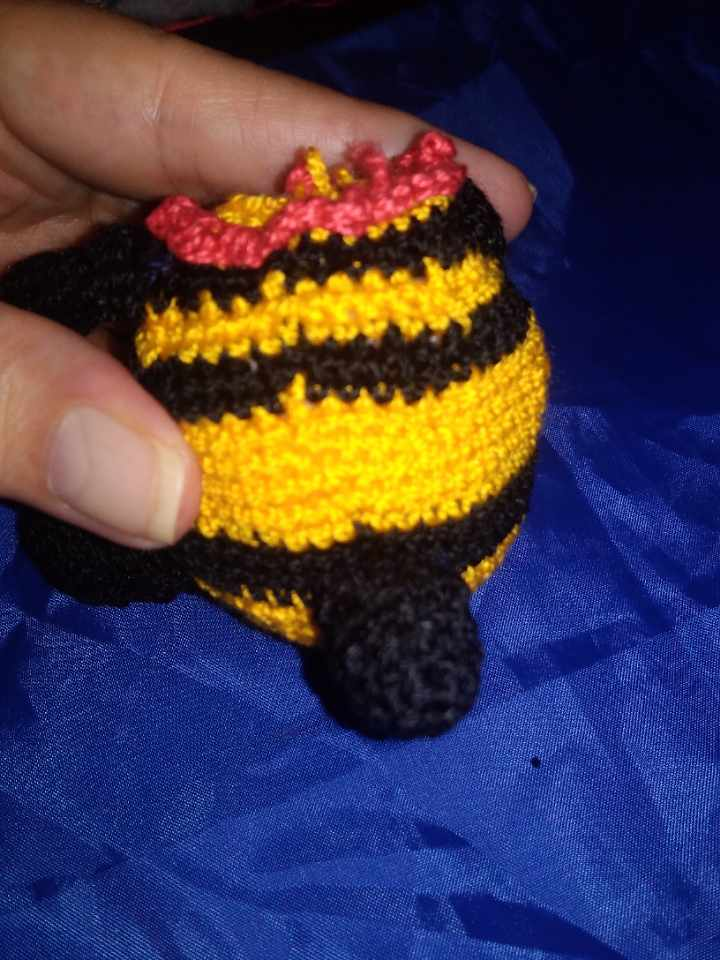
El cuerpo como se observa en la fotografía, lleva el color amarillo y el negro por lo que vamos a comenzar con el color amarillo y haciendo un anillo mágico de 8 puntos iniciamos el tejido, para seguir con una vuelta de aumentos que nos dará 16 puntos, luego vamos con otra vuelta de 1 punto 1 aumento que serán 24 puntos, luego 3 puntos y aumento con un total de 30 puntos, seguimos con 4 puntos y aumento, 5 puntos y aumento, 6 puntos y aumento logrando obtener 36, 42 y 48 puntos respectivamente, seguimos con 2 vueltas de 48 puntos cada una.
The body, as shown in the picture, has the yellow and black color, so we will start with the yellow color and making a magic ring of 8 stitches we start the knitting, to continue with a round of increases that will give us 16 stitches, then we go with another round of 1 stitch 1 increase that will be 24 stitches, then 3 stitches and increase with a total of 30 stitches, we continue with 4 stitches and increase, 5 stitches and increase, 6 stitches and increase achieving 36, 42 and 48 stitches respectively, we continue with 2 rounds of 48 stitches each one.
Para la próxima vuelta incorporamos el hilo de color negro haciendo 3 vueltas de 48 puntos cada una, cambiamos el color de hilo y se levantan 3 vueltas más de 48 puntos cada una, seguimos con el hilo amarillo y hacemos una vuelta de 6 puntos y disminución obteniendo 42 puntos, luego otra vuelta de 42 puntos, cambiamos a hilo negro y hacemos otra vuelta de 42 puntos, en la próxima vuelta serán 5 puntos y disminución con un total de 36 puntos, continuamos con otra vuelta de 36 puntos y en la siguiente incorporamos el color amarillo con 36 puntos más, otra vuelta con 4 puntos y disminución con un total de 30 puntos, para la otra vuelta usamos hilo negro haciendo 30 puntos más, la siguiente vuelta será de 3 puntos y disminución obteniendo 24 puntos, continuamos con el hilo amarillo haciendo vuelta de 24 puntos y una última de 2 puntos y disminución, terminando con punto deslizado dejando hebra larga, rellenamos.
For the next round we incorporate the black yarn making 3 rows of 48 stitches each, we change the yarn color and 3 more rows of 48 stitches each, we continue with the yellow yarn and make a row of 6 stitches and decrease obtaining 42 stitches, then another row of 42 stitches, we change to black yarn and make another row of 42 stitches, in the next round will be 5 stitches and decrease with a total of 36 stitches, we continue with another round of 36 stitches and in the next round we incorporate the yellow color with 36 more stitches, another round with 4 stitches and decrease with a total of 30 stitches, for the other round we use black yarn making 30 more stitches, the next round will be of 3 stitches and decrease obtaining 24 stitches, we continue with the yellow yarn making a round of 24 stitches and a last one of 2 stitches and decrease, finishing with slipped stitch leaving long strand, we fill in.
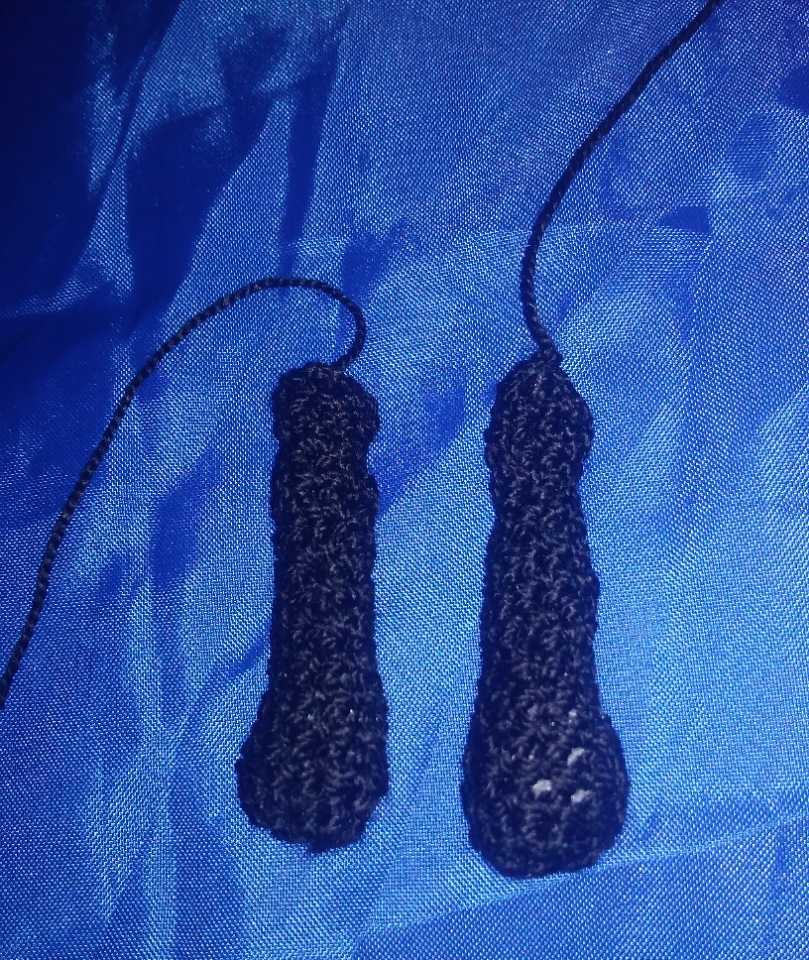
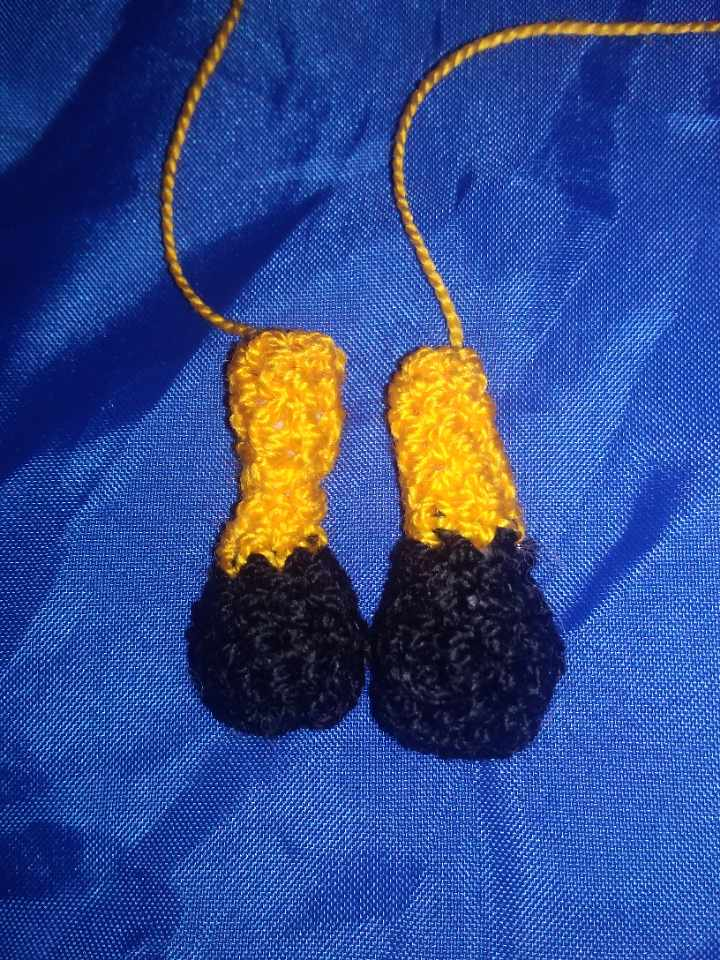
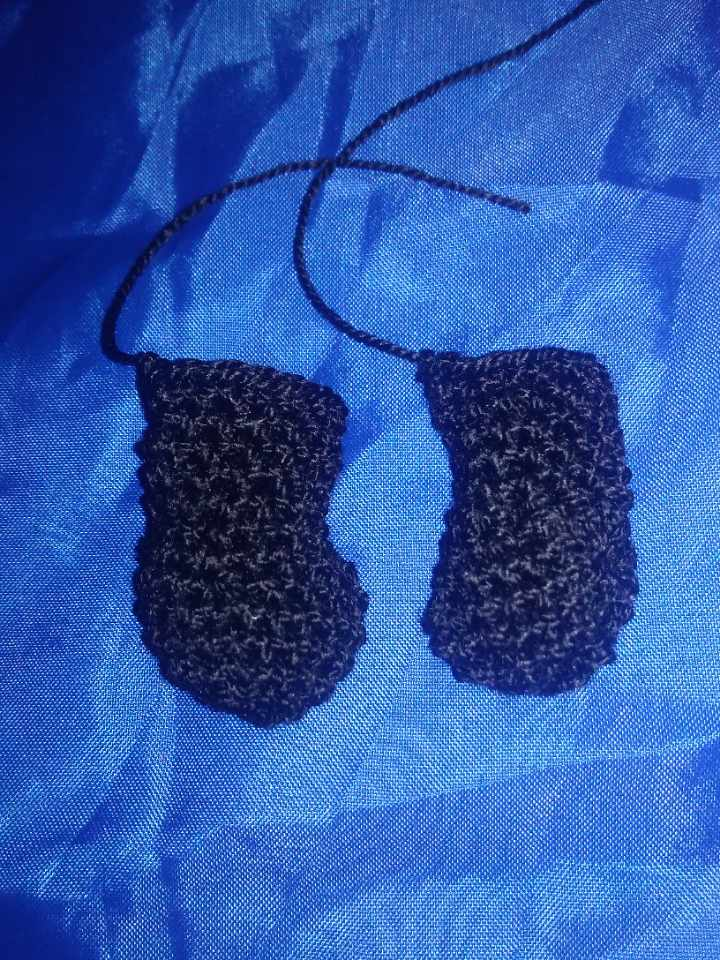
Los brazos los trabajamos con el color negro y empezando con anillo mágico de 5 puntos hacemos la primera vuelta, luego en la otra vuelta aumentamos todos los puntos obteniendo 10 puntos, seguidamente realizamos 2 vueltas de 10 puntos cada una, continuamos con otra vuelta de 3 puntos y disminución para lograr 8 puntos, rellenamos solo la mano y continuamos con 9 vueltas de 8 puntos cada una, al finalizar encaramos y cerramos las piezas con 3 puntos, dejar hebra larga.
We work the arms with black color and starting with magic ring of 5 stitches we make the first round, then in the other round we increase all the stitches obtaining 10 stitches, then we make 2 rounds of 10 stitches each one, we continue with another round of 3 stitches and decrease to obtain 8 stitches, we fill only the hand and continue with 9 rounds of 8 stitches each one, at the end we face and close the pieces with 3 stitches, leaving long strand.
Las piernas también las trabajamos en color negro, comenzamos haciendo un anillo mágico de 6 puntos y en la siguiente vuelta aumentamos cada punto para obtener 12 puntos, seguimos con otra vuelta de 1 punto 1 aumento con un total de 18 puntos, luego hacemos 2 vueltas de 18 puntos cada una, para la siguiente vuelta iniciamos las disminuciones; 6 puntos 3 disminuciones con un total de 15 puntos, en la siguiente vuelta son 4 puntos 3 disminuciones y 5 puntos con un total de 12 puntos, en la otra vuelta 4 puntos 2 disminuciones obteniendo 10 puntos, las próximas 4 vueltas serán de 10 puntos cada una, encaramos para cerrar con puntos deslizados dejando hebra larga.
The legs we also work them in black color, we start making a magic ring of 6 stitches and in the next round we increase each stitch to obtain 12 stitches, we continue with another round of 1 stitch 1 increase with a total of 18 stitches, then we make 2 rounds of 18 stitches each one, for the next round we start the decreases; 6 stitches 3 decreases with a total of 15 stitches, in the next round are 4 stitches 3 decreases and 5 stitches with a total of 12 stitches, in the other round 4 stitches 2 decreases obtaining 10 stitches, the next 4 rounds will be of 10 stitches each one, we face to close with slipped stitches leaving long strand.
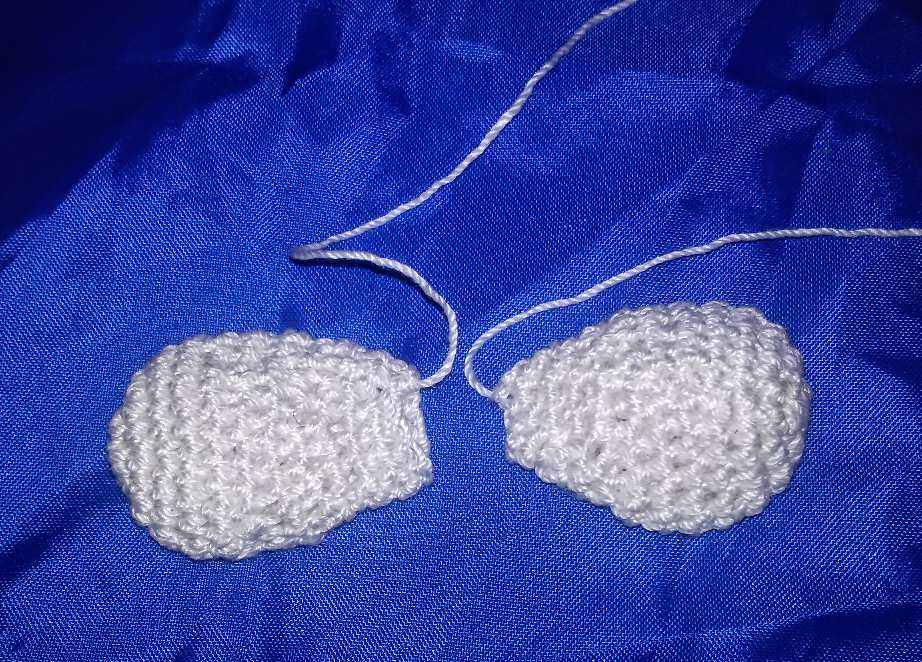
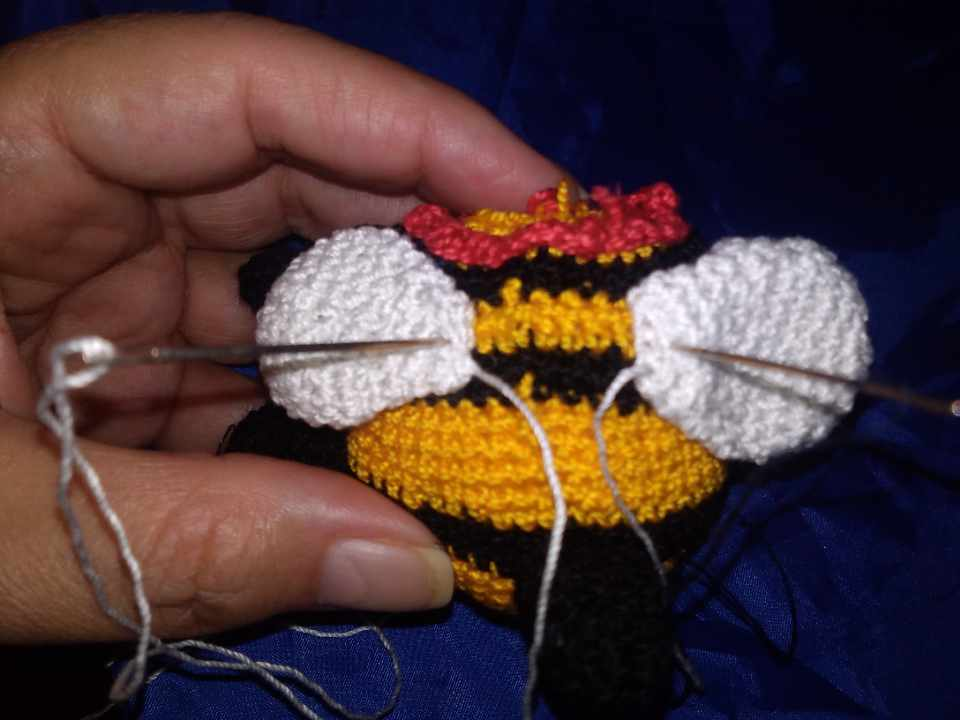
Aquí elaboramos las alas que son de color blanco, para ellas iniciamos con un anillo mágico de 7 puntos, en la siguiente vuelta duplicamos los puntos lo que será igual a 14 puntos, la siguiente vuelta es de 1 punto y aumento con un total de 21 puntos, luego hacemos 3 vueltas de 21 puntos cada una, en la siguiente vuelta comenzamos a disminuir; 5 puntos y disminución obteniendo 18 puntos, luego 1 punto 1 disminución con un total de 12 puntos, la siguiente vuelta también es de 12 puntos, luego vuelta de 2 puntos y disminución con 9 puntos en total, seguimos con otra vuelta de 9 puntos, aplanamos las piezas y cerramos dejando hebra larga.
Here we make the wings which are white, for them we start with a magic ring of 7 stitches, in the next round we double the stitches which will be equal to 14 stitches, the next round is 1 stitch and increase with a total of 21 stitches, then we make 3 rounds of 21 stitches each one, in the next round we start decreasing; 5 stitches and decrease obtaining 18 stitches, then 1 stitch 1 decrease with a total of 12 stitches, the next round is also of 12 stitches, then round of 2 stitches and decrease with 9 stitches in total, we continue with another round of 9 stitches, we flatten the pieces and close leaving long strand.
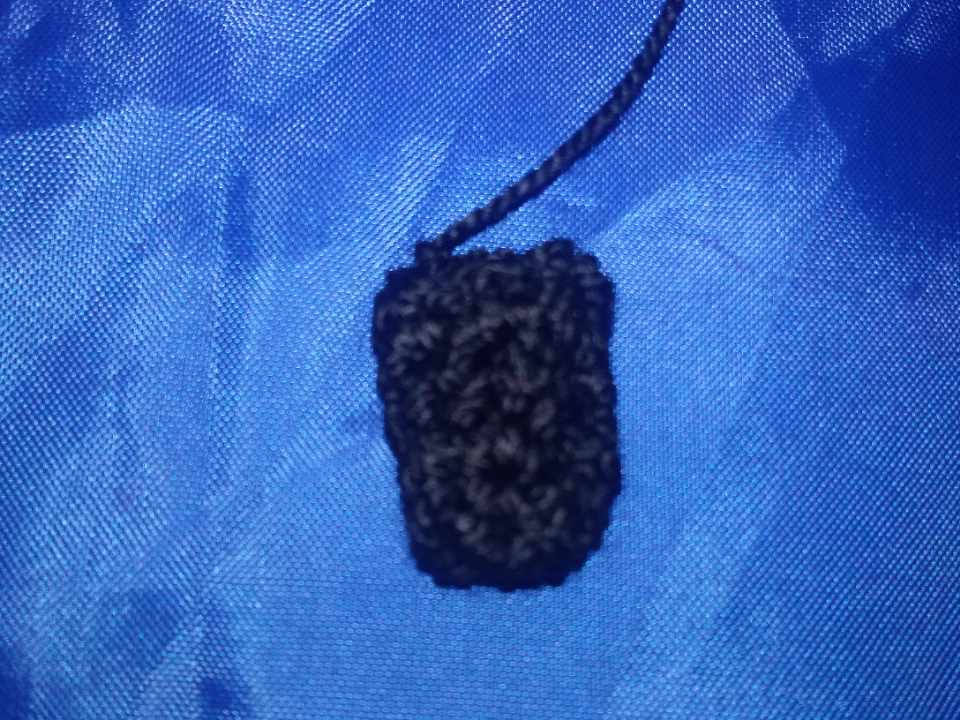
Esta pieza es la cola y va de color negro. Anillo mágico de 4 puntos, en la próxima vuelta 1 punto y aumento con un total de 6 puntos, luego vuelta de 6 puntos, en la siguiente vuelta 2 puntos y aumento obteniendo 8 puntos, seguidamente 3 puntos y aumento con un total de 10 puntos, luego 1 punto 1 aumento consiguiendo 15 puntos, rellenamos y cerramos con punto deslizado dejando hebra larga.
This piece is the tail and is black. Magic ring of 4 stitches, in the next row 1 stitch and increase with a total of 6 stitches, then row of 6 stitches, in the next row 2 stitches and increase obtaining 8 stitches, then 3 stitches and increase with a total of 10 stitches, then 1 stitch 1 increase obtaining 15 stitches, fill and close with slip stitch leaving long strand.

Lo que se observa aquí es un cuello decorativo para embellecer a nuestra abejita Miel, así que vamos a usar hilo rojo formando 26 cadenetas, luego comenzamos a trabajar en la segunda cadeneta realizando 4 puntos bajos en un mismo punto, levantamos 1 cadeneta, en el próximo punto volvemos hacer 4 puntos bajos en el mismo espacio y así repetimos hasta llegar al final donde culminamos con punto deslizado.
What you see here is a decorative collar to embellish our Honey Bee, so we are going to use red yarn forming 26 chains, then we start working on the second chain making 4 single crochet low stitches, we pick up 1 chain, on the next stitch we return to make 4 low stitches in the same space and so we repeat until we reach the end where we finish with a slip stitch.
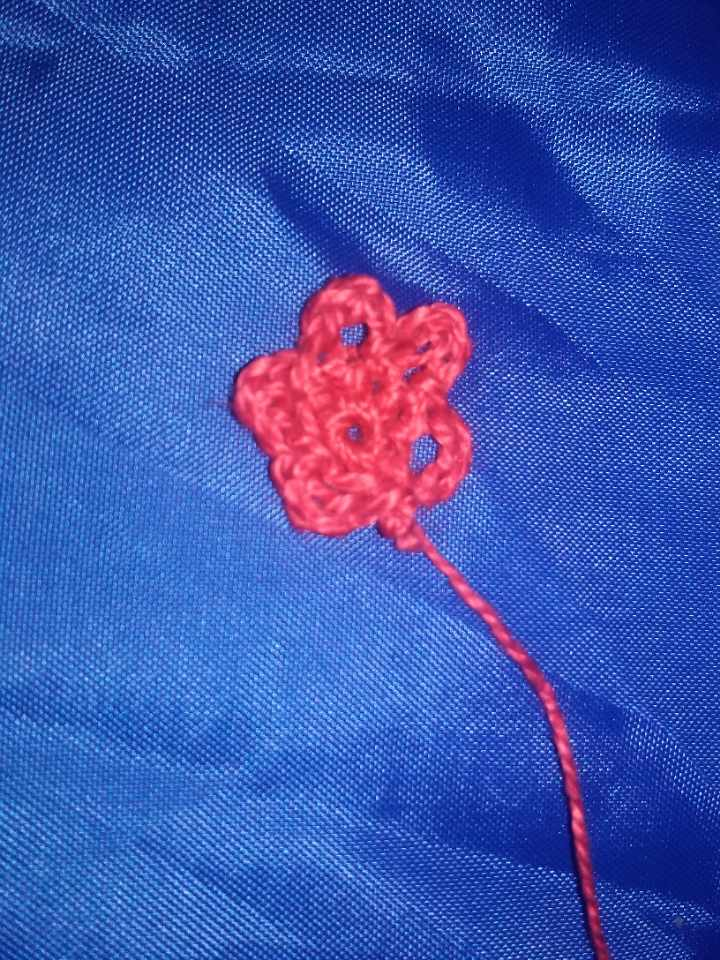
Para la flor usamos hilo rojo, haciendo un anillo mágico de 6 puntos, y en la siguiente vuelta realizamos 3 cadenetas y con punto deslizado entramos al siguiente punto y así sucesivamente se van creando los pétalos.
For the flower we use red yarn, making a magic ring of 6 stitches, and in the next round we make 3 chains and with slipped stitch we enter the next stitch and so on, creating the petals.
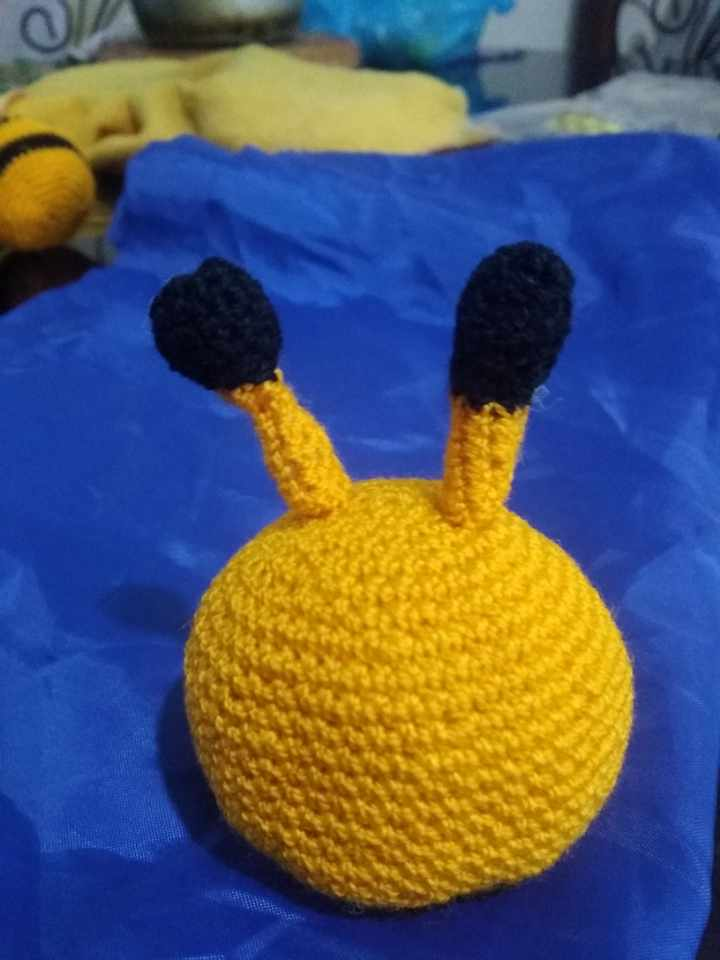
Aquí comenzamos el armado de la abeja así que iniciamos cociendo las antenas a la cabeza, tomando la hebra que dejamos y con ayuda de la aguja lanera cosemos en la parte por donde está el anillo mágico, contamos 3 puntos y allí colocamos cada antena asegurando bien con cada punto y de manera sutil para que estos no queden al descubierto.
Here we begin the assembly of the bee, so we start by sewing the antennas to the head, taking the yarn that we left and with the help of the wool needle we sew in the part where the magic ring is, we count 3 stitches and there we place each antenna securing well with each stitch and in a subtle way so that they are not uncovered.
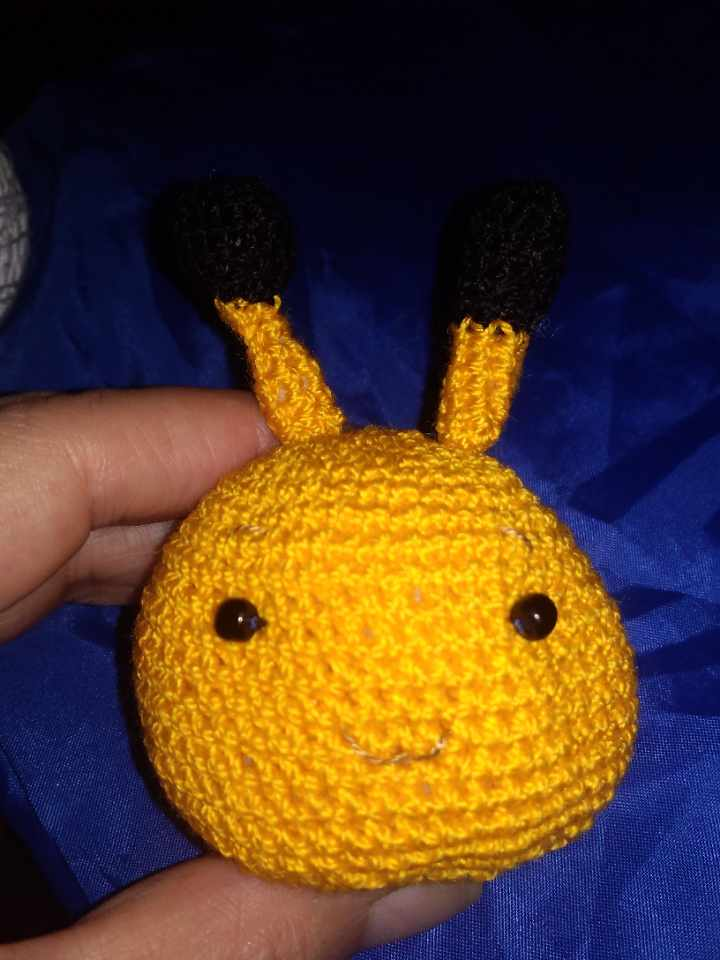
Los ojos van colocados entre las vueltas 15 y 16, tomando en cuenta que estos deben tener 10 puntos de separación. Como son mostacillas, los cosemos con hilo negro. En la imagen se pueden ver apenas las cejas y boca que hice con el hilo marrón claro.
The eyes are placed between rows 15 and 16, taking into account that they should be 10 stitches apart. As they are beads, we sew them with black thread. In the picture you can just see the eyebrows and mouth that I made with the light brown thread.
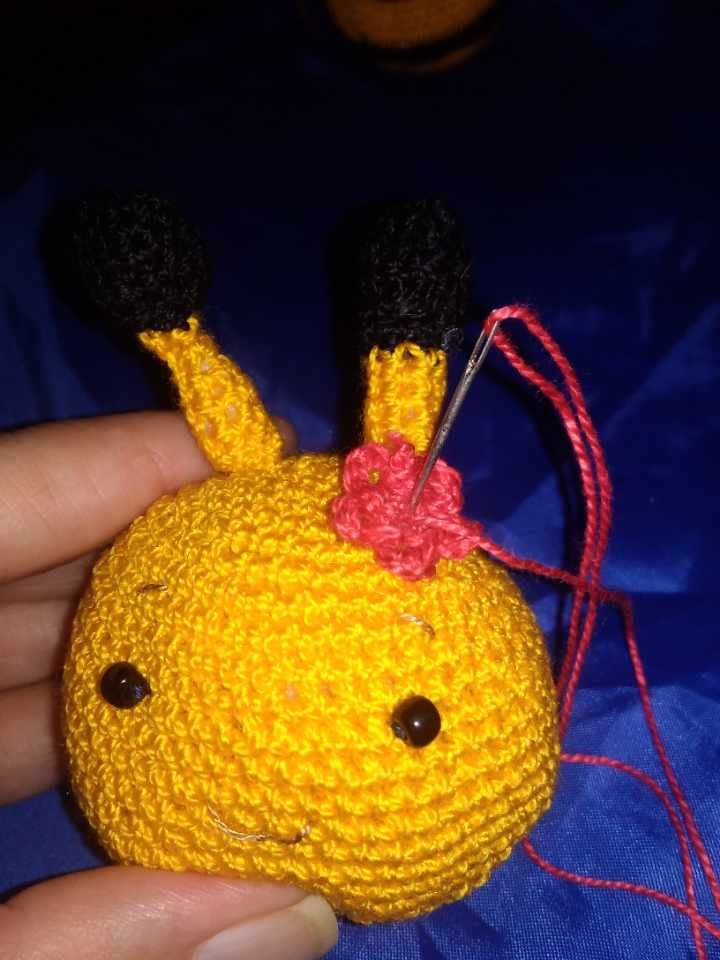
Con hilo rojo en la aguja lanera aseguramos la flor cerca de una de las antenas.
With red thread on the wool needle we secure the flower near one of the antennae.
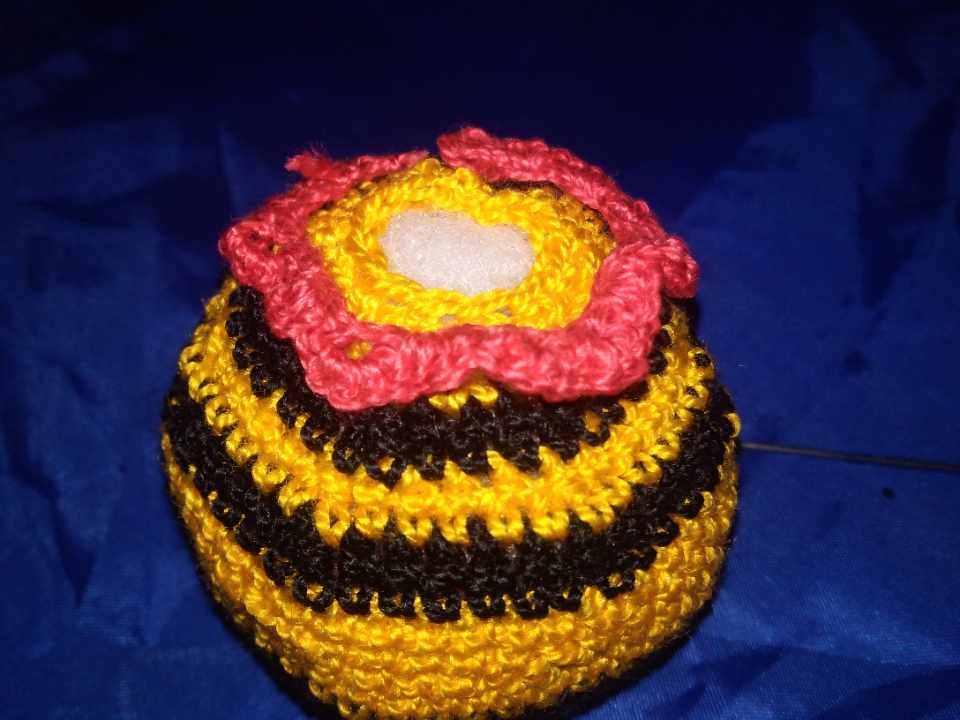
El cuello decorativo lo colocamos tal cual, como se muestra en la imagen, solo es cuestión de asegurarlo con la aguja lanera, haciendo puntadas muy delicadas para que el trabajo dé buena impresión.
The decorative collar is placed as shown in the image, it is only a matter of securing it with the wool needle, making very delicate stitches so that the work gives a good impression.
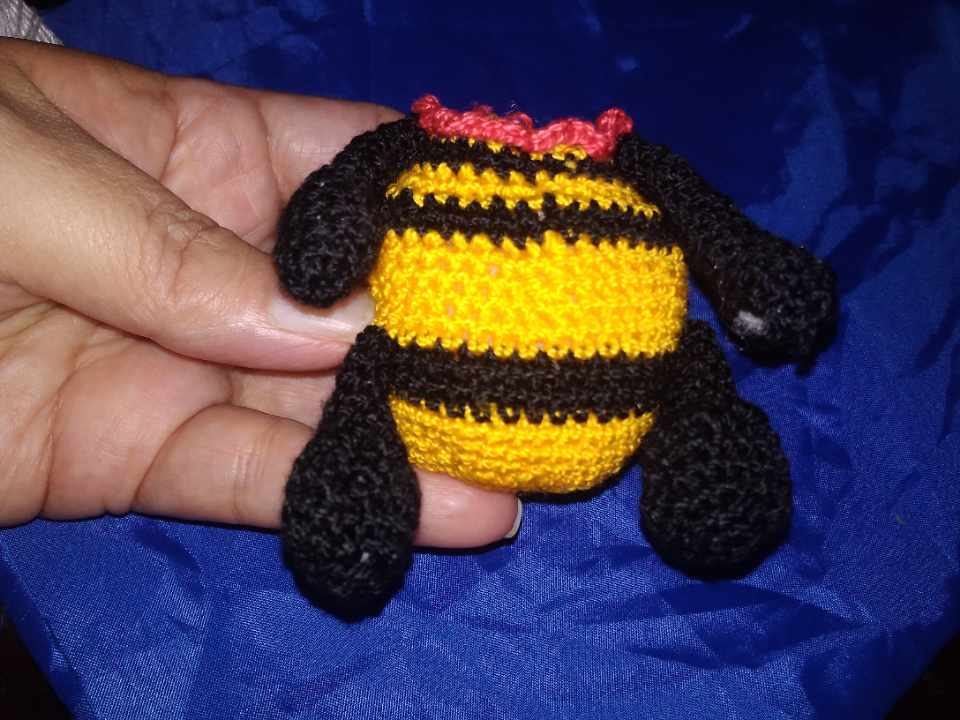
Para completar el cuerpo cosemos los brazos y piernas a este; los brazos debajo del cuello y en esa misma dirección las piernas.
To complete the body we sew the arms and legs to the body; the arms under the neck and in the same direction the legs.
Tomando en cuenta las terminaciones de cada vuelta por la parte de atrás del cuerpo, vamos a apegar la cola para que nos quede centrada y haciendo puntos muy sutiles con la aguja lanera aseguramos.
Taking into account the ends of each turn on the back of the body, we will attach the tail so that it is centered and by making very subtle stitches with the wool needle we will secure it.
Para pegar las alas, primero tomamos en cuenta la dirección que tiene la cola, contamos 3 a los lados y cosemos como se muestra en la foto. Fíjense que yo primero las coloqué con alfileres para luego coser y que estas queden en igual dirección.
To glue the wings, first we take into account the direction of the glue, count 3 on the sides and sew as shown in the photo. Notice that I first pinned the wings to sew them in the same direction.
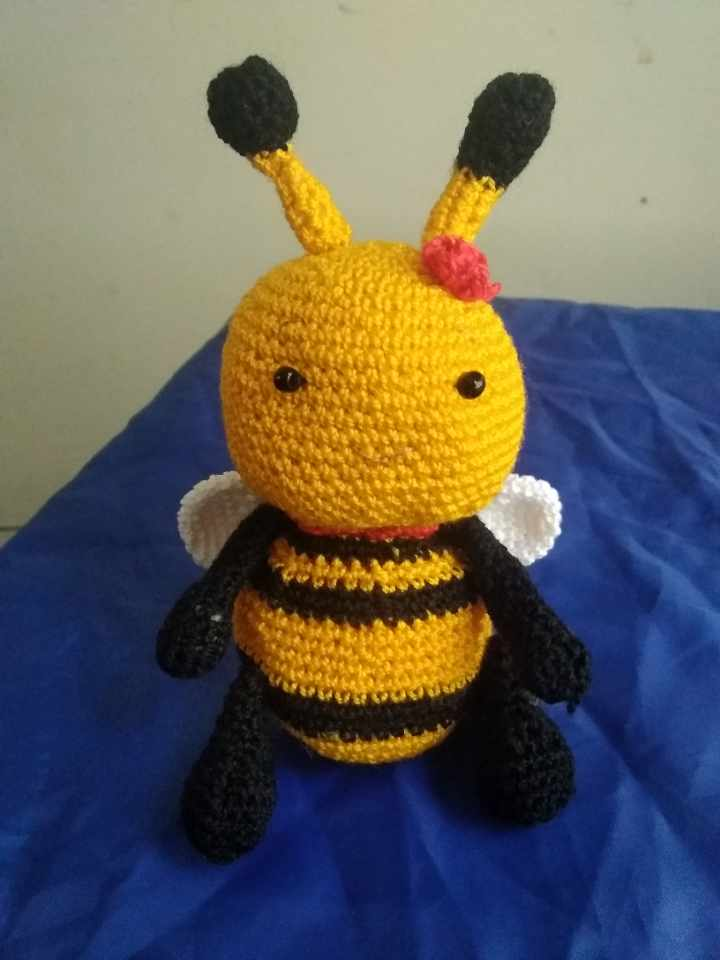
Lo último será unir la cabeza con el cuerpo. Esto lo hacemos con hilo de color amarillo, haciendo uso de la aguja lanera y procediendo con puntadas sutiles, pero seguras, para que la cabeza quede firme y se sostenga en el cuerpo.
The last thing to do is to join the head to the body. This is done with yellow thread, making use of the wool needle and proceeding with subtle but secure stitches so that the head is firm and held to the body.
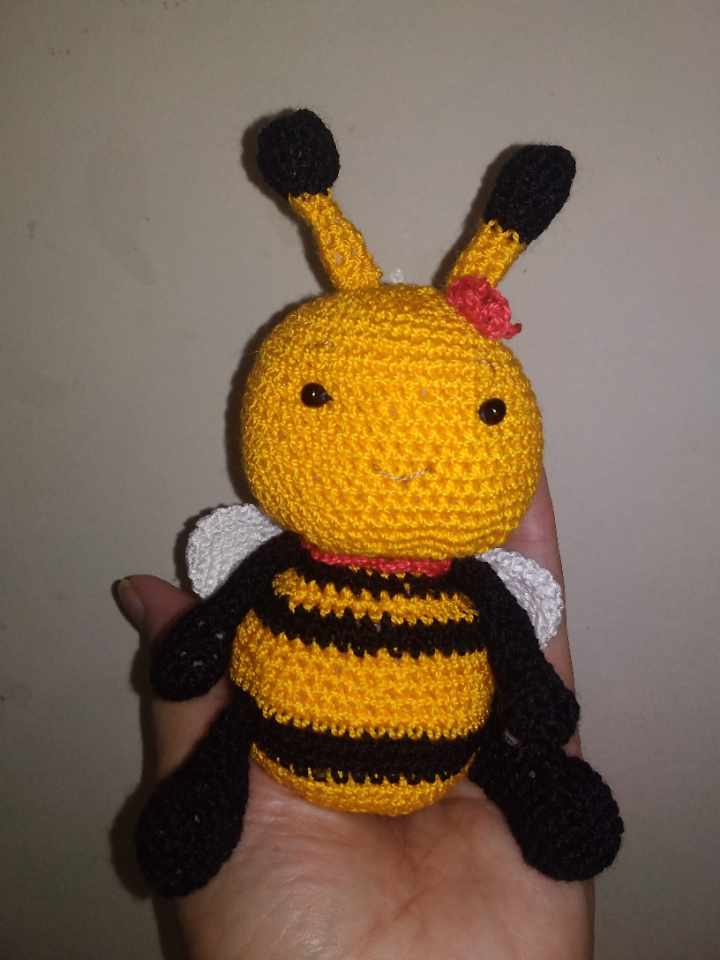
Trabajo culminado
Work completed
🐝🐝🐝🐝🐝🐝🐝🐝🐝🐝🐝🐝🐝🐝🐝
0
0
0.000
Que hermosa, la amé 😍 se ve tierna, excelente trabajo 🤗
Gracias, gracias, gracias, que bueno que te gusto. Saludos!
Que envidia me da cada vez que veo un amigurumi, quisiera aprender a tejer, un día de estos me decido a comprar los materiales y a ver tutoriales. Te quedó preciosa la abejita, me encantó 😍🐝
Amiga solo es cuestion de proponerse y veras como te sale cualquier proyecto que desees.
Incredible with what you have achieved, your bee was nicely done and it looks beautiful, wishing you all the best and good luck
must say that this bee is looking so cute and nice and you have done nice creative work
Gracias por el cumplido!
From Venezuela, our witness drives decentralization and the adoption of Web3 technology, creating opportunities for the local community and contributing to the global ecosystem. // Desde Venezuela, nuestro testigo impulsa la descentralización y la adopción de la tecnología Web3, generando oportunidades para la comunidad local y contribuyendo al ecosistema global.
Sigue, contacta y se parte del testigo en: // Follow, contact and be part of the witness in:
Wow, admiro todo este tipo de trabajo manual, se ve dificil y muy bien hecho!
Que bueno que te agrada.
Que linda abeja ❤️, hiciste un excelente trabajo quedo hermosa, me encantaría una para mi 🤭, mucha suerte en el concurso 🥰
Gracias !
Quedó muy bonito la abeja, lleva su proceso con un resultado bellísimo, saludos amiga.
Gracias!
¡Felicidades! Esta publicación obtuvo upvote y fue compartido por @la-colmena, un proyecto de Curación Manual para la comunidad hispana de Hive que cuenta con el respaldo de @curie.
Si te gusta el trabajo que hacemos, te invitamos a darle tu voto a este comentario y a votar como testigo por La Colmena.
Si quieres saber más sobre nuestro proyecto, te invitamos a acompañarnos en nuestro servidor de Discord.
Gracias por el apoyo, lo aprecio.
Congratulations, your post has been curated by @dsc-r2cornell. You can use the tag #R2cornell. Also, find us on Discord
Felicitaciones, su publicación ha sido votada por @ dsc-r2cornell. Puedes usar el tag #R2cornell. También, nos puedes encontrar en Discord
Agradecida por el apoyo a mi labor.
We all are eternally grateful to you for coming up with this wonderful art with great feeling. It is truly a pleasure to present a beautiful bee with extraordinary skill. But making this bee woven with yarn is a very difficult task. All in all appreciate your wonderful art.
Gracias, gracias, gracias. Realmente me honran tus palabras.
you are always most welcome my pleasure
It's a too cute. Making a bee with such yarn is a matter of great skill. You have used your creativity to complete such a creative artwork and described the process of making it in great detail which is very easy for us to understand. Best wishes to you, thank you.💕
Realmente es basntante trabajo pero vale la pena el resultado.
This is so beautiful
Gracias!