(ESP/ENG) Móvil con grullas y corazones de origami (PARTE 1: Grulla y Corazón) / Origami Crane and Heart Mobile (PART 1: Crane and Heart)
¡Hola, hola! Mi gente de Hive y linda comunidad de DIYHub, espero todos se encuentren súper bien, animados e inspirados 💟
Hoy les presento mi entrada al 🎎 DIYHUB Origami Contest! 🏮 para saber mas de este concurso entra al siguiente link https://peakd.com/hive-189641/@diyhub/join-our-diyhub-origami-contest
Bueno mi idea es realizar un bonito móvil que quiero colocar en mi rinconcito de trabajo, y lo hare con algunas grullas y corazones de origami, el proceso de hacer el móvil es algo extenso de explicar así que se los presentare dividido en 2 post, en este les mostrare como hacer la grulla y el corazón usando la técnica de origami, y el próximo post les presentare el armado del móvil.
Hello, hello! My Hive people and cute DIYHub community, I hope you all are super well, encouraged and inspired 💟.
Today I present to you my entry to the 🎎 DIYHUB Origami Contest! 🏮 to know more about this contest go to the following link https://peakd.com/hive-189641/@diyhub/join-our-diyhub-origami-contest.
Well my idea is to make a nice mobile that I want to place in my little corner of work, and I will do it with some origami cranes and hearts, the process of making the mobile is something extensive to explain so I will present them divided into 2 post, in this one I will show you how to make the crane and the heart using the origami technique, and the next post I will present you the assembly of the mobile.
Este concurso me tiene muy entusiasmada y a la vez trajo gratos recuerdos de mi infancia, y es que el primer intento de hacer una pieza en origami fue haciendo grullas, creo que yo tendría como unos 10 años de edad, y les cuento que me salían muy mal al principio jajaja... pero como con todo hay que praticar para poder mejorar y fue lo que hice.
Las grullas las hare con unas hojas que tenía guardadas para reciclar y me parecen perfectas para este trabajo ya que tienen un color amarillento como si fueran muy antiguas, y para mí eso las hace a estas hojas muy bonitas, y estoy segura que le darán un toque único y original a mi móvil.
Los corazones lo realizare con un papel color anaranjado, que me parece ideal para trabajarlo en origami ya que es bastante suave.
Bueno a lo que vinimos, les presento los materiales y el paso a paso de cómo realizar un móvil con grullas y corazones de origami.
Materiales:
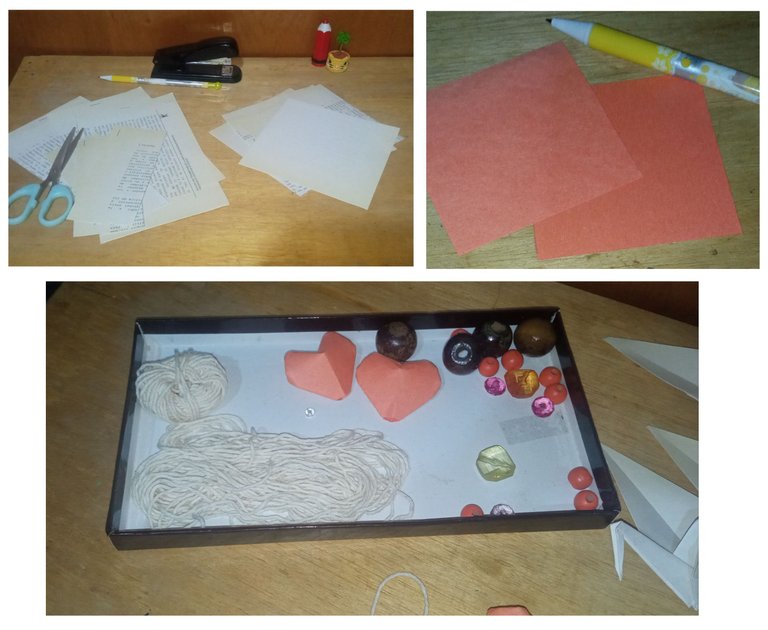
- 9 hojas de 15x15 cm para las grullas.
- 3 hojas de 7x7 cm para los corazones.
- Tijera.
- Escuadra o regla.
- Una varilla para globos.
- Hilo de algodón o pabilo.
- Pistola de silicón y una barra de silicón.
- Y algunas cuentas de colores y/o de madera. (Opcional)
This contest has me very excited and at the same time brought back fond memories of my childhood, and is that the first attempt to make a piece in origami was making cranes, I think I was about 10 years old, and I tell you that I came out very bad at first hahaha ... but as with everything you have to practice to improve and that's what I did.
I will make the cranes with some leaves that I had saved to recycle and I think they are perfect for this work because they have a yellowish color as if they were very old, and for me that makes these leaves very beautiful, and I'm sure they will give a unique and original touch to my mobile.
I will make the hearts with an orange colored paper, which I think is ideal for origami because it is quite soft.
Well, what we came to, I present the materials and the step by step of how to make a mobile with origami hearts and cranes.
Materials:
- 9 sheets of 15x15 cm for the cranes.
- 3 sheets of 7x7 cm for the hearts.
- Scissors.
- Square or ruler.
- A balloon rod.
- Cotton thread or wick.
- Silicone gun and a silicone stick.
- And some colored and/or wooden beads (optional).
Paso a paso:
Antes de comenzar a armar tanto las grullas como los corazones tome las hojas que iba a utilizar y las corte según las medidas correspondientes, hice 9 cuadrados de 15x15 cm para las grullas y 3 cuadrados de 7x7 cm para los corazones.
Para la grulla:
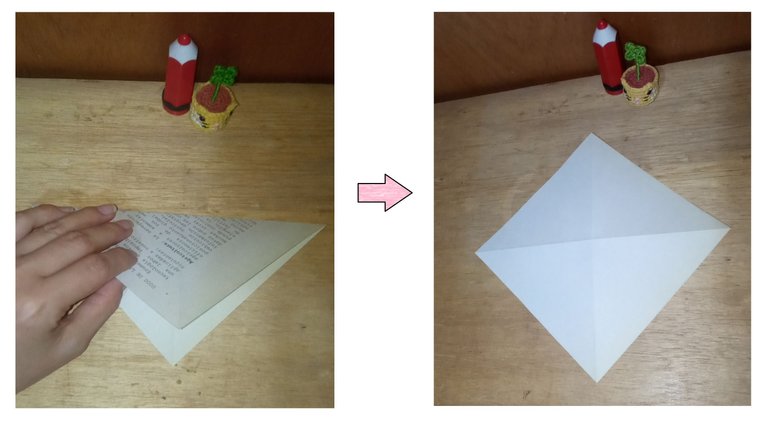
1. Doblar el papel diagonalmente como se muestra en la imagen, es muy importante que los vértices coincidan muy bien para que el resultado final sea una grulla bien formada; como quiero que las grullas sean sin las letras lo que hice fue que en este paso deje el lado del papel que tenía las letras por fuera.
Step by step:
Before starting to assemble both the cranes and the hearts I took the leaves I was going to use and cut them according to the corresponding measures, I made 9 squares of 15x15 cm for the cranes and 3 squares of 7x7 cm for the hearts.
For the crane:
1. Fold the paper diagonally as shown in the image, it is very important that the vertices match very well so that the final result is a well formed crane; as I want the cranes to be without the letters what I did was that in this step I left the side of the paper that had the letters on the outside.
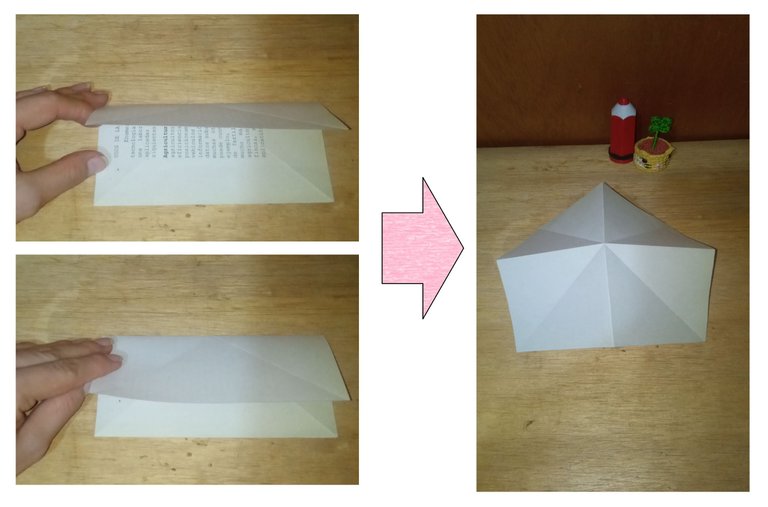
2. Ahora doblamos el papel por la mitad de ambos lados, y en este caso dejando la parte que tiene letras por dentro, estos dobleces quedaran en forma de montaña y los del paso anterior en forma de valle.
2. Now fold the paper in half on both sides, and in this case leaving the part that has letters on the inside, these folds will be in the shape of a mountain and those of the previous step in the shape of a valley.
3. Bien, ahora hacemos coincidir los puntos centrales de los lados, y lo que se hace es doblar las diagonales en forma de valle y las mitades en forma de montaña, y así obtenemos un cuadrado más pequeño que tendrá uno de los extremos abierto y el otro cerrado.
3. Well, now we match the central points of the sides, and what is done is to fold the diagonals in the shape of a valley and the halves in the shape of a mountain, and so we get a smaller square that will have one end open and the other closed.
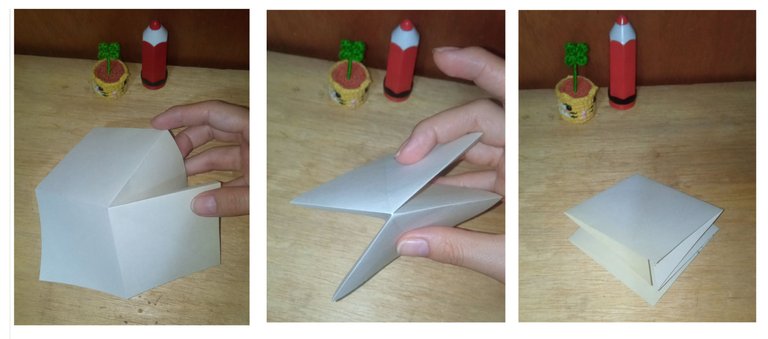
4. En el lado abierto del cuadrado doblamos como muestro en la imagen, en ambas caras del cuadrado y así obtendremos una forma como de rombo, procurando que coincidan los dobleces pero sin solaparse, es decir, que no quede uno sobre el otro.
4. On the open side of the square we fold as shown in the image, on both sides of the square and thus obtain a diamond shape, making sure that the folds coincide but without overlapping, that is to say, that one is not on top of the other.
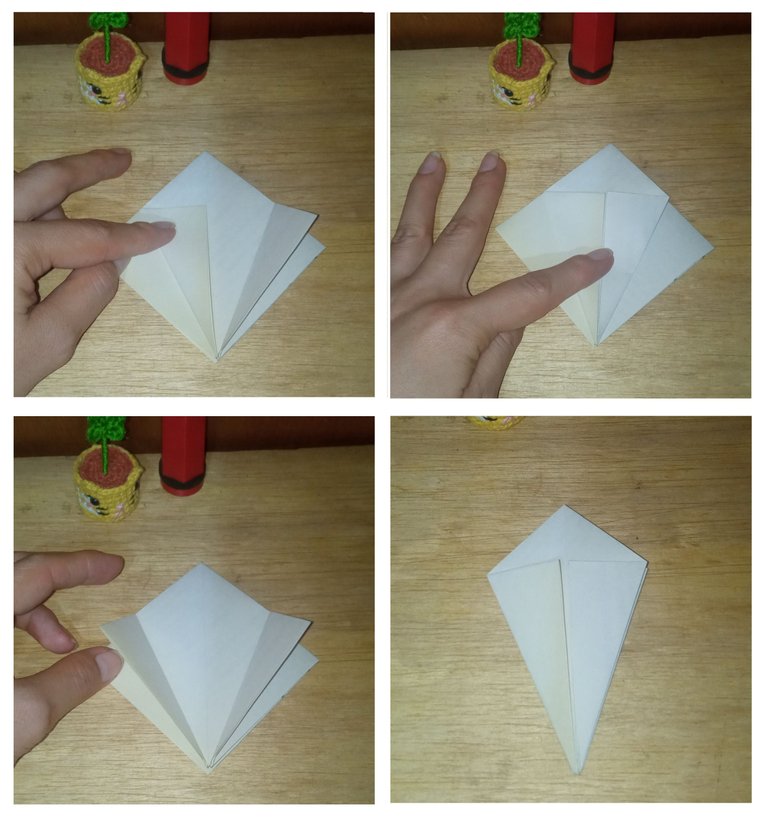
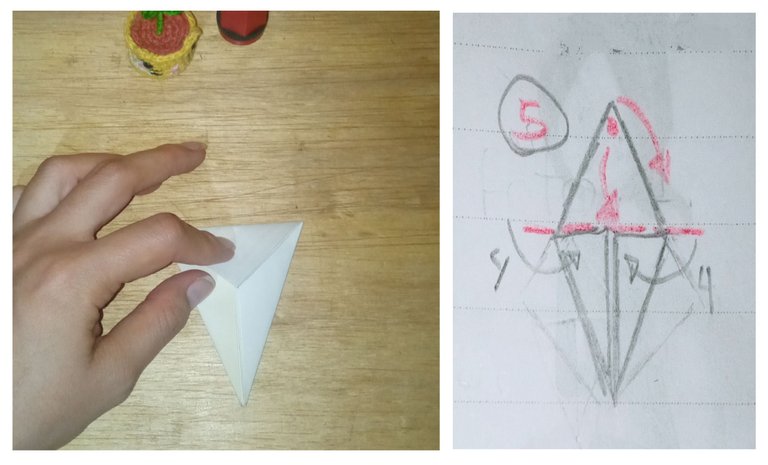
5. Ahora la parte que nos quedó arriba la doblamos hacia abajo, primero de un lado y luego del otro, como lo indica las flechas rojas o como lo ven en la imagen, esto nos ayudara en el siguiente paso.
5. Now the part that was left on top we fold it down, first on one side and then on the other, as indicated by the red arrows or as you see in the image, this will help us in the next step.
6. Ahora abrimos las alitas que hicimos, buscamos el vértice y lo abrimos y cerramos por los dos laterales y asi nos queda un rombo perfecto, luego hacemos lo mismo del otro lado.
6. Now we open the wings we made, look for the vertex and open and close it on both sides and so we have a perfect rhombus, then do the same on the other side.
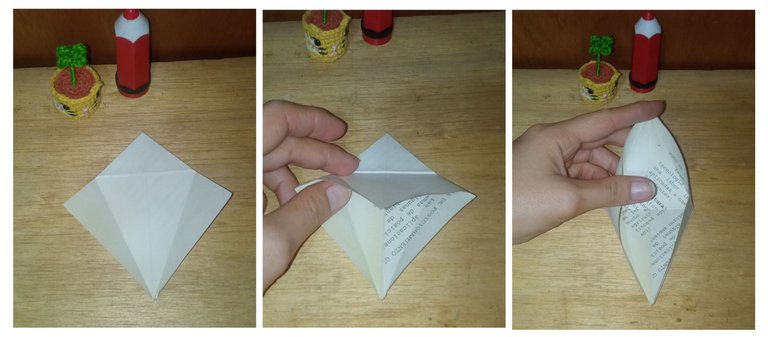
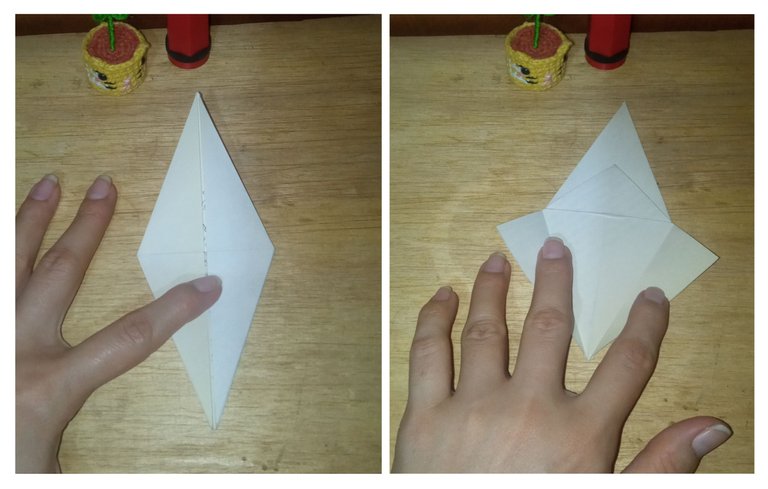
7. Lo que continua es super fácil, la parte que tiene como un corte serán el cuello y la cola, y la parte de arriba son las alas, asi que en la parte que esta ceparada doblamos por la mitad, llevando los bordes hacia el centro, y esto lo repetimos del otro lado.
7. What follows is super easy, the part that has like a cut will be the neck and tail, and the top are the wings, so in the part that is separated we fold in half, bringing the edges to the center, and repeat this on the other side.
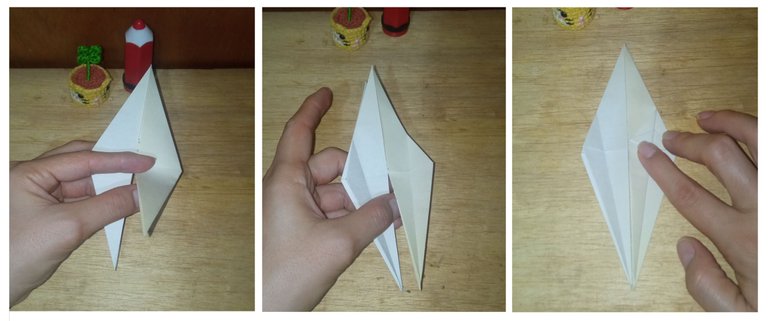
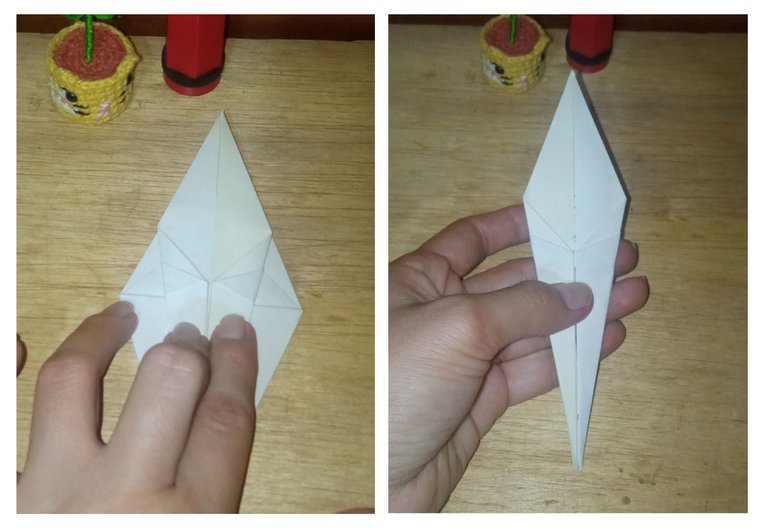
8. Para finalizar doblamos los piquitos hacia arriba dando la inclinación que deseemos para la cabeza y la cola, luego las esconderemos en los laterales de lo que son las alas, abriéndolos y guiándonos por el dobles que hicimos anteriormente, doblamos metiéndolas hacia adentro de la solapa del lateral, alineamos todo muy bien y doblamos uno de los piquitos para formar la cabeza, y listo tenemos nuestra grulla, ya solo faltan 8 más jajaja…
8. To finish, we fold the little nibs upwards giving the inclination we want for the head and tail, then we will hide them on the sides of what are the wings, opening them and guiding us by the double we did before, we fold them inside the flap of the side, we align everything very well and fold one of the little nibs to form the head, and ready we have our crane, we only need 8 more hahaha ....


Para el corazón:
1. Tomamos una hoja de 7x7 cm y la doblamos por la mitad y luego la abrimos.
For the heart:
1. We take a 7x7 cm sheet and fold it in half and then open it.
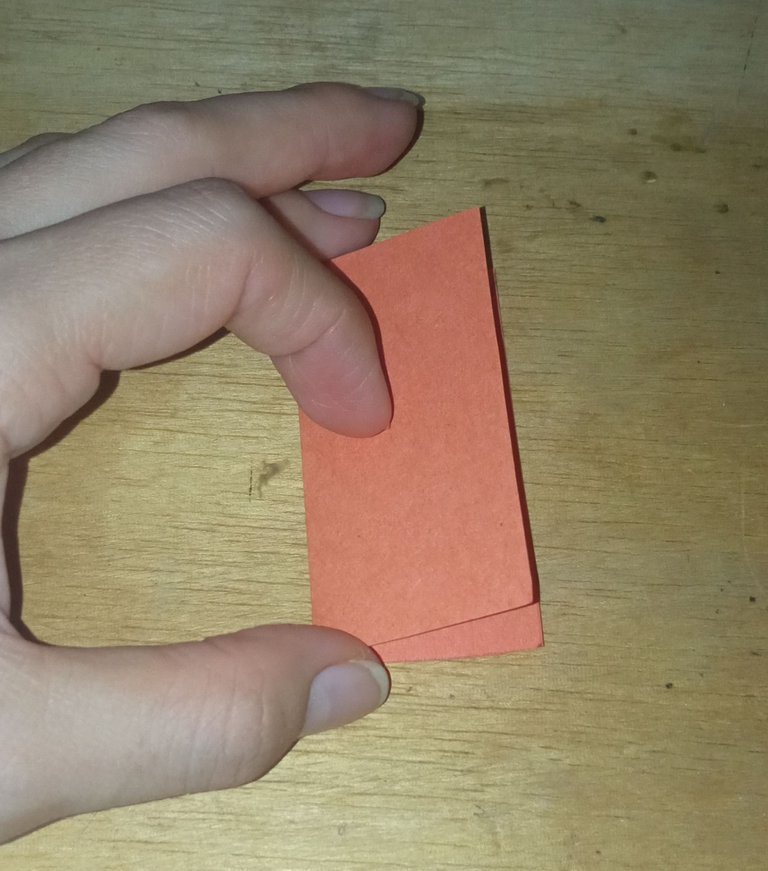
2. Ahora de manera transversal al dobles anterior doblamos formando una pequeña pestaña de más o menos 0.5 cm
2. Now in a transversal way to the previous fold we fold forming a small flange of about 0.5 cm.
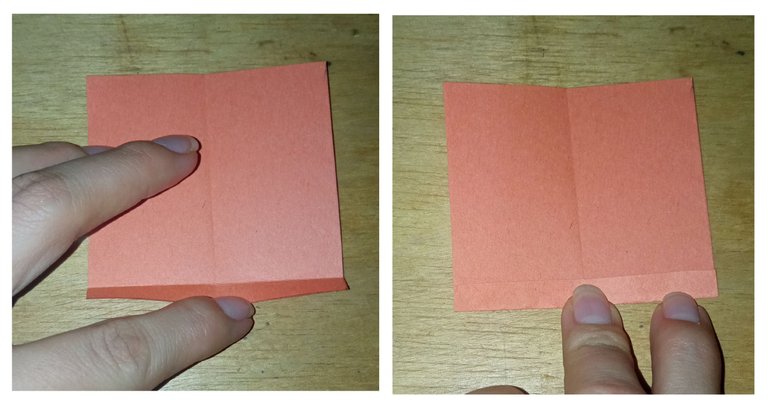
3. Doblamos nuevamente a la mitad, en la misma dirección que hicimos la pestaña del paso anterior.
3. Fold again in half, in the same direction that we made the tab in the previous step.
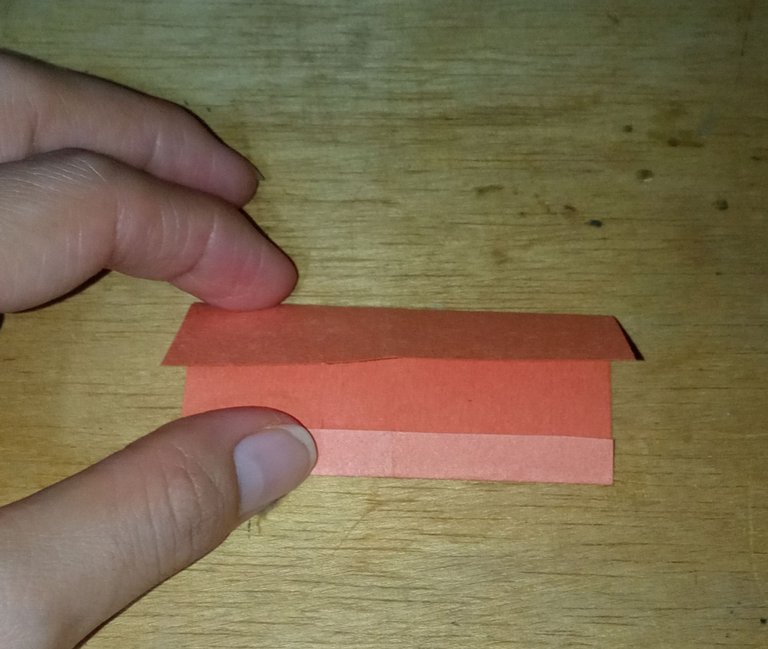
4. Ahora doblaremos por la parte que se abre, llevando los vértices hacia la parte de arriba, y quedara un pequeño espacio en el centro y 2 solapas triangulares.
4. Now we will fold the part that opens, bringing the vertices to the top, and there will be a small space in the center and 2 triangular flaps.

5. Ahora doblamos las solapas por la mitad, marcamos bien los dobleces y desdoblamos.
5. Now fold the flaps in half, mark the folds well and unfold.

6. Seguidamente doblaremos las puntas hacia el centro, y estas deben quedar a la altura de la marca que hicimos anteriormente.
6. Next we will fold the ends towards the center, and these should be at the height of the mark we made previously.
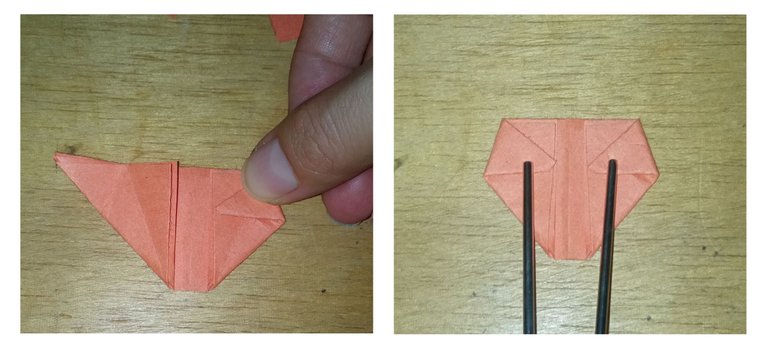
7. Y ahora doblamos hacia abajo las pequeñas pestañas que quedan, y las introducimos en las solapas de los dobleces anteriores.
7. And now fold down the small tabs that remain, and insert them into the flaps of the previous folds.
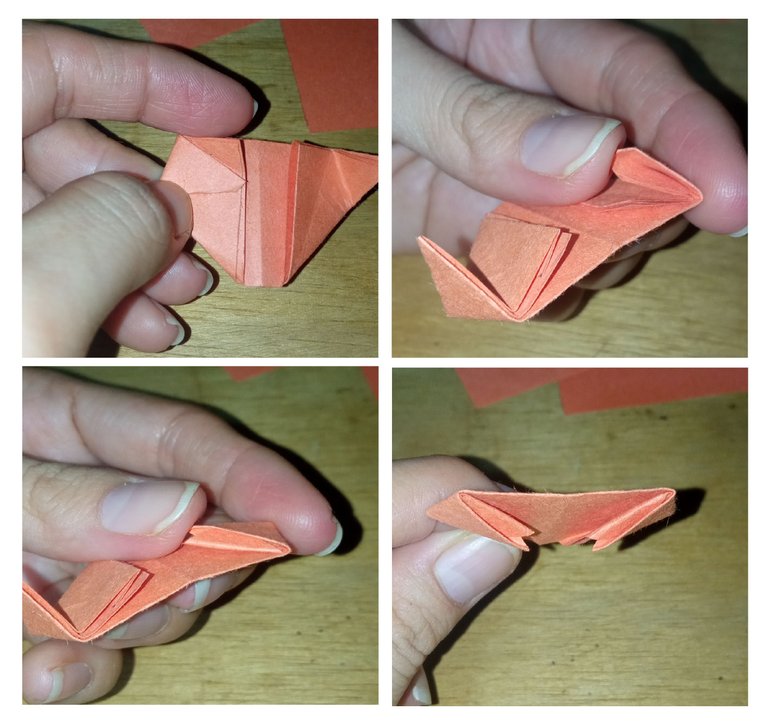
8. Ya para finalizar doblamos un poquito los vértices que quedan, para dar la forma redondeada del corazón.
8. Finally, we fold a little bit the remaining vertices to give the rounded shape of the heart.

9. Y para inflar en corazón soplamos por la pequeña abertura que ha quedado en la parte que sería la punta del corazón, y le damos bien la forma al corazón.
9. And to inflate the heart, blow through the small opening that has been left in the part that would be the tip of the heart, and give the heart a good shape.

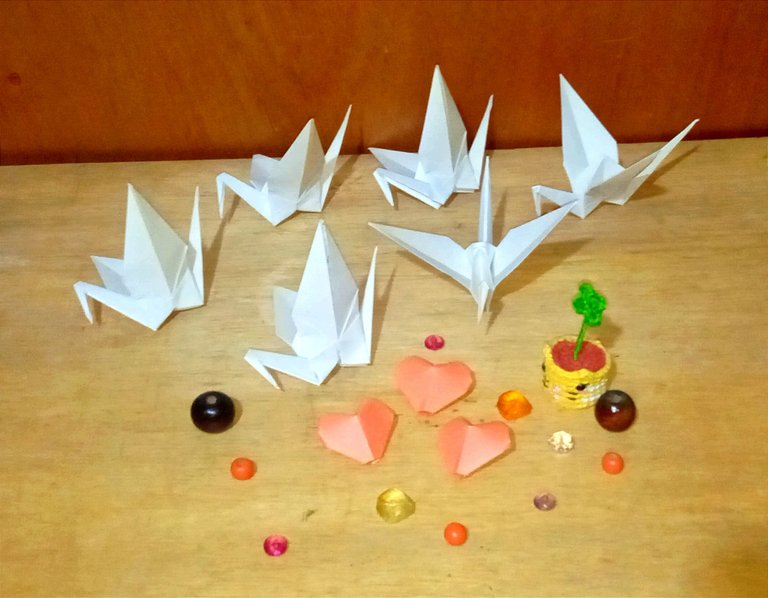
Ya tenemos listas las grullas y corazones de origami para armar el móvil, así que los espero en el siguiente post para mostrarles como armar el móvil, y puedan ver el resultado final de esta hermosa manualidad.
We already have the origami cranes and hearts ready to assemble the mobile, so I'll wait for you in the next post to show you how to assemble the mobile, and you can see the final result of this beautiful craft.
DESEO LES HAYA GUSTADO TANTO COMO A MI ESTE POST Y ESPERO SUS BONITOS COMENTARIOS Y/O VOTOS, ASÍ ME MOTIVAN PARA SEGUIR COMPARTIENDO MIS CREACIONES CON USTEDES 🐸 💟
Se despide de ustedes con mucho cariño su amiga Nathalie @laranitacrochet
I HOPE YOU LIKED THIS POST AS MUCH AS I DID AND I LOOK FORWARD TO YOUR NICE COMMENTS AND / OR VOTES, THIS WAY YOU MOTIVATE ME TO CONTINUE SHARING MY CREATIONS WITH YOU 🐸 💟
Your friend Nathalie @laranitacrochet bids you a fond farewell.
*Todas las fotografías utilizadas en la publicación son propiedad de la autora.
*Las fotografías fueron tomadas y editadas con mi REDMI 9 y con la App FotoRoom.
*La traducción la hice en https://www.deepl.com/es/translator
*All photographs used in this publication are property of the author.
*The pictures were taken and edited with my REDMI 9 and the FotoRoom App.
*The translation was done at https://www.deepl.com/es/translator
Muy buen trabajo, se ve bien 😃.
La maceta 🪴 que sale al fondo es encantadora jajaja 😍
Muchas gracias!
jajaja... si lo es, mira el post en este link seguro te gustara https://peakd.com/hive-189641/@laranitacrochet/lucky-cat-pot-remembering-my-childhood-michi-maceta-gatuna-de-la-suerte-recordando-a-mi-michi-de-la-infancia
Ya pude ver el post, definitivamente hermoso amo este tipo de tejidos jajaja 😍😍😍😍
😊😌
!DIY
Very nice origami work. Keep sharing in our community and thanks for participating in the contest. Good luck✨ // Muy lindo trabajo de origami. Sigue compartiendo en nuestra comunidad y gracias por participar en el concurso. Buena suerte✨
😊 gracias!
Hola @laranitacrochet 👋
Me encanta como se ve tu publicación, muy ordenada y todo se comprende perfecto. El móvil se te verá precioso. Te deseo mucha suerte 🍀 en este nuevo reto. 🫂
Hola @creacioneslelys 🤗
En verdad muchas gracias, me esfuerzo mucho para que mis publicaciones siempre se vean muy ordenadas, así queuchas gracias por notarlo 😌☺️ y gracias por los buenos deseos!
que cute! genial...
how cute! brilliant...
Gracias 😊
Congratulations @laranitacrochet! You have completed the following achievement on the Hive blockchain And have been rewarded with New badge(s)
Your next target is to reach 3000 upvotes.
You can view your badges on your board and compare yourself to others in the Ranking
If you no longer want to receive notifications, reply to this comment with the word
STOPMuy bien, de verdad que agilidad portas para realizar con papel hermosas presentaciones. Excelente post, lo haces ver tan facil
Jajajaja... Gracias, gracias! 😊🤗