Saluditos comunidad de
#diy como me les va, el día de hoy regresó para unirme a esta iniciativa de los signos zodiacales que tanto llamó mi atención, en esta oportunidad vamos trabajar con el signo de Aries.
Realmente siento mucha atracción por este tema de los signos zodiacales y los horóscopos, aunque no me llevo al 100% por ellos, además de que me parece interesante ver cómo se utiliza para las artes manuales y como lo representaron.
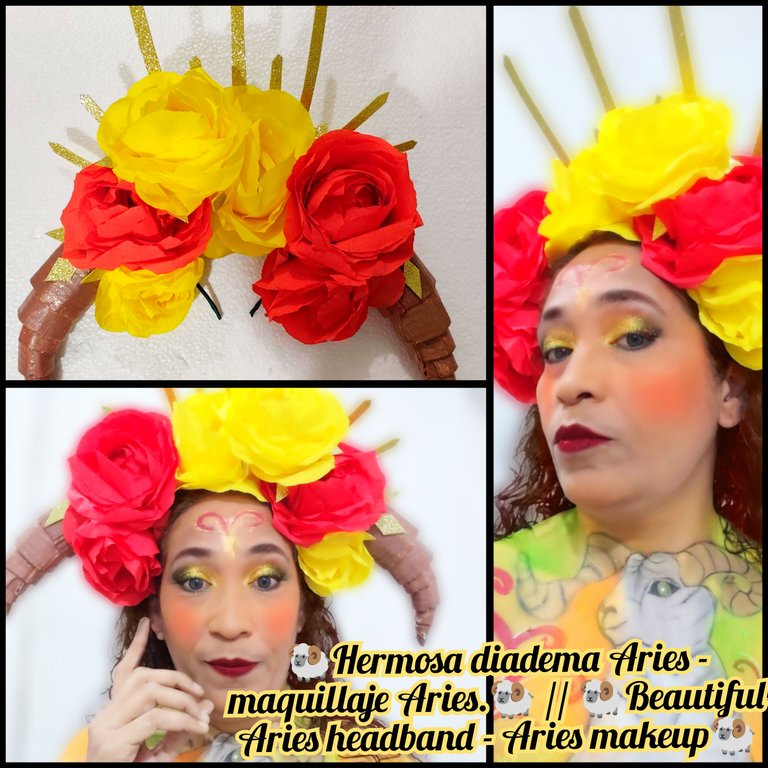
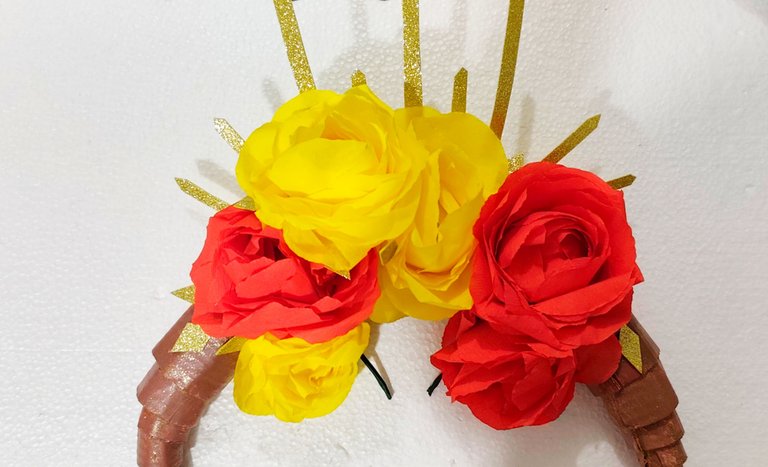
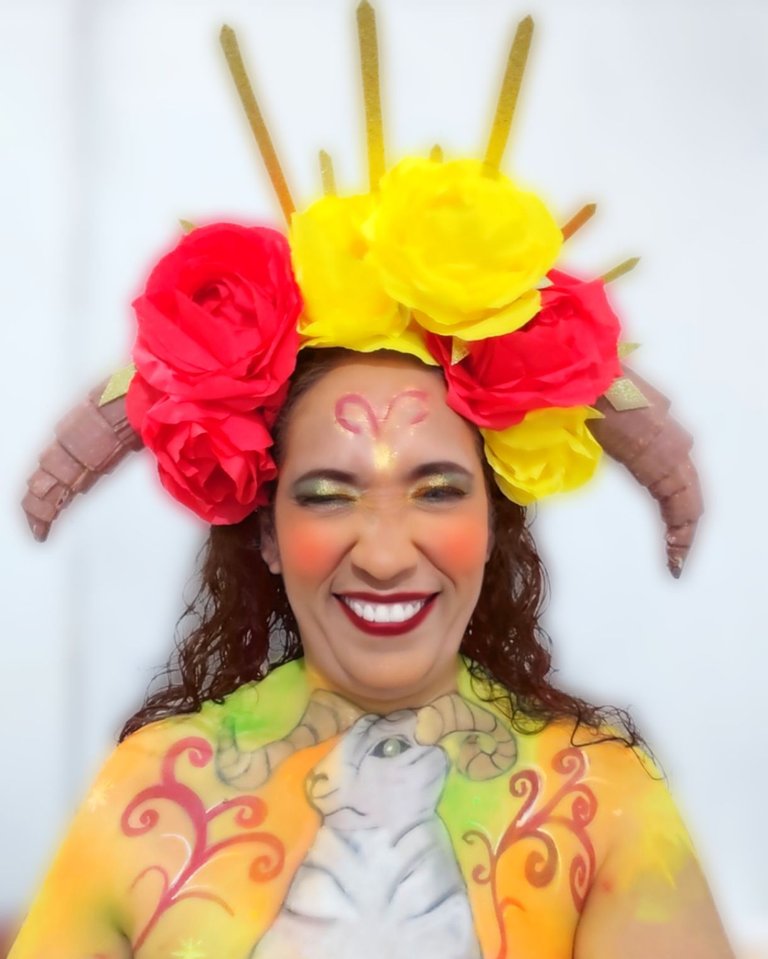
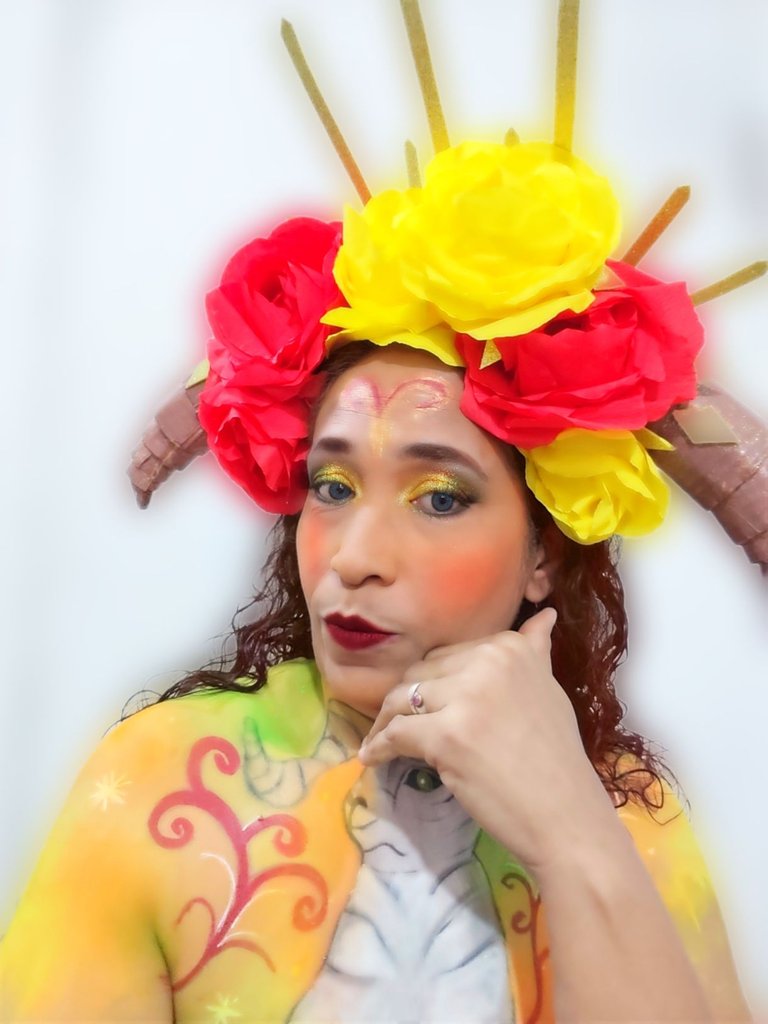
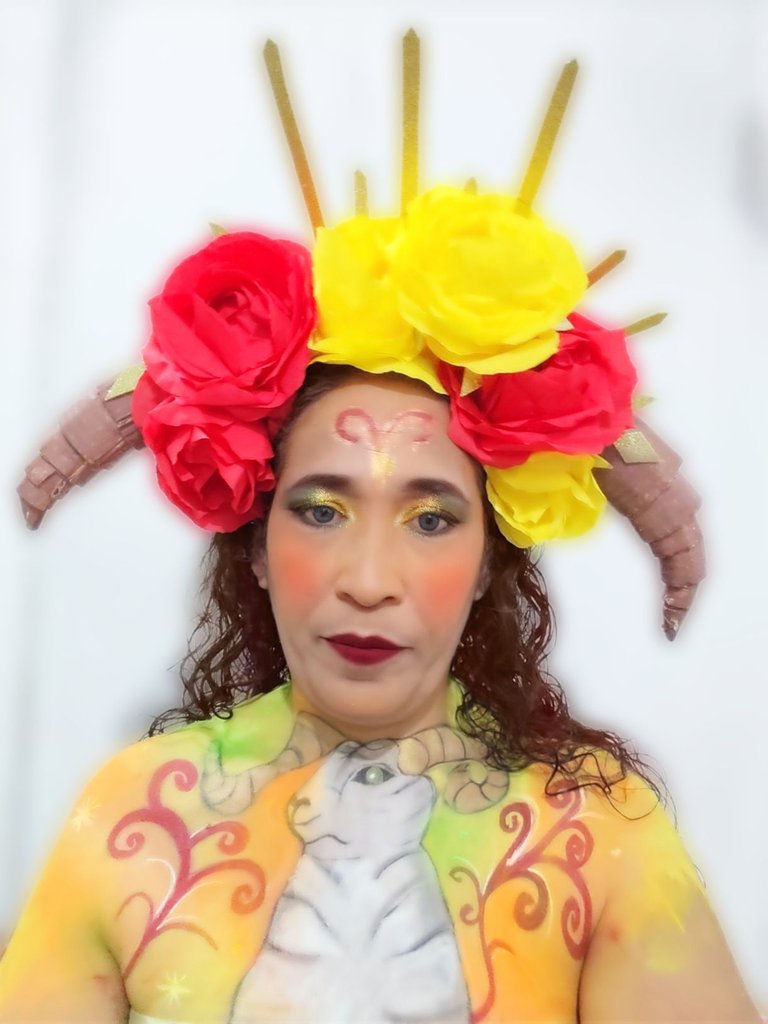
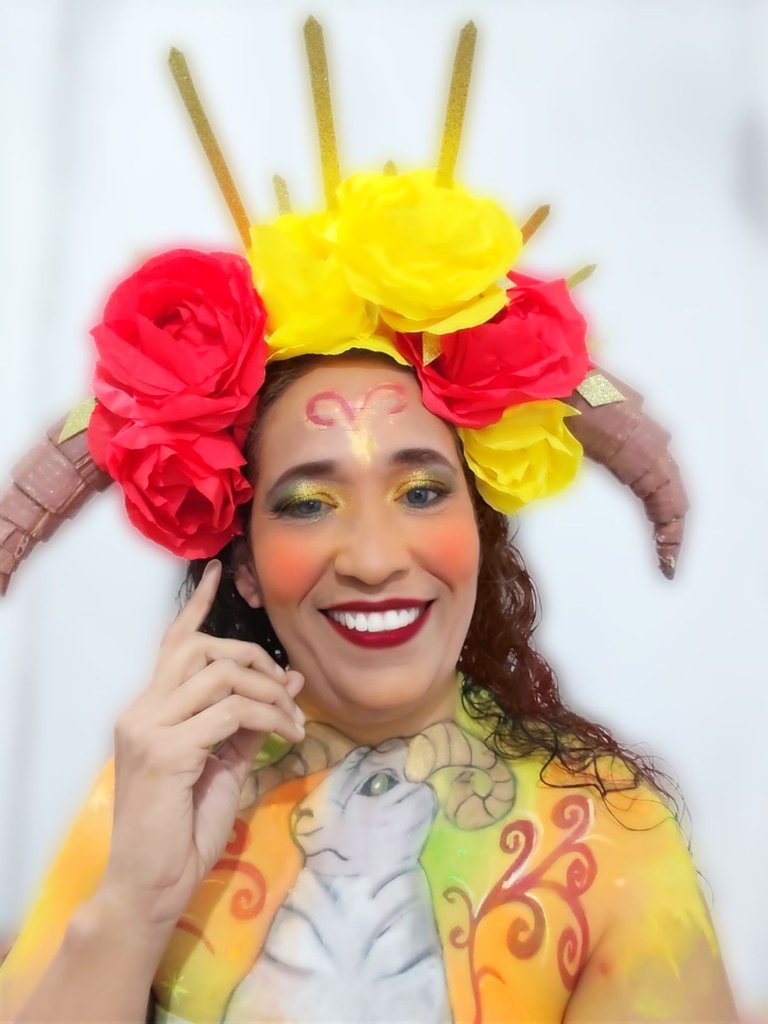
Yo en mi caso decidir juntar las artes manuales con el arte del maquillaje artístico para hacer una representación del signo de Aries, que según la astrología es el primero de todos los signos y pertenece a los signos de fuego, y se le representa con un carnero, por lo que decidí crear una diadema diferente a las que me gusta realizar.
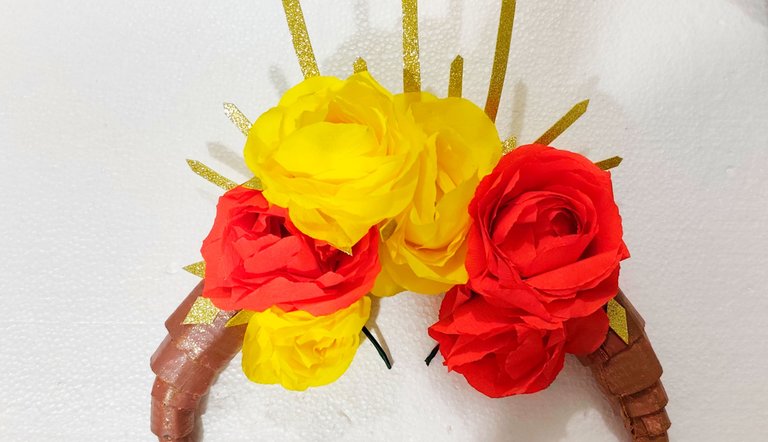
Hoy les traigo una diadema que es la fiel representación del carnero, en esta diadema además de los cuernos, fue decorada con flores y por supuesto utilice los tonos cálidos como el rojo y el amarillo, espero les guste.
🐏 MATERIALES 🐏
🐏 Cartón de caja.
🐏 Silicón líquido.
🐏 Papel crepé rojo.
🐏 Papel crepé amarillo.
🐏 Pintura beige.
🐏 Pintura marrón.
🐏 Brillo dorado.
🐏 Cintillo base.
🐏 Foami dorado.
🐏 Pincel.
🐏 Tijera.
🐏 Lápiz.
🐏 Regla.
🐏 Ganchos de ropa o pinzas.
🐏 Vaso plástico desechable.
🐏 PASO A PASO DE LA DIADEMA ARIES 🐏
🐏 PASO 1:
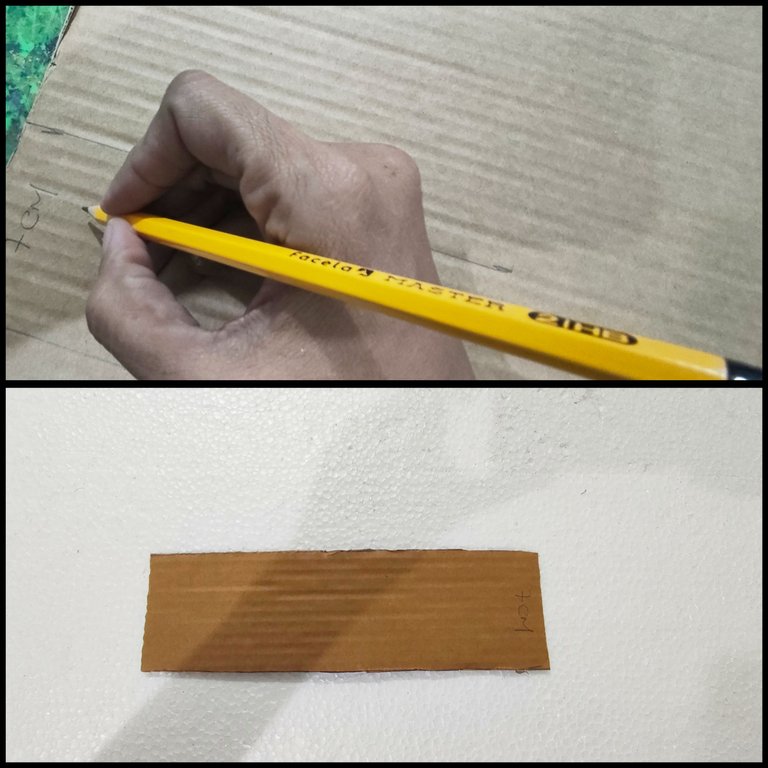
Tome el cartón de caja y con el lápiz y la regla marcó siete tiras, una de 7 cm de ancho, una de 6 cm, una de 5 cm, una de 4 cm, una de 3 cm, una de 2 cm y una de 1 cm, luego con la tijera las recortó.
🐏 PASO 2:
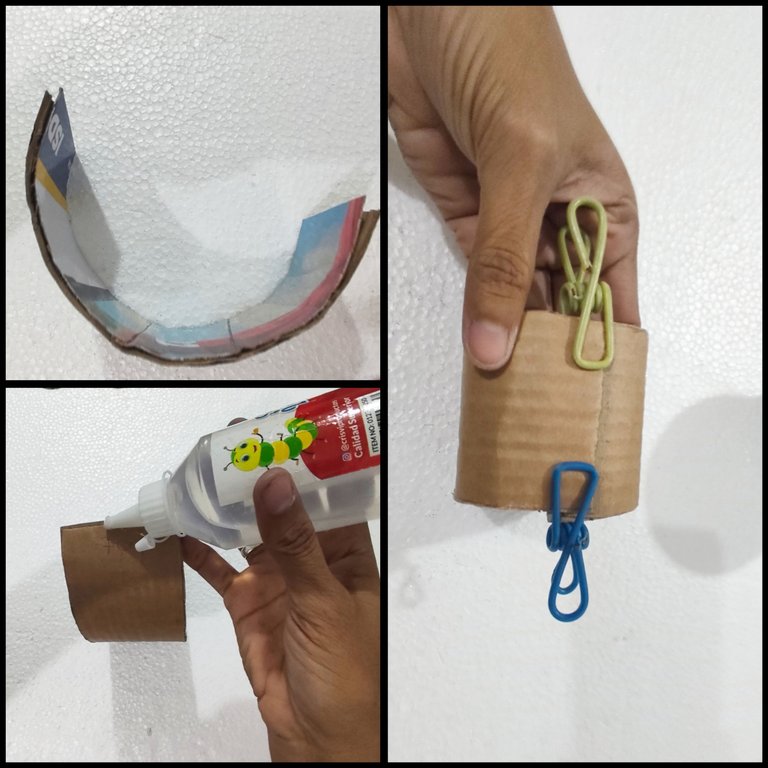
Ahora tomó la tira de 7 cm y lo arqueó, cuando ya tiene la forma le aplicó el un poco de silicón líquido y le coloca en cada extremo una pinza para ayudar a mantener la forma hasta el momento que seque, y dejamos reposar.
🐏 PASO 3:
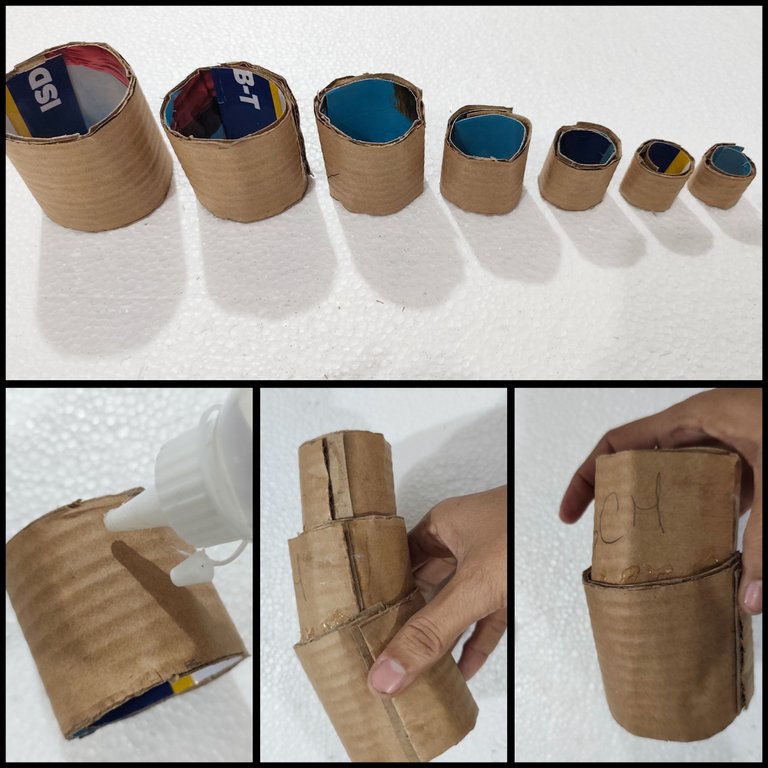
Luego de un rato y cuando ya están secas todas las piezas, les aplique silicón líquido en uno de los extremos e introducir el anillo más pequeño dentro del otro y así hasta lograr pegar todas las piezas, aplique silicón líquido en cada unión para evitar que se despegue y dejamos secar bien.
Yo lo deje por dos días para que secara y pegará bien.
🐏 PASO 4:
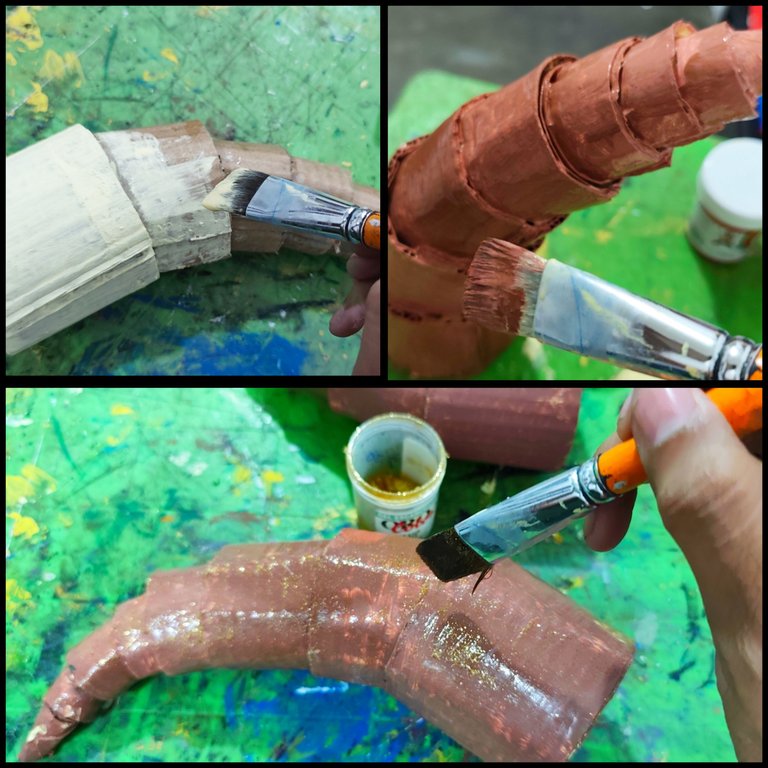
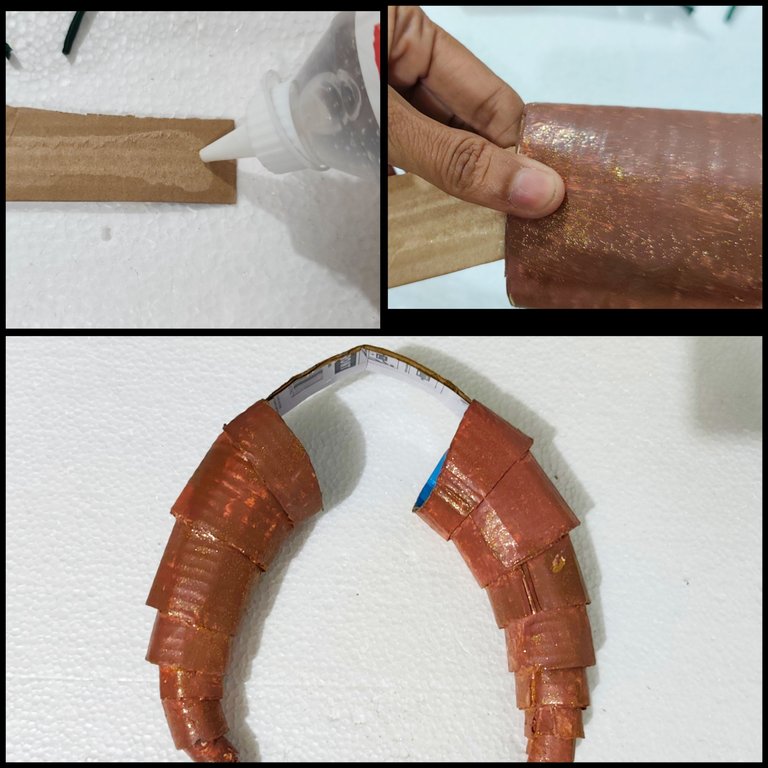
Cuando ya formamos el cuerno repetimos el procedimiento, y tenemos los dos cuernos listo, allí tomé la pintura de color beige y le aplicó una primera mano y dejamos secar.
Cuando ya los dos cuernos están secos, aplicó la pintura de color marrón, dándole dos capas de pintura, y nuevamente dejamos secar.
Ya estando secos, tomó el brillo de color dorado y aplicó en ambos cuernos y dejo secar.
🐏 PASO 5:
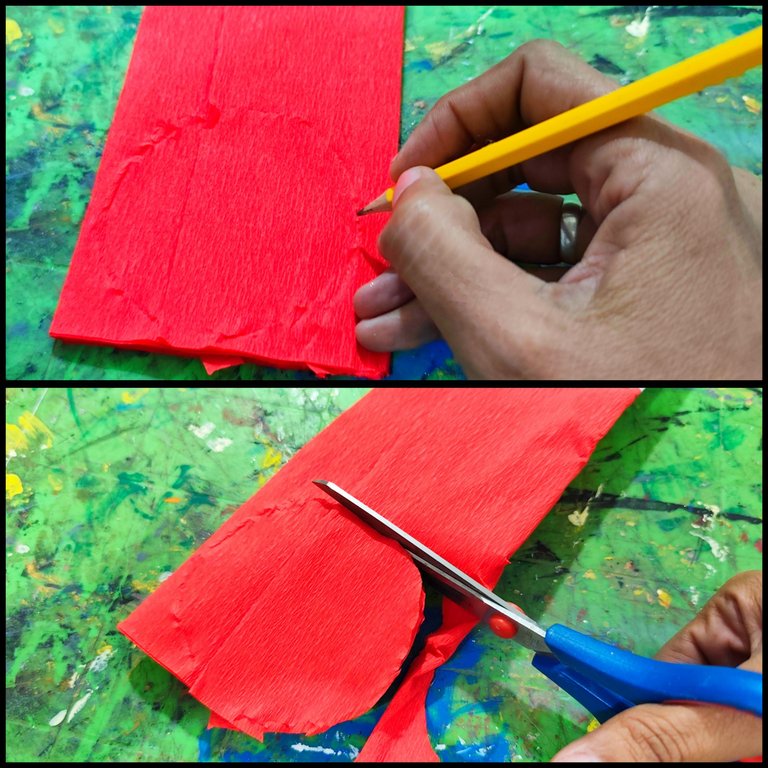
Tome el papel crepé rojo y con el lápiz marqué una circunferencia, luego con la tijera recortó.
🐏 PASO 6:
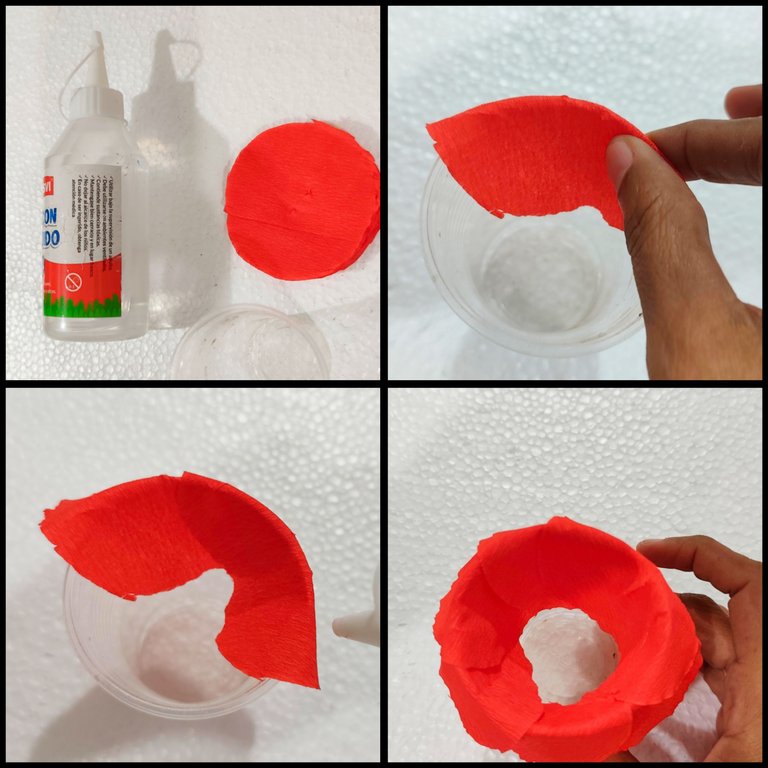
En el vaso plástico colocó uno de los círculos doblando a la mitad, luego aplicó un poco de silicón líquido y montó otro círculo, y así sucesivamente hasta lograr colocar todas las capas.
🐏 PASO 7:
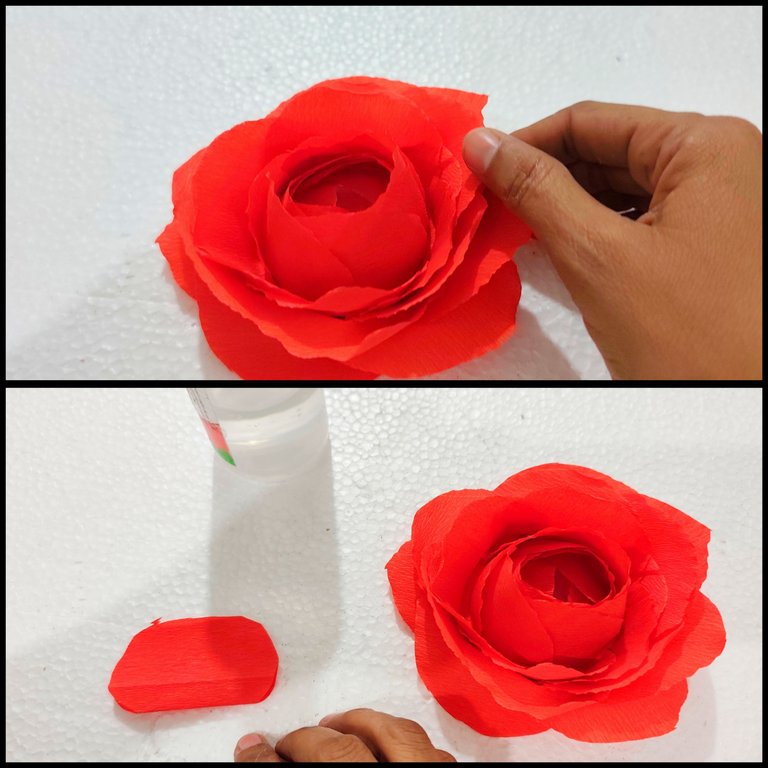
Aparte uno de los círculos el cual pegamos con el silicón líquido en el fondo de la flor que hemos creado.
🐏 PASO 8:
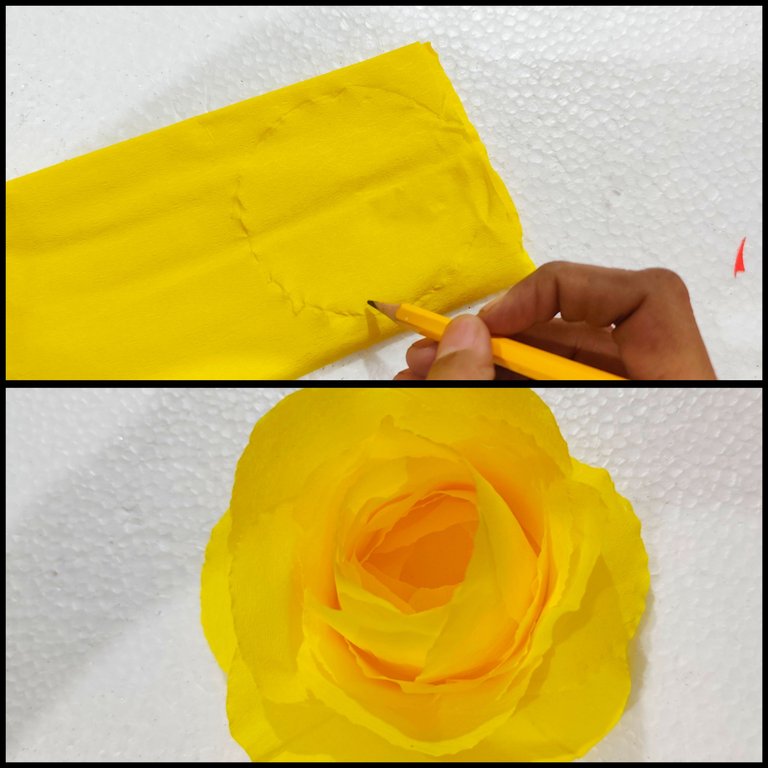
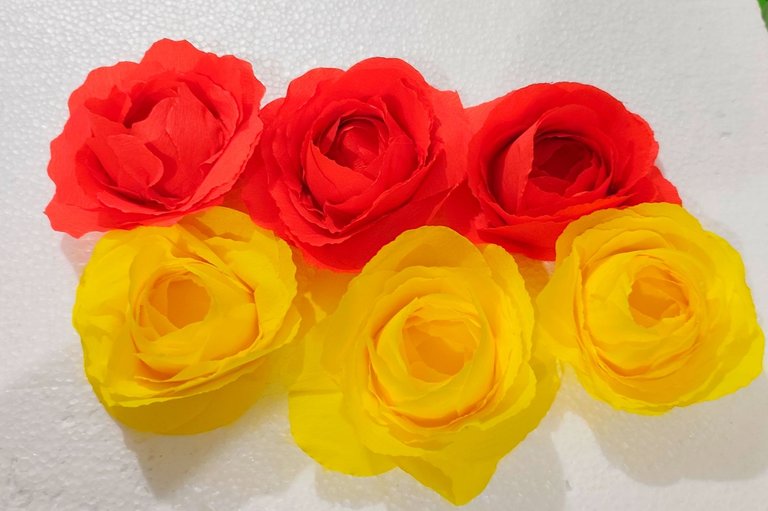
Tomó el papel crepé de color amarillo y repito todo el procedimiento anterior hasta formar varias flores, tres para ser más específico.
🐏 PASO 9:
Del cartón de caja recorté una tira de unos 8 cm de largo por unos 2 cm de ancho, y en cada extremo aplicó silicón líquido y pegamos dentro de los cuernos y dejamos secar.
🐏 PASO 10:
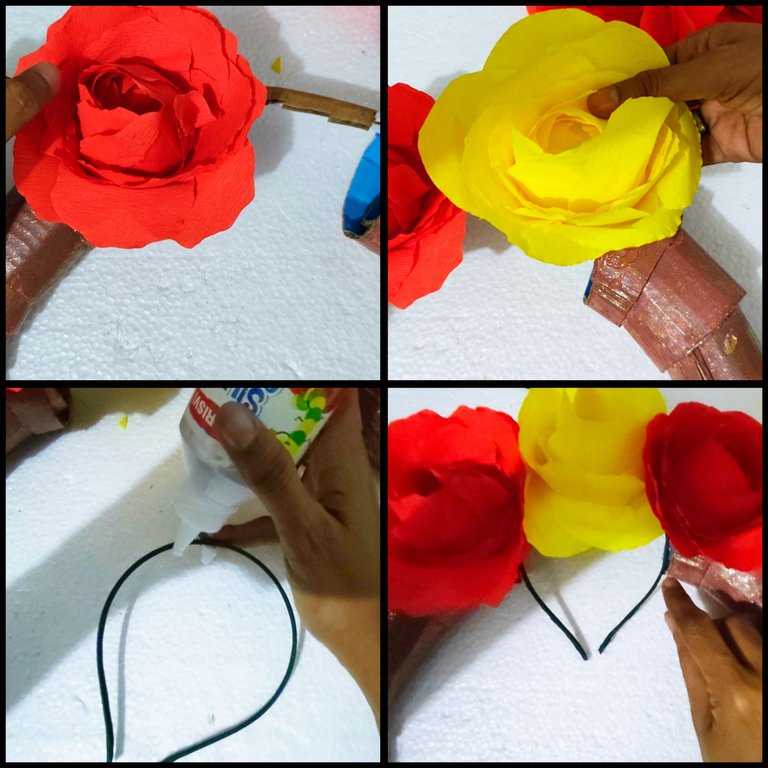
Aplicó silicón líquido al cintillo base y lo pego en el cartón de la caja, luego pegamos con el silicón líquido las flores que elaboramos previamente.
🐏 PASO 11:
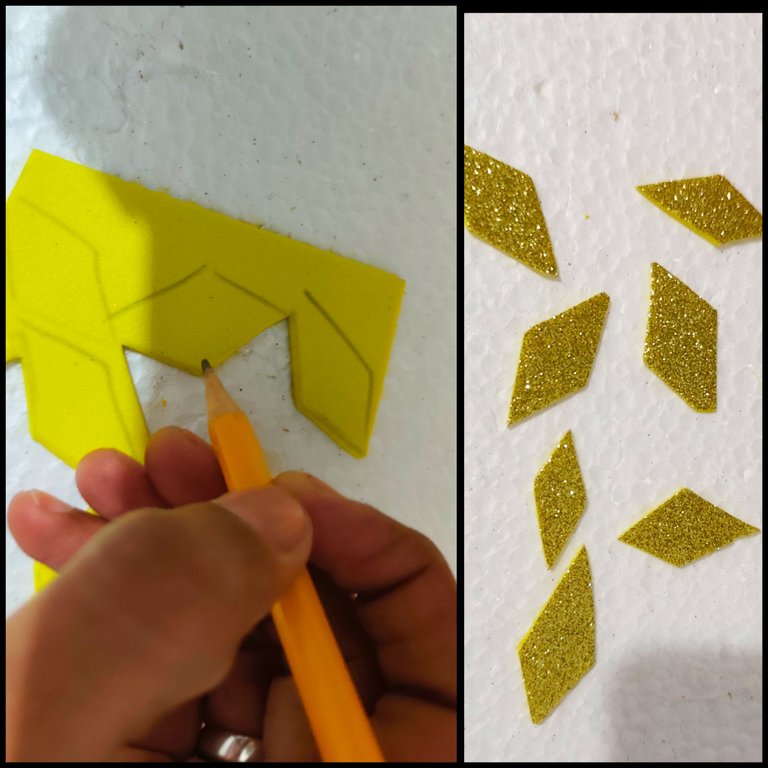
En el foami dorado dibujé algunos rombos y luego los recorté, luego pegamos en las flores, y en los cuernos.
🐏 PASO 12:
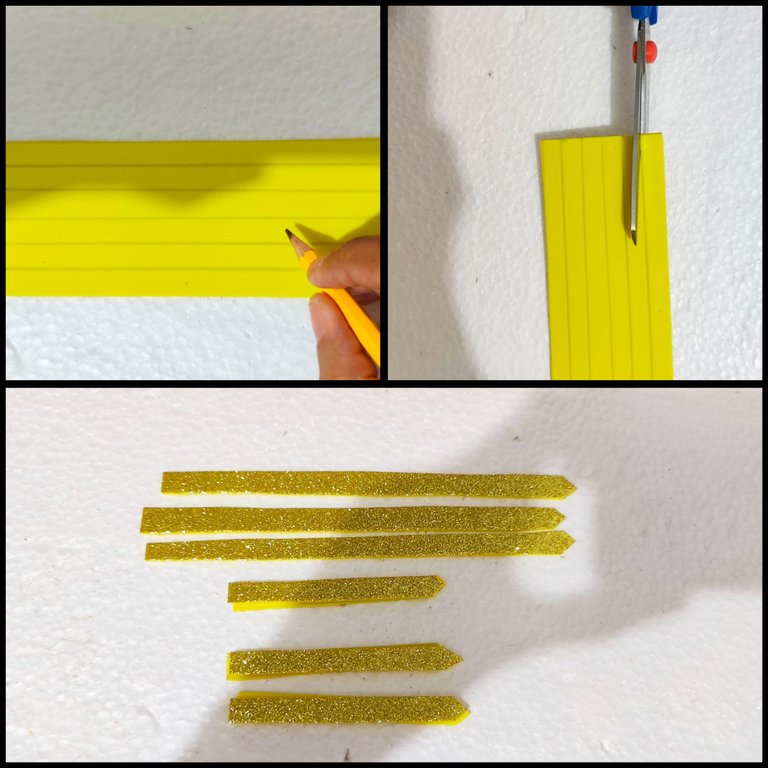
También dibuje tiras de 1 cm de ancho por 12 de largo y recorté.
🐏 PASO 13:

Recorté una pieza en el cartón y luego con ayuda del silicón líquido fui pegando, cuando ya esté seco pegamos en la parte trasera de los cuernos y dejamos secar al menos un día y listo.
🐏 MAQUILLAJE ARIES 🐏
🐏 MAQUILLAJE UTILIZADO 🐏
🐏 Maquillaje artístico.
🐏 Polvo suelto translúcido.
🐏 Sombras.
🐏 Pigmentos.
🐏 Labial.
🐏 Rubor.
🐏 Máscara de pestañas.
🐏 Lápiz de ojos.
🐏 Agua micelar.
🐏 Pinceles.
🐏 Brochas.
🐏 Borlas.
🐏 Corrector de ojeras.
🐏 Contorno.
🐏 Iluminador.
🐏 Skin care.
🐏 PASO A PASO DEL MAQUILLAJE ARIES 🐏
🐏 PASO 1:
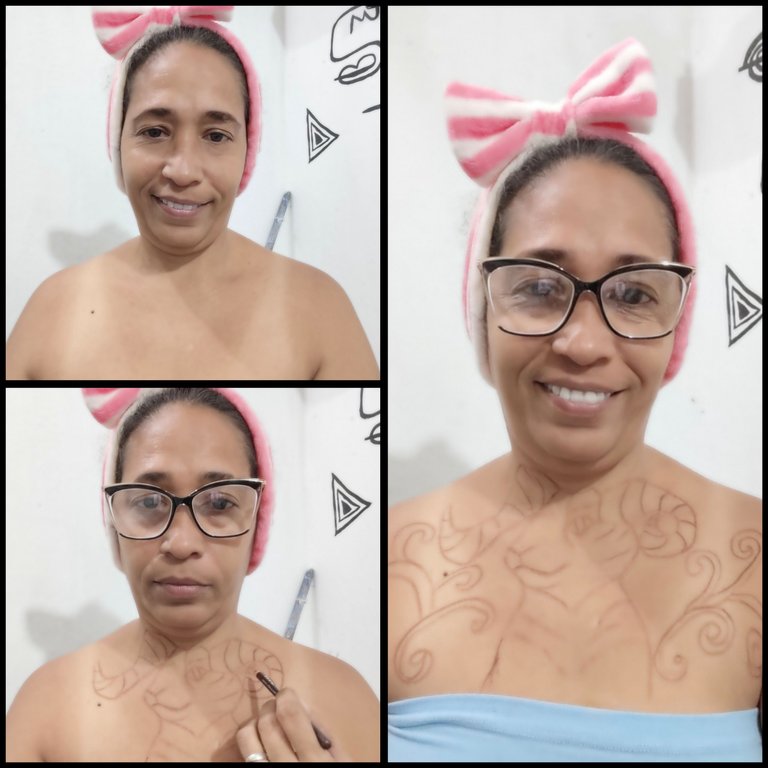
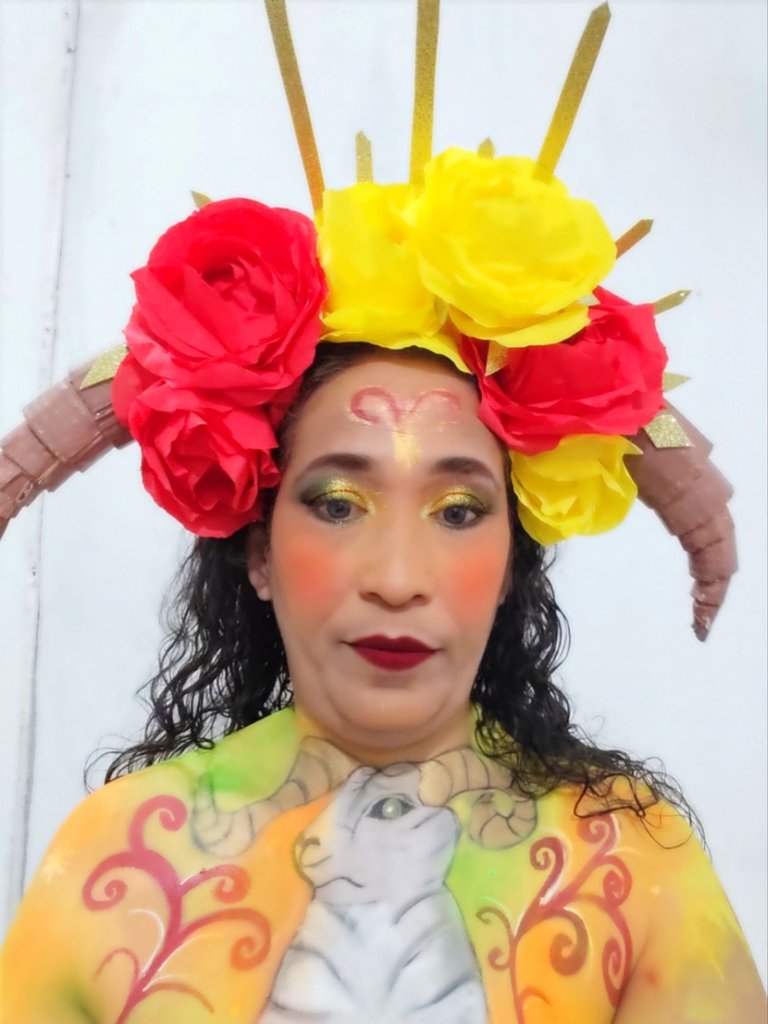
Con el lápiz de ojos negro dibujo en mi pecho el carnero, animal con el que se representa el signo de Aries.
🐏 PASO 2:
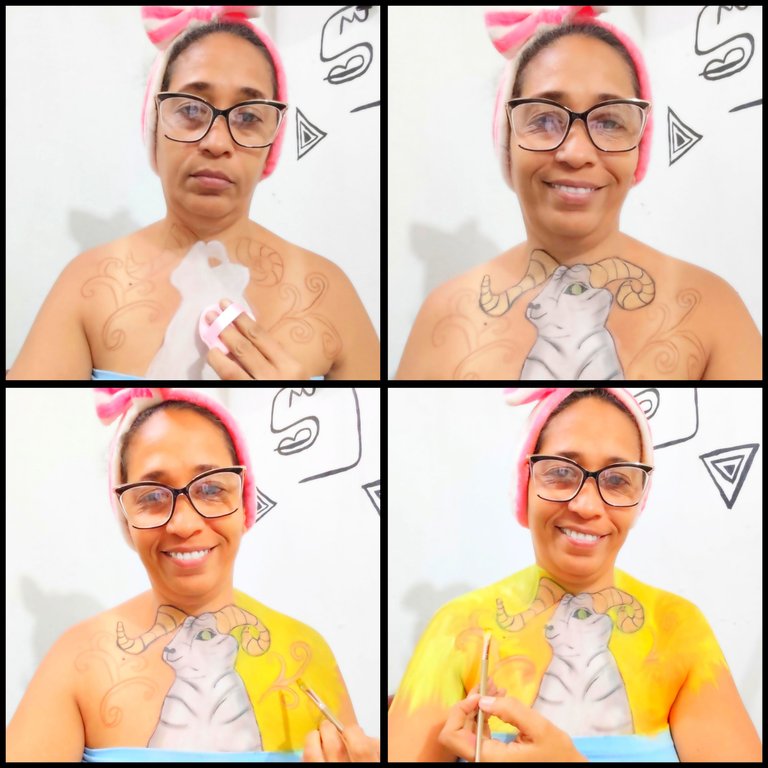
Aplicó el maquillaje artístico de color blanco, luego lo sello con polvo suelto translúcido. Después aplicó el maquillaje de color dorado en los cuernos, después con el maquillaje de color negro delineamos todo y luego sellamos con polvo suelto translúcido.
Luego aplicó el maquillaje de color amarillo, encima aplicó el color rojo y naranja y con la esponja difuminó y sello con el polvo suelto translúcido.
🐏 PASO 3:
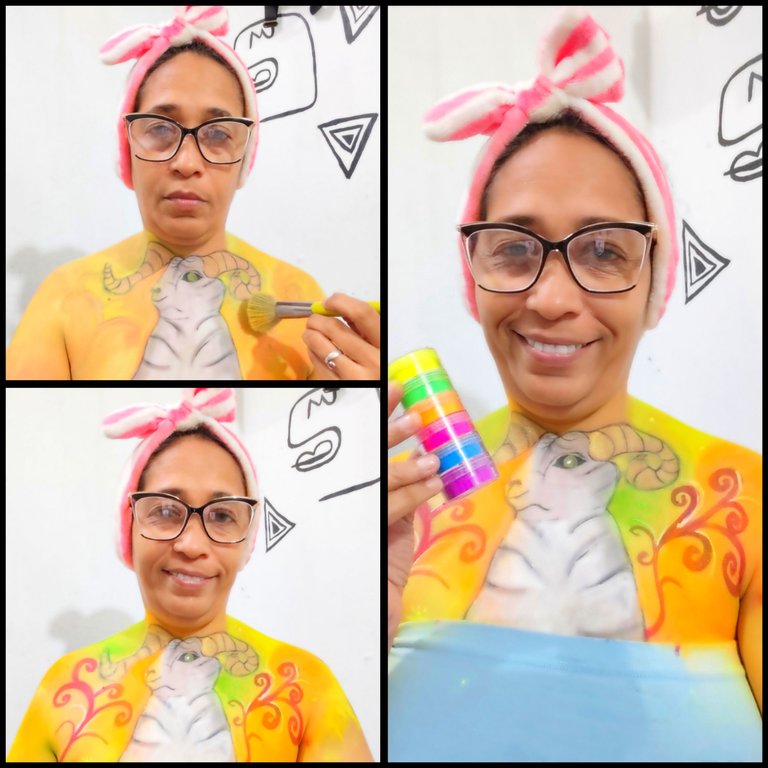
Ahora Aplicó los pigmentos en diferentes partes, para lograr el efecto degradado y simulando el fuego.
🐏 PASO 4:
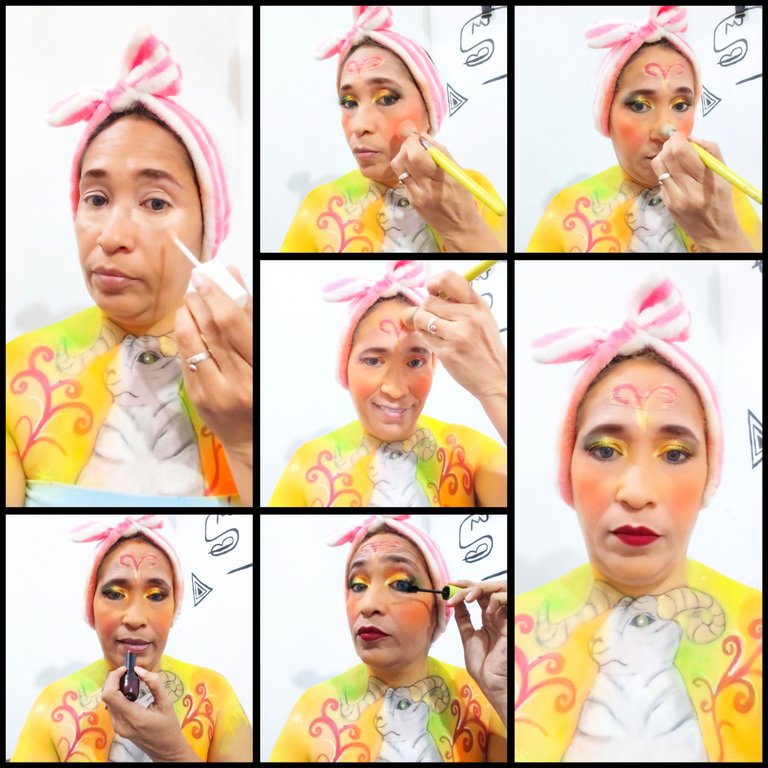
Aplicó el corrector de ojeras, y la base líquida, y difuminó con la esponja húmeda y sello con el polvo suelto translúcido. Después me aplicó las sombras.
En la frente dibujé el signo con el que se le conoce a aries, aplicó rubor, iluminador, máscara de pestañas, contorno y labial y listo.
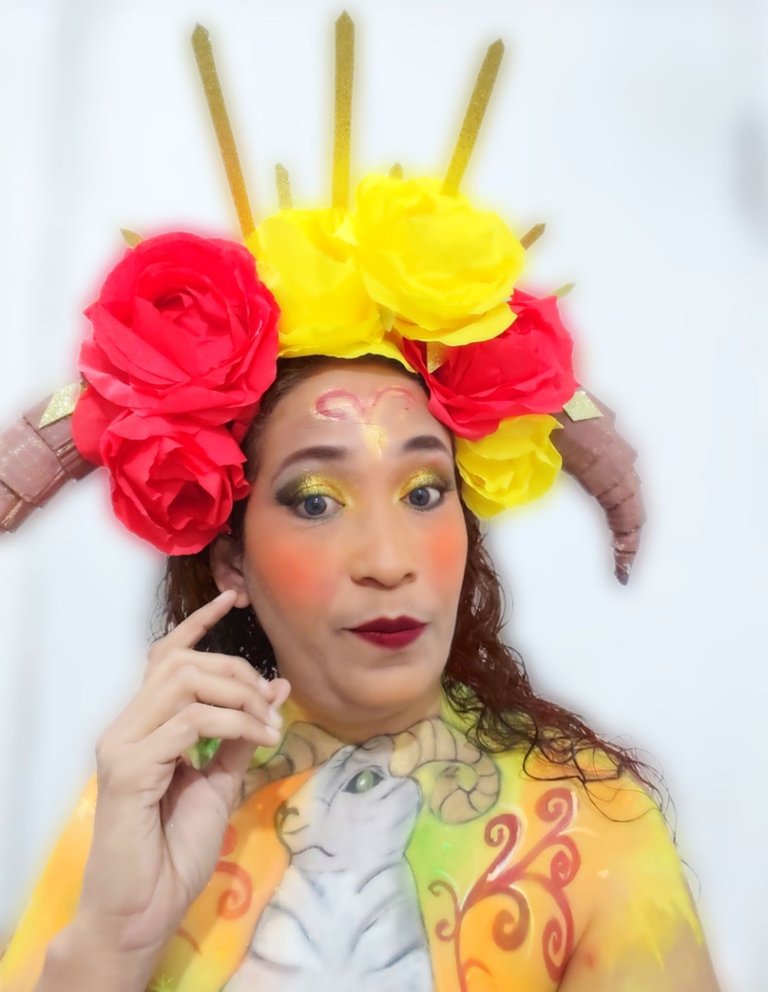
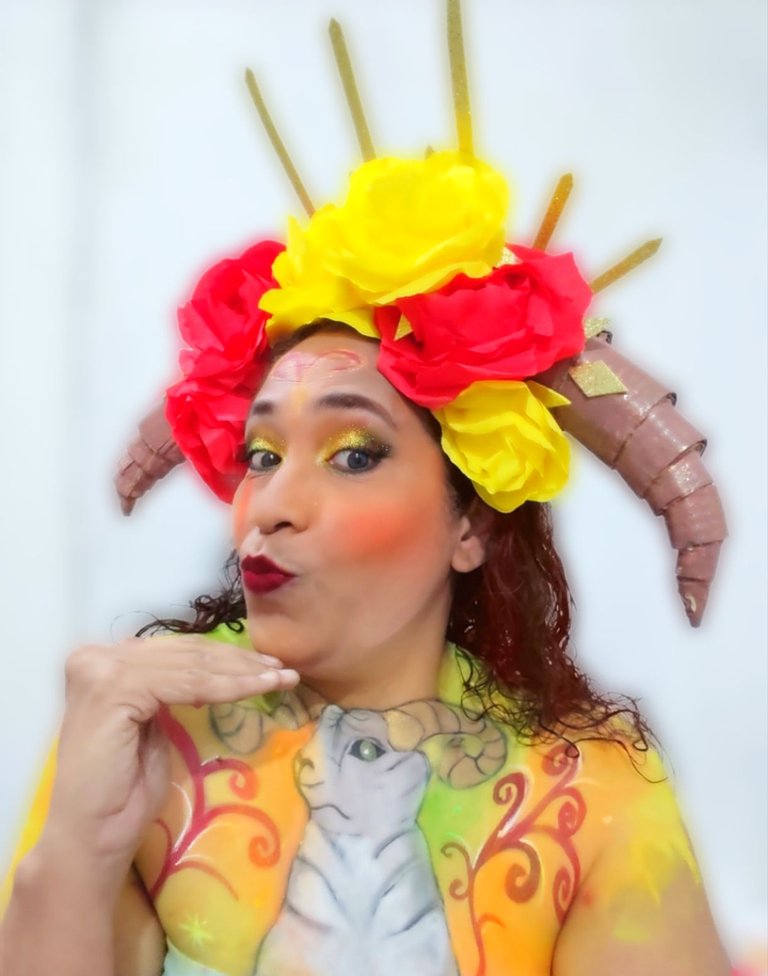
🐏 RESULTADO FINAL 🐏


 🐏 CRÉDITOS 🐏
Todas las fotografías fueron tomadas con mi teléfono Xiaomi y son de mi propiedad utilice el programa polish y el traductor Deep.


Greetings
#diy community, today I am back to join this initiative of the zodiac signs that caught my attention, this time we are going to work with the sign of Aries.
I really feel a lot of attraction for this theme of zodiac signs and horoscopes, although I don't get 100% for them, plus I find it interesting to see how it is used for manual arts and how they represented it.
In my case I decided to join manual arts with the art of artistic makeup to make a representation of the sign of Aries, which according to astrology is the first of all the signs and belongs to the fire signs, and is represented with a ram, so I decided to create a different headband to those I like to make.
Today I bring you a diadem that is the faithful representation of the ram, in this diadem in addition to the horns, was decorated with flowers and of course use the warm tones like red and yellow, I hope you like it.
🐏 MATERIALS 🐏
🐏 Box carton.
🐏 Liquid silicone.
🐏 Red crepe paper.
🐏 Yellow crepe paper.
🐏 Beige paint.
🐏 Brown paint.
🐏 Gold glitter.
🐏 Base headband.
🐏 Gold foami.
🐏 Brush.
🐏 Scissors.
🐏 Pencil.
🐏 Ruler.
🐏 Clothespins or clothespins.
🐏 Disposable plastic cup.
🐏 ARIES HEADBAND STEP BY STEP 🐏
🐏 STEP 1:
Take the cardboard box and with the pencil and the ruler he marked seven strips, one 7 cm wide, one 6 cm wide, one 5 cm wide, one 4 cm wide, one 3 cm wide, one 2 cm wide and one 1 cm wide, then with the scissors he cut them out.
🐏 STEP 2:
Now he took the strip of 7 cm and arched it, when it has the shape he applied a little liquid silicone and placed at each end a clamp to help keep the shape until it dries, and let it rest.
🐏 STEP 3:
After a while and when all the pieces are dry, apply liquid silicone on one of the ends and insert the smaller ring inside the other and so on until all the pieces are glued, apply liquid silicone on each joint to prevent it from peeling off and let it dry well.
I left it for two days to dry and stick well.
🐏 STEP 4:
When we already formed the horn we repeat the procedure, and we have the two horns ready, there I took the beige paint and applied a first coat and let it dry.
When the two horns are dry, he applied the brown paint, giving it two coats of paint, and again let it dry.
Once dry, he took the gold-colored glitter and applied it to both horns and let it dry.
🐏 STEP 5:
Take the red crepe paper and with the pencil mark a circumference, then with the scissors cut it out.
🐏 STEP 6:
In the plastic cup he placed one of the circles folding it in half, then he applied some liquid silicone and mounted another circle, and so on until all the layers were placed.
🐏 STEP 7:
Set aside one of the circles which we glue with the liquid silicone on the bottom of the flower we have created.
🐏 STEP 8:
He took the yellow crepe paper and repeated the whole procedure until he formed several flowers, three to be more specific.
🐏 STEP 9:
From the box cardboard I cut a strip about 8 cm long by about 2 cm wide, and at each end applied liquid silicone and glued inside the horns and let dry.
🐏 STEP 10:
He applied liquid silicone to the base headband and glued it to the cardboard of the box, then we glued the flowers we had previously made with the liquid silicone.
🐏 STEP 11:
On the gold foami I drew some rhombuses and then cut them out, then we glued on the flowers, and on the horns.
🐏 STEP 12:
I also drew strips 1 cm wide by 12 cm long and cut them out.
🐏 STEP 13:
I cut a piece out of the cardboard and then with the help of the liquid silicone I glued it, when it was dry we glued it on the back of the horns and let it dry for at least one day and that was it.
🐏ARIES MAKEUP 🐏
🐏MAKEUP USED🐏
🐏 Artistic makeup.
🐏 Translucent loose powder.
🐏 Shadows.
🐏 Pigments.
🐏 Lipstick.
🐏 Blush.
🐏 Mascara.
🐏 Eye pencil.
🐏 Micellar water.
🐏 Brushes.
🐏 Brushes.
🐏 Tassels.
🐏 Dark circles concealer.
🐏 Contour.
🐏 Illuminator.
🐏 Skin care.
🐏ARIES MAKEUP STEP BY STEP🐏
🐏 STEP 1:
With the black eyeliner pencil I draw on my chest the ram, the animal that represents the sign of Aries.
🐏 STEP 2:
She applied the white artistic makeup, then sealed it with translucent loose powder. Then she applied the gold colored makeup on the horns, then with the black colored makeup we outlined everything and then sealed it with translucent loose powder.
Then she applied the yellow make-up, applied the red and orange color on top and with the sponge she blended and sealed with the translucent loose powder.
🐏 STEP 3:
Now he applied the pigments in different parts, to achieve the gradient effect and simulating fire.
🐏 STEP 4:
She applied the under eye concealer, and liquid foundation, and blended with the damp sponge and sealed with the translucent loose powder. Then she applied the shadows.
On the forehead I drew the sign with which aries is known, applied blush, highlighter, mascara, contour and lipstick and that was it.
🐏FINAL RESULT🐏
🐏 CRÉDITS 🐏
All pictures were taken with my Xiaomi phone and are my property I used the polish program and the Deep translator.

https://x.com/Mayelin2021/status/1909445573142262239?t=7kyzmPyWB3-GXPfY-ammUA&s=19
Congratulations @mayifiestas! You have completed the following achievement on the Hive blockchain And have been rewarded with New badge(s)
Your next target is to reach 7750 replies.
You can view your badges on your board and compare yourself to others in the Ranking
If you no longer want to receive notifications, reply to this comment with the word
STOPCheck out our last posts:
Gracias
¡Eso es genial @mayifiestas! ¡Estás haciendo un gran trabajo en Hive! ¡Seguimos animándote para tu próxima meta!
I love the way the Aries sign is represented, it caught my attention because one of my friends is an Aries sign and the colours you used would surely appeal to her. Also the materials are simple, easy to get and the step by step instructions are very detailed so that anyone can do it without any problems.
You have made a beautiful expression of art with this theme and your work and explanation is impeccable. A big hug!
I have picked this post on behalf of the @OurPick project! Check out our Reading Suggestions posts!
Please consider voting for our Liotes HIVE Witness. Thank you!
Muchísimas gracias por su apreciación, utilice los tonos cálidos porque Aries es un signo de fuego, gracias por el apoyo 🌹🌹🌹
Gracias a vos por tan buen trabajo! Un gran abrazo!🤗
Esta muy linda tu creacion amiga, que lindos colores 😍 las flores siempre son un buen material de decoracion jeje
Saludos mi reina bella, gracias por tu visita, un abrazo 🌹🌹🌹🌹
Un hermoso y creativo trabajo, linda diadema, y el arte en tu cuerpo, impresionante, te felicito, saludos.
Gracias mi vida, hice lo que pude, sobre todo porque me llevo mucho tiempo realizarlo, tres días la diadema y 3 horas y 25 minutos el maquillaje, saludos y gracias por la visita. 🌹🌹🌹🌹
Mira, yo pensé en eso, el tiempo que te tomo, sobre todo el maquillaje, waoo pensé que fue más, pero eres una experta, me imagino con el tiempo, ya has mejorado la rapidez para realizarlo, que bonito la verdad, un abrazo.😍🤗
Es que este maquillaje realmente fue sencillo, por eso solo llevo tres horas, pero si hacen los otros signos verás algunos más elaborados que tengo ya diseñados. Jajajaja 🌹🌹🌹
wow so bright, l like it👍
Thank you so much my heart, I'm so glad to hear you liked it.
You're welcome, have a nice day.