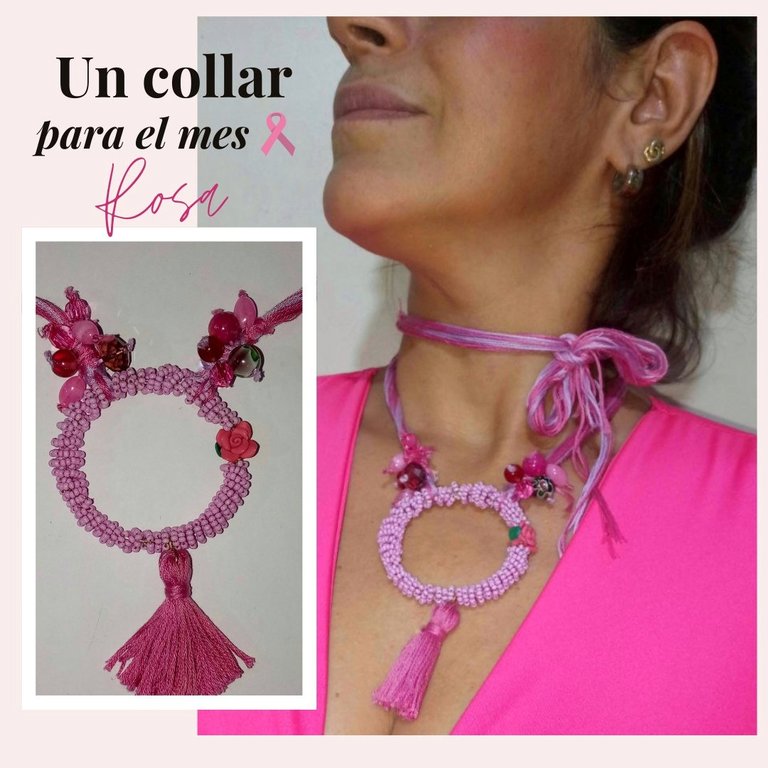
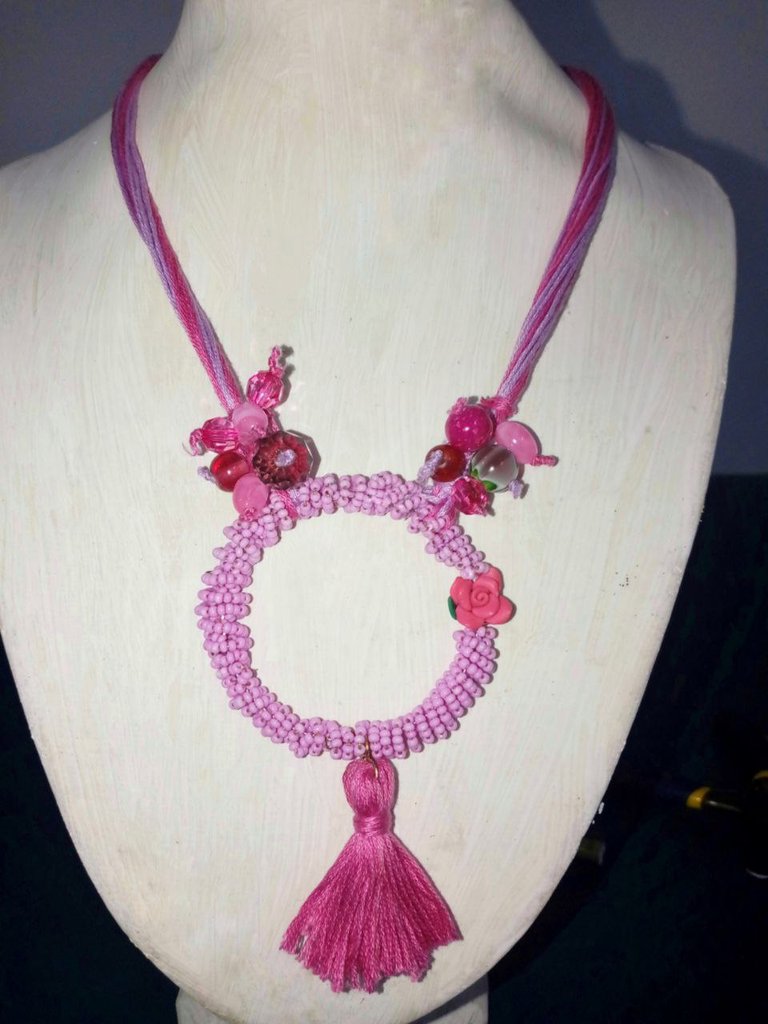
Un collar para el mes Rosa // A necklace for the month Pink 💕
¡Hola Hola ! querida comunidad @jewerly ¡¡
¡Octubre es el mes Rosa! Es un mes en el que nos reunimos para hacer accesorios que recuerden la importancia de la prevención del cáncer de mama. En ocasiones también los regalamos, los subastamos o los vendemos para recaudar fondos para ayudar a las mujeres con sus mamografías.
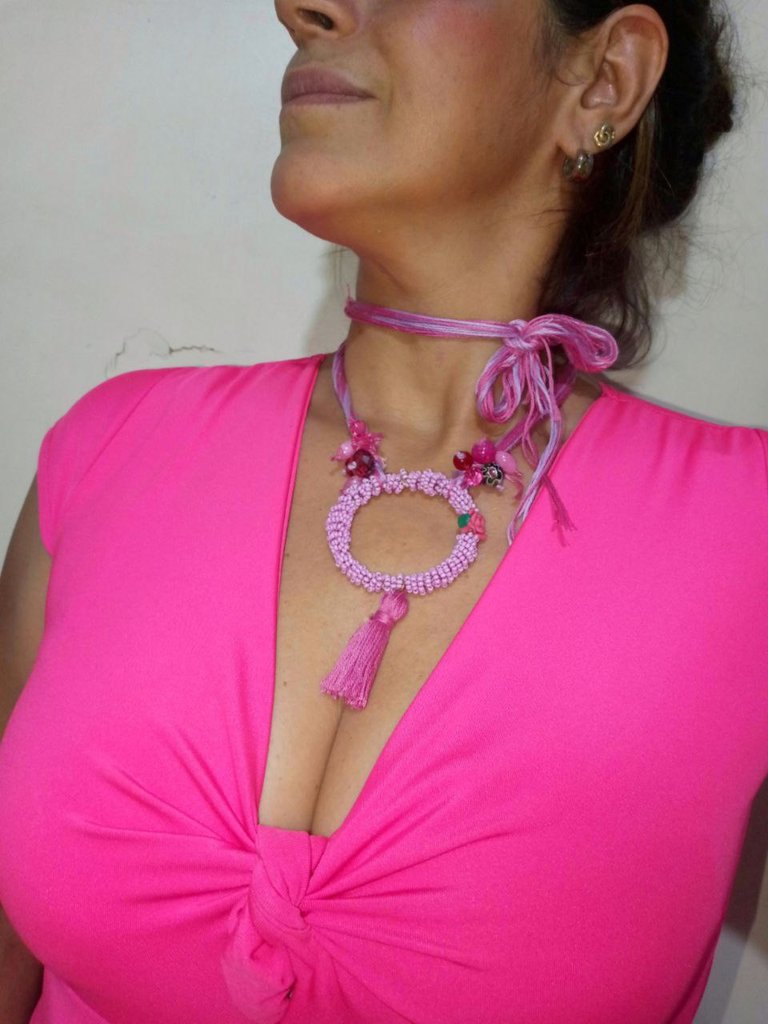
Me hace mucha ilusión participar en este concurso con un hermoso collar, ¡inspirado en los colores rosa por supuesto! Es un accesorio que se puede usar tanto largo como corto y sin broche en la parte superior, para que puedas adaptarlo a tu gusto.
Hello Hello! dear community @jewerly ¡¡
October is Pink month! It's a month when we come together to make accessories that remind us of the importance of breast cancer prevention. We also sometimes give them away, auction them or sell them to raise funds to help women with their mammograms.
I am very excited to enter this contest with a beautiful necklace, inspired by the colors pink of course! It is an accessory that can be worn either long or short and without a clasp at the top, so you can tailor it to your liking.

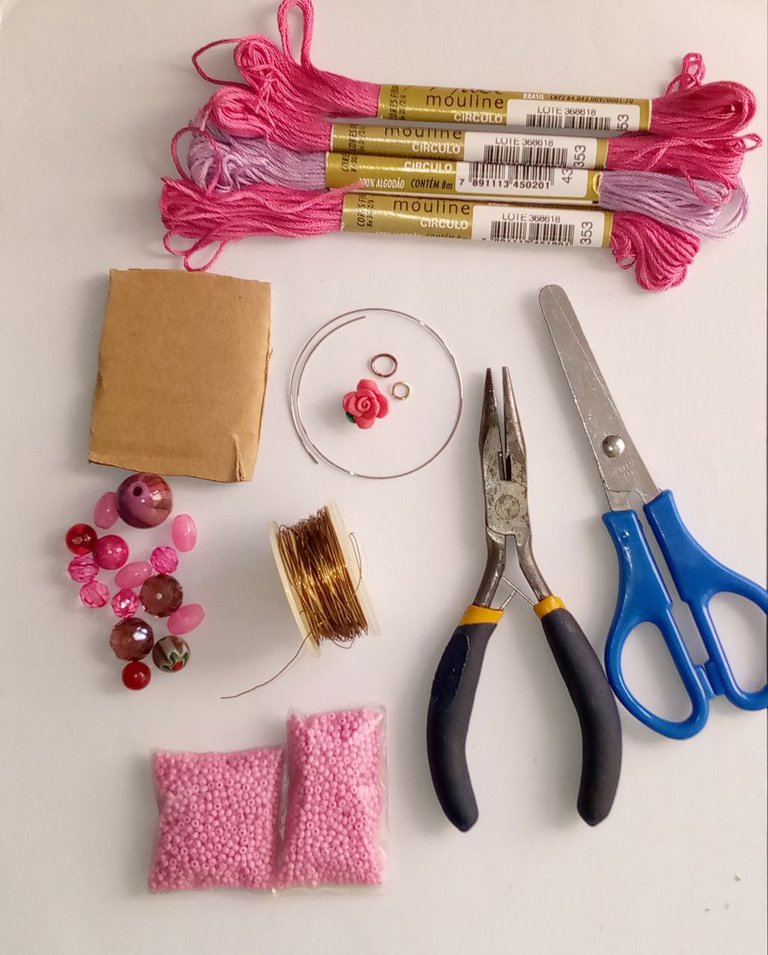
- Hilo de bordar color colores rosa y lila
- Alambre tipo "memoria"
- Alambre para bisutería #18
- Mostacillas color rosa
- Piezas de acrílico
- 2 Argollas
- 1 aplique de masa flexible en forma de rosa
- Un pedazo de cartón o cartulina
- Pinzas de bisutería
- Tijera
- Pink and lilac colored embroidery thread
- Memory wire
- Jewelry wire #18
- Pink beads
- Acrylic pieces
- 2 rings
- 1 application of flexible rose-shaped dough
- A piece of cardboard or cardboard
- Costume jewelry tweezers
- Scissors
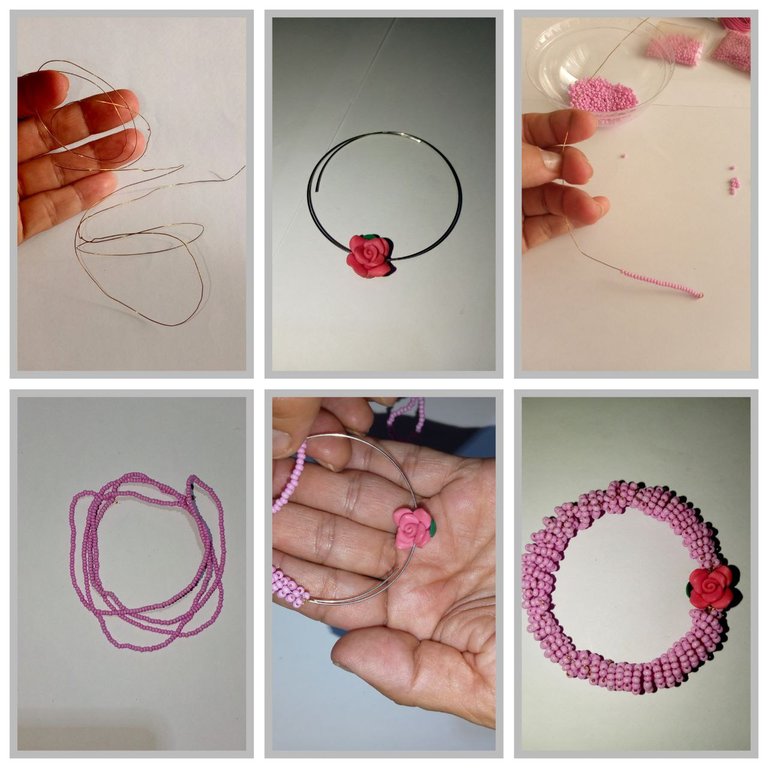
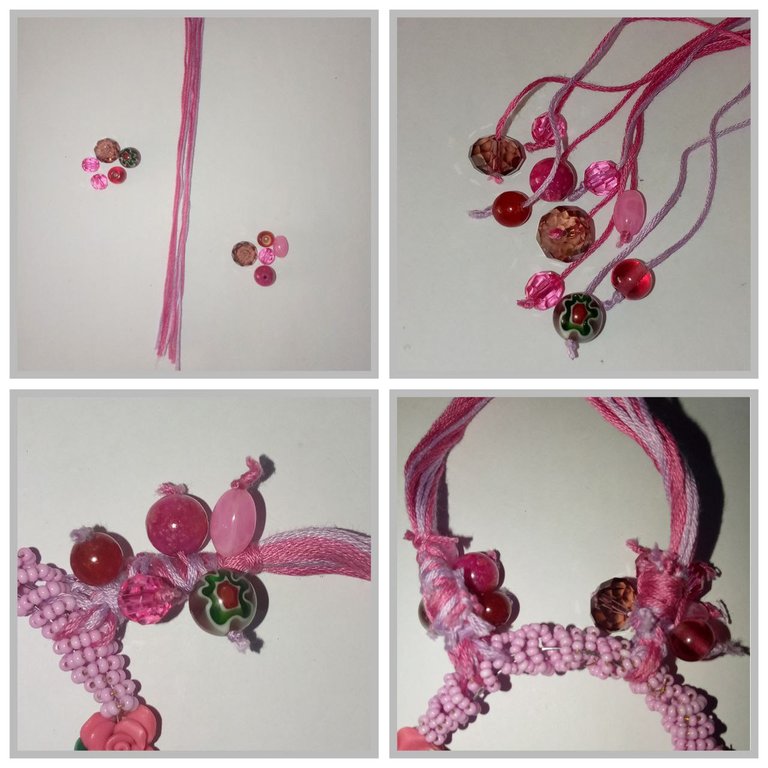
PASO 1 : Cortar un trozo de 1 metro de alambre #18, ensartar las cuentas de canutillo hasta cubrirlo por completo.
Para elaborar el dije utilicé un pedazo de alambre tipo "memoria" que tenía de una pulsera, se insertó primero la rosita y luego vamos a enrollar el alambre en forma de espiral. Este proceso hay que hacerlo con mucha paciencia tanto el insertar el canutillo como en enrollar el aro, porque hay que hacerlo con mucho cuidado para evitar que se parta el alambre con las mostacillas.
Cut a 1 meter piece of wire #18, string the beads until it is completely covered.
To make the charm I used a piece of "memory" wire that I had from a bracelet, I inserted the rose first and then we are going to wind the wire in a spiral shape. This process must be done with a lot of patience, both inserting the bead and winding the ring, because it must be done very carefully to avoid breaking the wire with the beads.

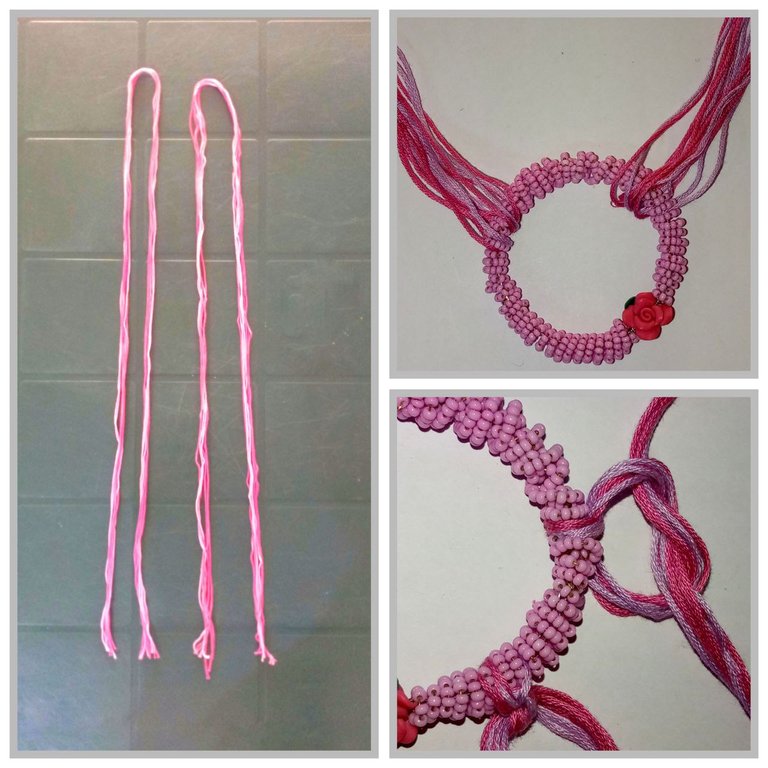
PASO 2: Cortar 14 hebras de hilo de seda de (120 cm cada uno), aquí utilicé de los 2 colores, Separamos 7 hebras de hilo que irán en un extremo y 7 para el otro extremo del aro. Juntar los hilos y doblar a la mitad, anudar abrazando los extremos del aro.
STEP 2: Cut 14 strands of silk thread (120 cm each), here I used 2 colors. Separate 7 strands of thread that will go at one end and 7 for the other end of the hoop. Join the threads together and fold in half, knotting them together to embrace the ends of the hoop.
PASO 3: Ahora vamos a seleccionar la cantidad de acrílicos que pondremos a cada lado, y se cortan hebras de hilo de 18 cm , una para cada pieza, se anudan las puntas para que no se salgan las cuentas y amarramos al collar dando vueltas.
STEP 3 : STEP 3: Now we are going to select the amount of acrylics that we will put on each side, and cut 18 cm strands, one for each piece, knot the ends so that the beads do not come off and tie them to the necklace.
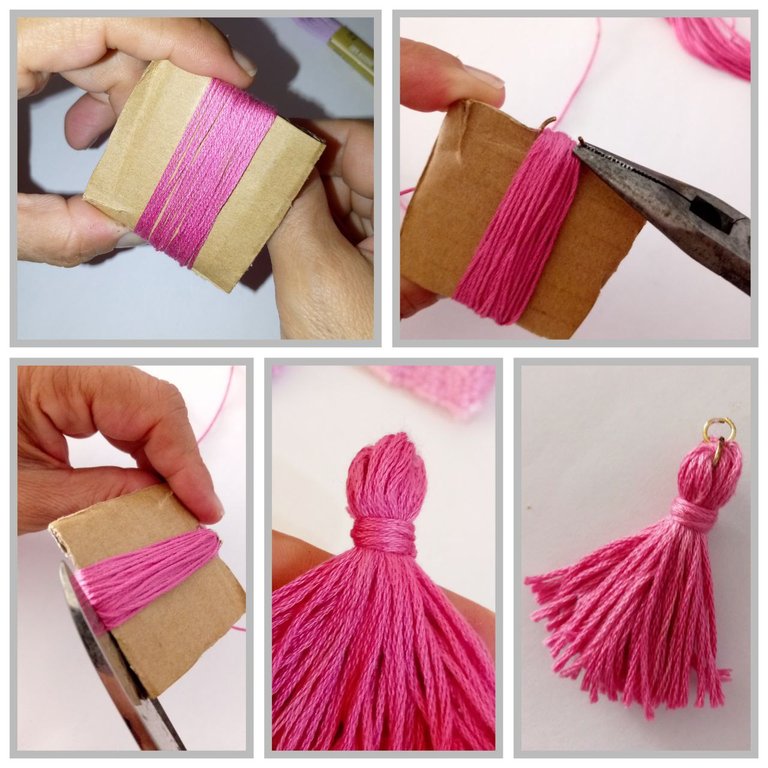
PASO 4: Se hizo una borla con el mismo hilo de seda. Para la borla cortar un pedazo de cartón o cartulina que tenga el mismo largo que necesita la borla. Enrolla el hilo de seda alrededor varias veces (Va a depender del grueso que desees) en este caso di 35 vueltas . Con ayuda de una pinza se pasa una anilla por el extremo superior y se cierra. Corta el otro extremo del hilo. Lo hice con tijera de costura para que me quedaran parejos.
Con otra hebra de se enrollar varias veces y anudar bien 1 cm más abajo de la anilla.
STEP 4: A tassel was made with the same silk thread. For the tassel cut a piece of cardboard or cardboard that is the same length as the tassel needs. Wrap the silk thread around it several times (it will depend on the thickness you want) in this case I made 35 turns. With the help of a plier pass a ring through the upper end and close it. Cut the other end of the thread. I did it with sewing scissors to make them even.
With another strand of yarn wind it several times and knot well 1 cm below the ring.
PASO 5: Para finalizar tomar la 2da anilla, se coloca en el medio del aro y se inserta la borla. Cerrar con la pinza.
STEP 5: To finish, take the 2nd ring, place it in the middle of the ring and insert the tassel. Close with the clip.
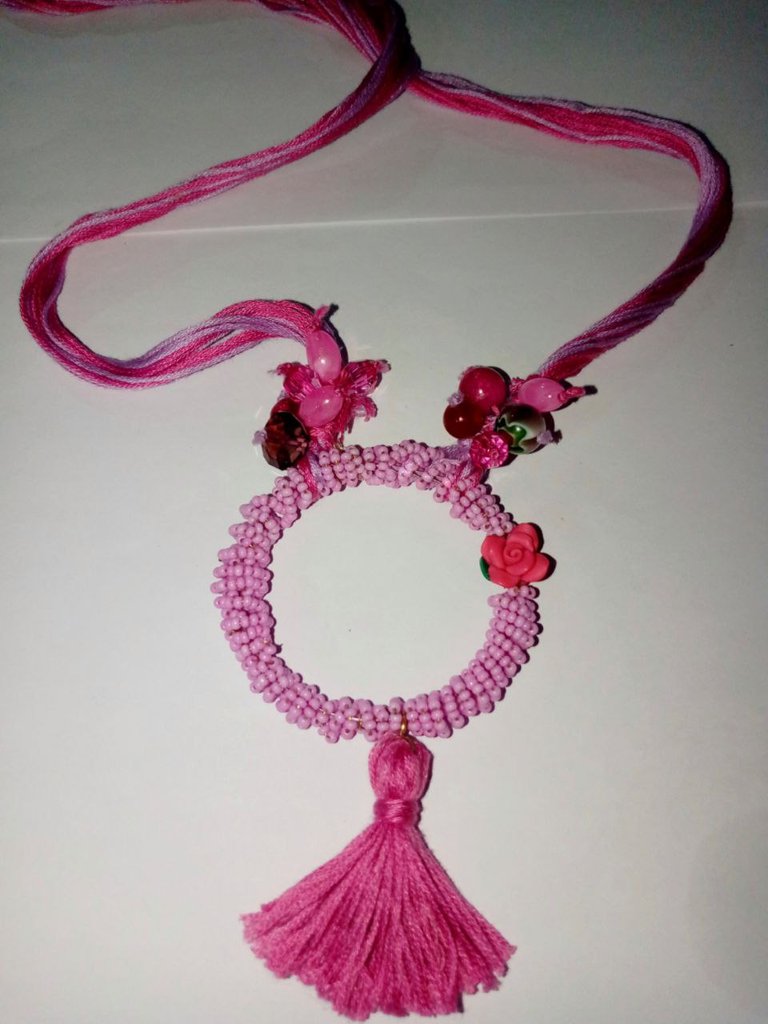
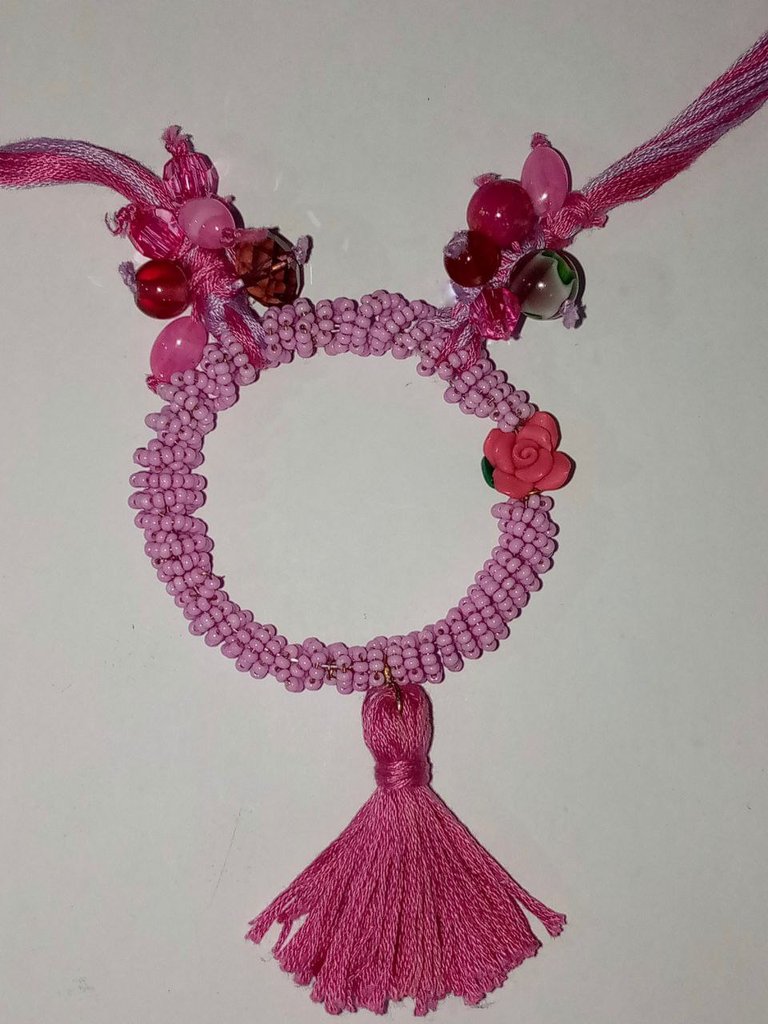
Y este es el resultado final de la creación de este hermoso accesorio relacionando con la concientación del mes rosa.
And this is the final result of the creation of this beautiful accessory related to the awareness of the pink month.

Y hasta aquí mi participación en este concurso rosa, esperando haya sido de tu agrado. Tus sugerencias y comentarios siempre serán bienvenidos.
Con cariño...
Mercedes 💜
And so far my participation in this pink contest, I hope it has been to your liking. Your suggestions and comments are always welcome.
With love...
Mercedes 💜
Todas las fotografías fueron tomadas con mi telefóno móvil // All photos were taken with my mobile phone.
Portada editada en Canva // Cover edited in Canva
Separadores realizados en Canva // Dividers made in Canva
Traducción realizada con www.deepl.com // Translation made with www.deepl.com
Congratulations @mergusa88! You have completed the following achievement on the Hive blockchain And have been rewarded with New badge(s)
Your next target is to reach 5000 upvotes.
You can view your badges on your board and compare yourself to others in the Ranking
If you no longer want to receive notifications, reply to this comment with the word
STOPAmiga, quedó precioso, me encanta la forma como se ata al cuello!!
Hola Rosita se puede poner de varias formas , pero atado al cuello es como luce más lindo . A mi también me gusta más como se ve así ❤️
Gracias por compartir, me encantó el diseño. Saludos @mergusa88.
Hola @blanca56 gracias por comentar , me alegra que te haya gustado este diseño de collar ♥️
¡Felicitaciones!
Estás participando para optar a la mención especial que se efectuará el domingo 27 de octubre del 2024 a las 8:00 pm (hora de Venezuela), gracias a la cual el autor del artículo seleccionado recibirá la cantidad de 1 HIVE transferida a su cuenta.
¡También has recibido 1 ENTROKEN! El token del PROYECTO ENTROPÍA impulsado por la plataforma Steem-Engine.
1. Invierte en el PROYECTO ENTROPÍA y recibe ganancias semanalmente. Entra aquí para más información.
2. Contáctanos en Discord: https://discord.gg/hkCjFeb
3. Suscríbete a nuestra COMUNIDAD y apoya al trail de @Entropia y así podrás ganar recompensas de curación de forma automática. Entra aquí para más información sobre nuestro trail.
4. Visita nuestro canal de Youtube.
Atentamente
El equipo de curación del PROYECTO ENTROPÍA
Muchas gracias apreciada comunidad por la notificación y el apoyo ❤️🤗
👍👍👍
Congratulations @mergusa88! You received a personal badge!
You can view your badges on your board and compare yourself to others in the Ranking
Check out our last posts:
Yeahhh already 3 years in HIVE! time has gone fast. I hope to continue doing many more years. Thanks for the badge 🎂🎊🙏♥️
Happy Hive Birthday @mergusa88
🎉🎈🎂🎉🎈