Qurator's Mischievous Mondays | DIY Dynamo

Welcome to Qurator's Mischievous Mondays!
This will be a weekly competition that we will be hosting every Monday. We want to see a little more engagement and fun when it comes to some of our competitions so this will be a simpler and shorter competition. Easy to enter, but maybe not so easy to win. ;) This competition will be similar to the Monday Missions we had a long time ago, but instead of writing posts to enter we will now consider only the comments and answers on this blog as your entry to win.
Why Mischievous?
We all could use a little fun in our lives. We would even say that we deserve it, let loose a little and have a go at making everyone laugh or think a little, even if it is a little over the top or pure silliness. Go all out and let your creative juices flow.

This week's theme : DIY Dynamo
RULES
Write a comment in this post, your comment will be your entry.
Only comments that fit the theme and style.
It has to be done by you, no plagiarism.
All entries will be reviewed by the Qurator team.
Only one entry per account.
Deadline: Before this post reaches payout
Your entry will not count if you aren't following the above-mentioned rules.

The previous theme : Workstation Wonders
1st Prize - 30% Upvote
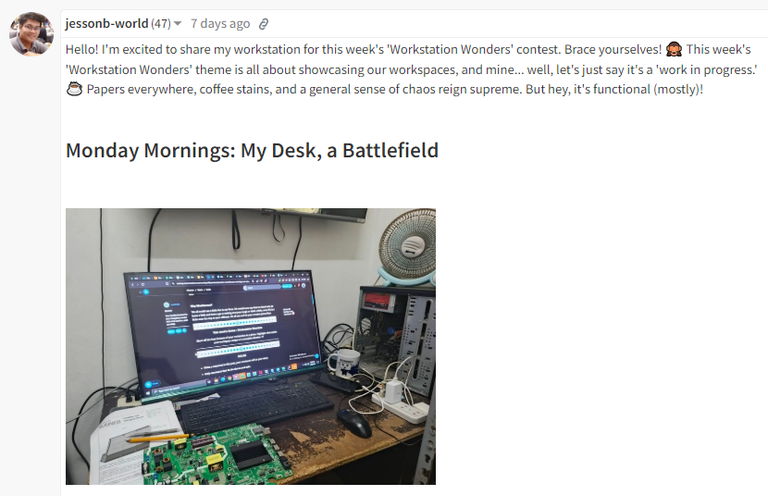
@jessonb-world
2nd Prize - 25% Upvote
@soyunasantacruz

3rd Prize - 20% Upvote
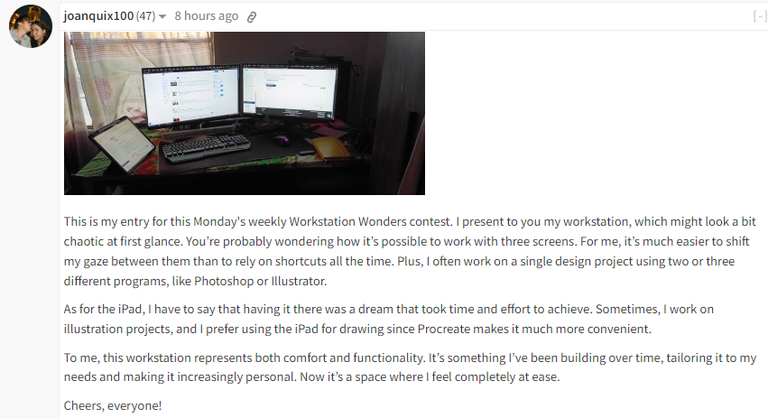
@joanquix100
4th Prize - 15% Upvote
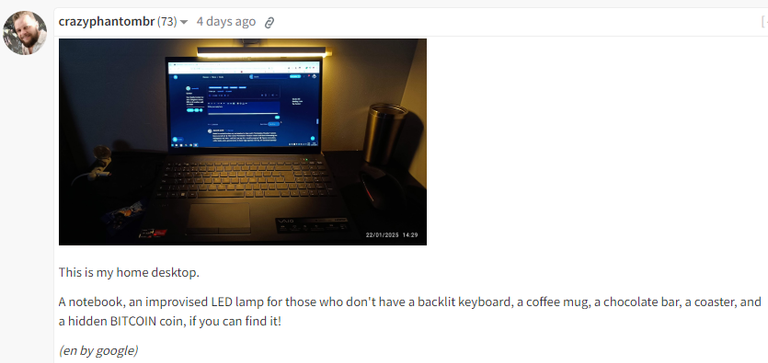
@crazyphantombr
Congrats to the winners!
The Qurator project is brought to you by:
Like what we do? Consider voting for us as a Hive witness.
Active Witness rank: 59
0
0
0.000
How cool, I love the activity, thank you very much. Let me tell you that at first, I wanted to call a professional. In fact, I contacted one who agreed to come to my house, but after waiting several days, they never showed up. We called another one, and they also let us down.
Frustrated, I decided to take matters into my own hands, I looked up tutorials on how to install wooden doors, and after following some tips, I felt confident enough to start my project.
The process wasn’t perfect while working, I injured my hand with a tool. Luckily, it wasn’t serious in fact, it has already healed. Despite the setbacks, the door turned out pretty well! I’m sharing some before and after photos so you can judge for yourselves.!
First off, I would like to say thank you to @qurator for creating "Mischievous Mondays" contest.
So, for this week's theme: DIY Dynamo, I've been wanting to share with you a latest DIY project I made, something that would be both challenging and rewarding. And let me tell you, this one definitely pay me off.
On our warehouse there are cuttings and discarded racking system scrap. And guess what, I decided to build a single bed from scratch. Now, before you raise an eyebrow, hear me out. This not the average, shelving unit that is widely available in the super market. This was a sturdy and industrial grade racking system. The one use in warehouses, groceries and etc. It was destined for the junk shop, but I saw potential.
The first step, of course, was the disassembly and cuttings. It was a bit of a wrestling match, let me tell you. Those bolts were on tight! But eventually, I have device called GATO.
Next came the design phase. I spent a good hour sketching out different configurations, trying to figure out how to maximize the space and create a sturdy frame. I wanted something that looked simple and minimalist, but also something that could withstand the inevitable jumping and bouncing that comes with having a bed in the house.
The actual construction was a bit of a trial and error process. I started by bolting the main frame together, using my size 10 open wrench. Once the frame was complete, I moved on to the slats. I used some scrap plywood to create a sturdy base for the mattress.
The final step was the most satisfying: adding the finishing touches. I sanded down any rough edges and gave the entire bed a coat of grey spray paint. The result? A sleek, industrial-looking bed that I'm incredibly proud of.
The best part? Is, I already have a bed for an afternoon nap in the office. And knowing that I built something functional and stylish out of what was essentially trash, was just addional.
If you're thinking about taking on a DIY project, I highly recommend it. It's a great way to learn new skills, unleash your creativity, and create something truly unique. And who knows, you might even end up with a one of a kind piece of furniture from nothing like I did like I did.