Fanart / Essan (Dark Summoner) / Rada Quest Contest - Eng- Esp
Essan (Dark Summoner)

English
Greetings Friends I hope you are very well.
This is a special occasion, it's my first entry for the Rada Quest art contest!
I had a long time thinking about trying it and how to try it, I took the time to give it a good effort and finish it.
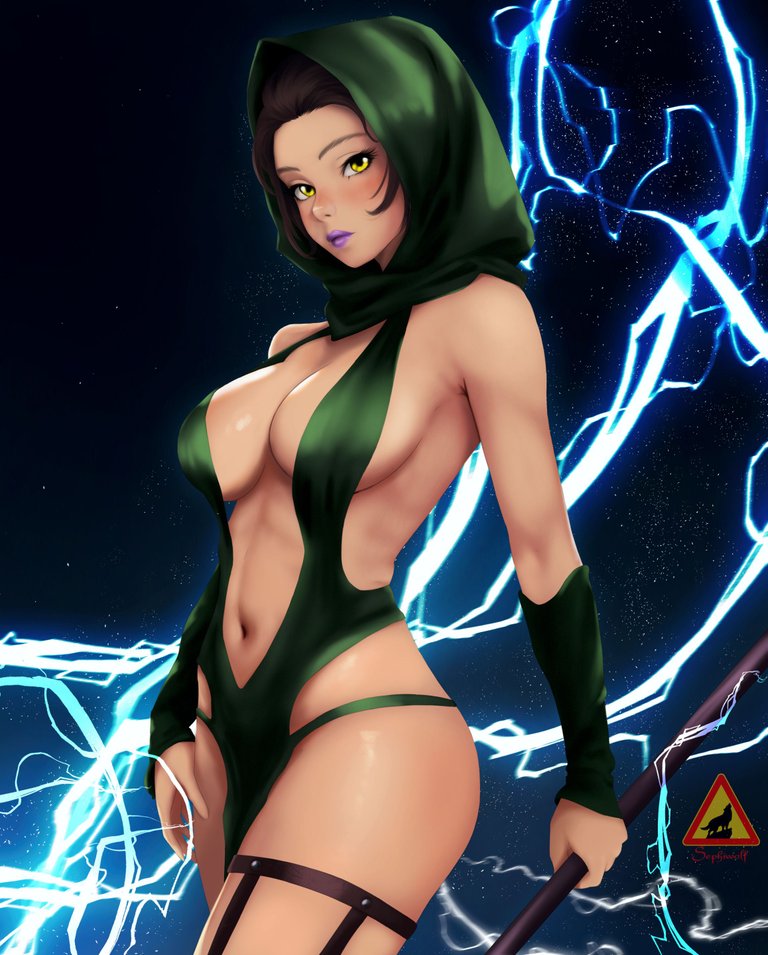
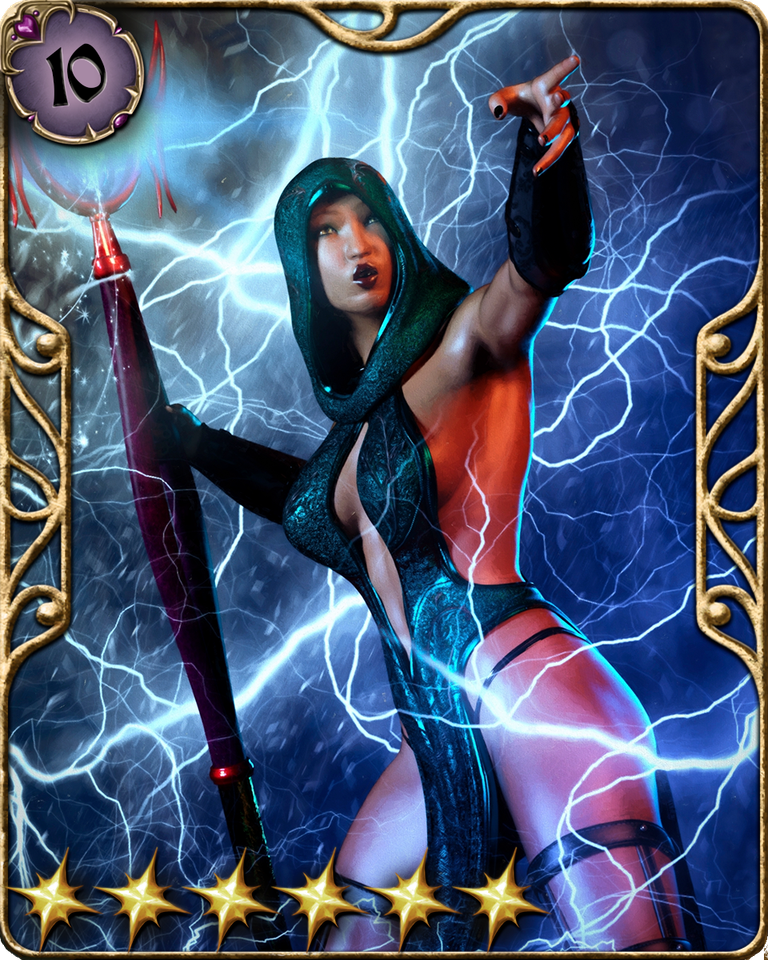
For my entry I chose the character Essan (Dark Summoner), the art style that the original character has is 3D so we will make a reinterpretation of it, but with my style based mostly on anime, I didn't want to make an exact copy of it so I decided to modify a little his clothes especially the part of the hood so you can see some of his hair.
With respect to the background I left a relatively empty part, this was with the intention that the attention was more focused on the face of the character, on the other hand I added more weight in the lower right corner to make contrast.
Español
Saludos Amigos Espero estén muy bien.
¡Esta es una ocasión especial, es mi primer entrada para el concurso de arte de Rada Quest!
Tenía mucho tiempo pensando en intentarlo y en como intentarlo, me tome el tiempo necesario para dar un buen esfuerzo y terminarlo.
Para mi entrada elegí al personaje Essan (Dark Summoner), el estilo de arte que tiene el personaje original es 3D por lo que haremos una reinterpretación del mismo, pero con mi estilo basado mayormente en anime, no quise hacer una copia exacta del mismo por lo que decidí modificar un poco su ropa en especial la parte de la capucha para que se vea algo de su cabello.
Con respecto al fondo deje una parte relativamente vacía, esto fue con la intención de que la atención estuviera más centrada en el rostro del personaje, en contraparte agregue más peso en la esquina inferior derecha para hacer contraste.
Reference
Process/Proceso
Well folks, the process took time and planning. I wanted to make a reinterpretation of the character in my own style, but respecting the essence of the character.
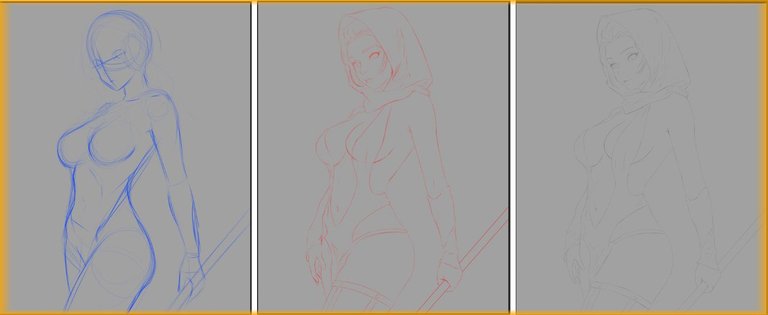
-As a first step we make a kind of pre-sketch, in which we make clear what will be the pose of the character, for this we use blue color.
-The next step is to make the sketch using the red color, the brush that I use for this is very similar to the previous one only that of a smaller size, this helps us to give details to the same one.
-Once the sketch is ready on a new layer, we create the lineart, for this we use a brush a little bit smaller and 50% hardness, and a black color.
This type of lineart is not very visible to the naked eye, but when the color is applied it takes much more relevance.
Bien amigos, El proceso llevo tiempo y planificación. Quería hacer una reinterpretación del personaje en mi propio estilo, pero respetando la esencia del mismo.
-Como primer paso hacemos una especie de pre-boceto, en el que dejamos en claro cuál será la pose del personaje, para esto usamos color azul.
-El siguiente paso es hacer el boceto usando el color rojo, el pincel que use para esto es muy parecido al anterior solo que de un tamaño más pequeño, esto nos ayuda a darle detalles al mismo.
-Una vez listo el boceto sobre una nueva capa, creamos el lineart, para esto usamos un pincel un poco mas pequeño y dureza al 50%, y un color negro.
Este tipo de lineart no se aprecia del todo a simple vista, pero cuando se aplica el color toma mucha más relevancia.
It is time to apply the base color, we will use shades relatively similar to those of the reference.
By this I mean that we must reinterpret the reference colors but under a different shade of light.
I think I chose correctly, to finish this stage we apply a simple background in two mixed tones.
Es momento de aplicar el color base, usaremos tonos relativamente similares a los de la referencia.
Con esto quiero decir que debemos reinterpretar los colores de la referencia pero bajo un tono diferente de luz.
Creo que elegí correctamente, para finalizar esta etapa aplicamos un fondo simple en dos tonos mezclados.
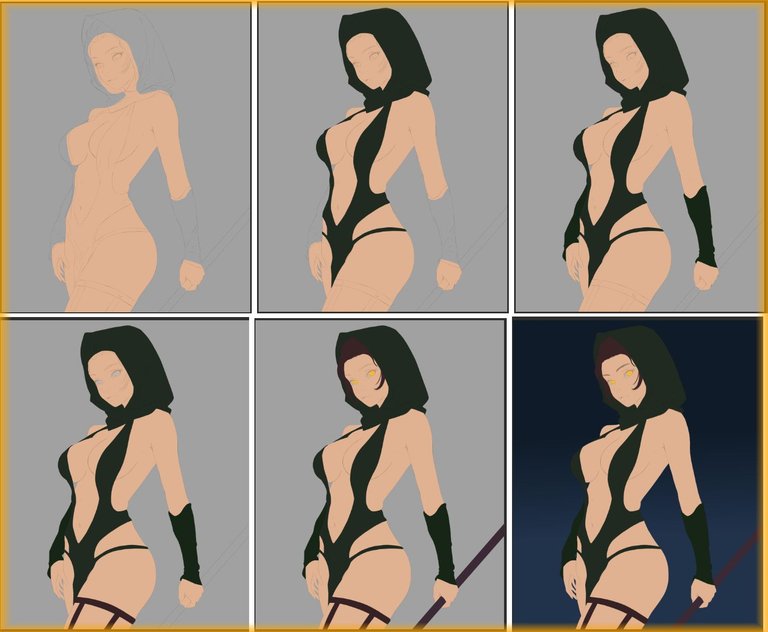
Now we'll give details, I wanted to start from the background of the illustration, we apply a light light before adding rays and light particles, followed by changing the ton of the rays and applying the lighting effect.
As a final step from the background we add a little movement or distortion effect.
Once the background is ready we will work on the most time consuming part of the whole illustration, and I'm talking about the skin.
To start in this we apply a very soft shadow with reddish tones, here we delimit where the shadows and strong lights will be.
Following this we will detail with stronger shadows and highlights, starting from the face.
In some parts of the body I apply stronger highlights with a texture brush, I think this detail is very nice to the eye.
The skin was the part that took me the most time and my favorite part because of the result I got.
Ahora daremos detalles, quise empezar desde el fondo de la ilustración, aplicamos una ligera luz antes de agregar rayos y partículas de luz, seguido de esto cambiamos el ton de los rayos y aplicamos el efecto de iluminación.
Como paso final del fondo agregamos un pequeño efecto de movimiento o distorsión.
Una vez listo el fondo trabajaremos en la parte que más tiempo me llevo de toda la ilustración, y estoy hablando de la piel.
Para empezar en esto aplicamos una sombra muy suave con tonos rojizos, aquí delimitamos donde estarán las sombras y luces fuertes.
Seguido de esto detallaremos con sombras y luces más fuerte, empezando desde el rostro.
en algunas partes del cuerpo le aplique brillos mas fuertes con un pincel de textura, creo que este detalle es muy bonito a la vista.
La parte de la piel fue la que mas tiempo me llevo y mi parte favorita por el resultado que consegui.

In clothing it is a similar process after applying the soft shadows we apply stronger and more defined shadows.
To finish with the clothes we add some noise in the layer, to give the effect of fabric.
We add details to the other parts of the drawing and now only the most important part of the illustration is left to finish.
En la ropa es un proceso similar luego de aplicar las sombras suaves aplicamos sombras mas fuertes y definidas.
Para terminar con la ropa agregamos algo de ruido en la capa, para dar el efecto de tela.
Agregamos detalles a las otras partes del dibujo y ahora solo queda la parte más importante de la ilustración para terminar.

We added the final details, among them the most important part the eyes, you can notice the great change by adding details and eyelashes in the eyes.
Also a couple of lightning bolts on all the other layers.
As a final detail we corrected a little bit the color tones so that all the layers will be more uniform.
Agregamos los detalles finales, entre ellos la parte mas importante, los ojos, se puede notar el gran cambio al agregar detalles y pestañas en los ojos.
Tambien un par de rayos sobre todas las otras capas.
Como detalle final corregimos un poco los tonos de colores para que todas las capas se integren mejor.
ref Rada quest:
https://game.radaquest.net/referer/code?id=sephiwolfxxx
Wax :
sephiwolfxxx
Hive:
sephiwolf
Tools:
- CLIP STUDIO
- Inspiroy H640 Pen Tablets
- Corel PHOTO-PAINT 2019
- www.deepl.com/translator

Congratulations @sephiwolf! You have completed the following achievement on the Hive blockchain And have been rewarded with New badge(s)
Your next target is to reach 69000 upvotes.
You can view your badges on your board and compare yourself to others in the Ranking
If you no longer want to receive notifications, reply to this comment with the word
STOPWow, amazing work @sephiwolf!
thanks you! 😊
!PIZZA
$PIZZA slices delivered:
@sephiwolf(1/5) tipped @fijimermaid
Wow! Very Nice!
https://x.com/AlienArtHive/status/1806328883672727853
Keep up the good work. 👏
Recognized by Mystic artist Gudasol
You are loved.
Interested to to help music map cXc.world spread more good vibes on Hive?.