(ESP-ENG) DIYHub August Contest: Recycling and Creating a Bee-Themed Cotillion🐝🍯👩🎨
¡Bienvenidos amigos creativos!👩🎨
🙋♀️¡Hola gente bonita y creativa! Espero que se encuentren súper bien y hayan tenido días llenos de gratos momentos. Por este lado de la pantalla todo bien gracias a Dios feliz de estar una vez más aquí, participando en el concurso mensual de la increíble comunidad de DIYHub, haciendo honor a este mes al Día Mundial de la Abeja, antes de comenzar agradezco a mí amiga @jorgelissanchez por tan generosa invitación y aprovechar de extenderla a @yraimadiaz y @valenpba. Sin más preámbulos…
Welcome creative friends!👩🎨
Hello beautiful and creative people! I hope you are feeling super well and have had days full of pleasant moments. On this side of the screen all good thank God happy to be here once again, participating in the monthly contest of the amazing DIYHub community, honoring this month's World Bee Day, before I start I thank my friend @jorgelissanchez for such a generous invitation and take the opportunity to extend it to @yraimadiaz and @valenpba. Without further ado...
¡Llegó la hora de crear! / It's time to create!👩🎨
|
|---|
¿Cuál es el proceso?/ What is the process?⬇️
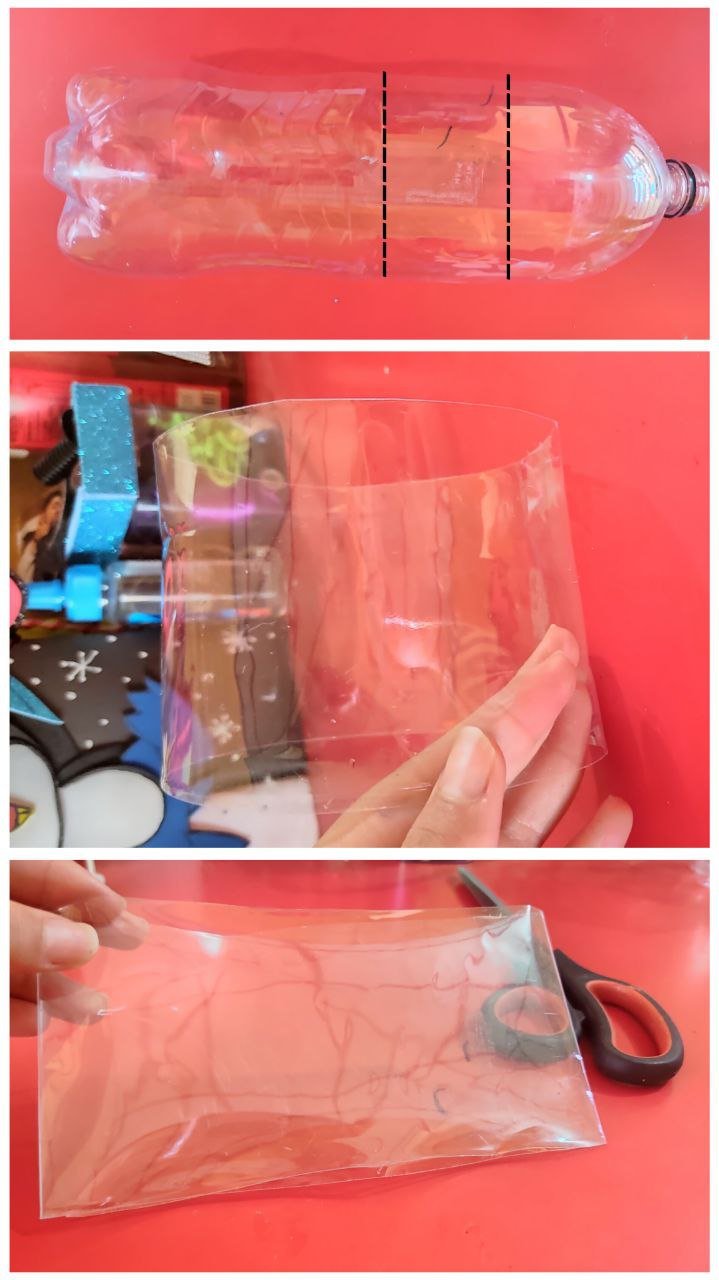
🐝 Paso 1 / Step1
En un recipiente de botella de plástico recorte un extremo de la botella, está parte irá de acuerdo a la botella con la que ustedes cuente, en mi caso fue de 1,5 litros y la parte que me serviría la señale con líneas negras en la siguiente imagen.
In a plastic bottle container cut one end of the bottle, this part will go according to the bottle you have, in my case it was 1.5 liters and the part that would be useful to me is marked with black lines in the following image.

🍯 Paso 2 / Step 2
Luego de recortar el extremo que necesitaba lo que hice fue aplanar cada extremo del plástico para ello me apoye con una Tijera para que el dobles fuera mucho más fácil.
After trimming the end I needed, I flattened each end of the plastic and used a scissors to make the folding much easier.
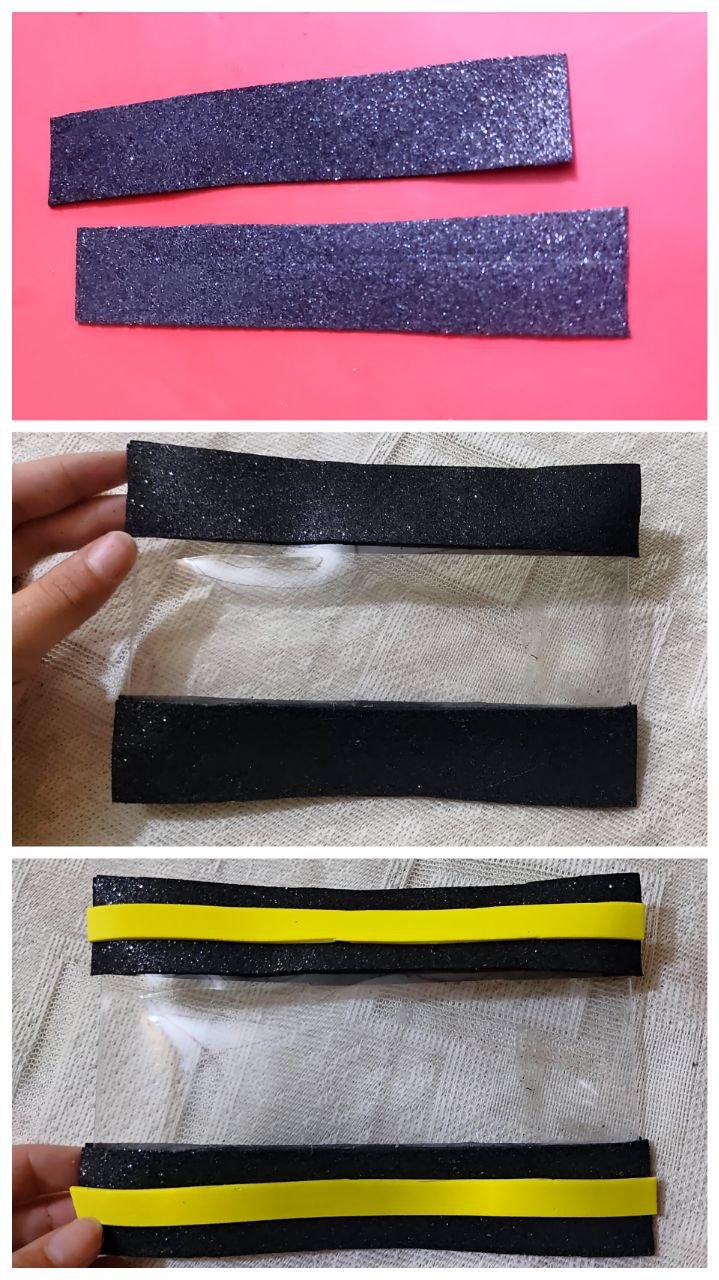
🐝 Paso 3 / Step 3
En foami escarchado color negro recorte cuatro tiras de 16cm de largo x 3xm de ancho, estás para pegar en el borde del plástico tanto arriba como abajo y en ambas caras del mismo.
In black frosted foami cut four 16cm long x 3xm wide strips to stick on the edge of the plastic both on the top and bottom and on both sides of the plastic.
🍯 Paso 4 / Step 4
Luego con foami liso color amarillo recorte una tira con un ancho de 1cm siendo el mismo largo que el negro y pegue en el centro de cada tira negra.
Then cut out a strip with a width of 1cm being the same length as the black and glue it in the center of each black strip.
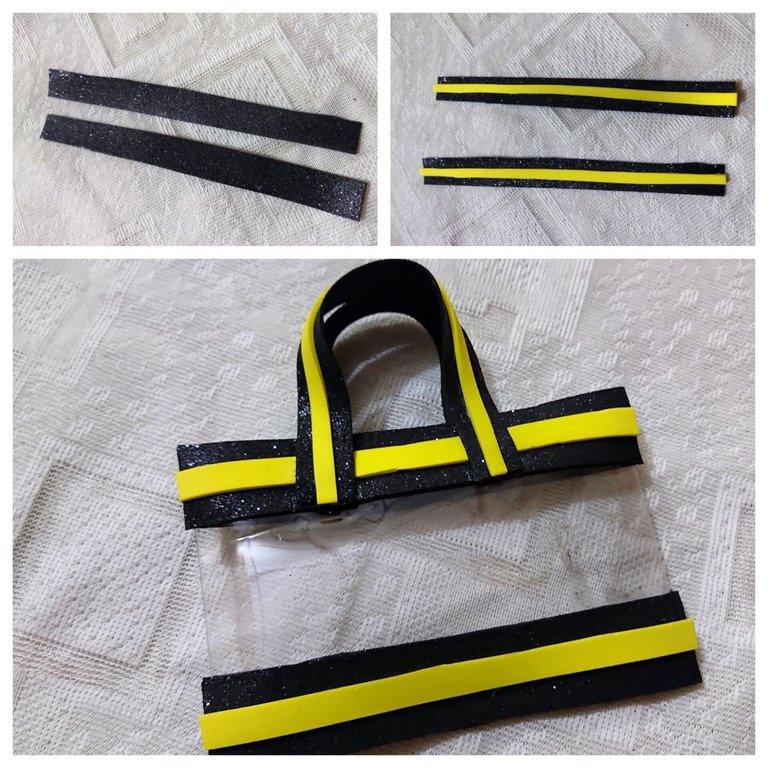
🐝 Paso 5 / Step 5
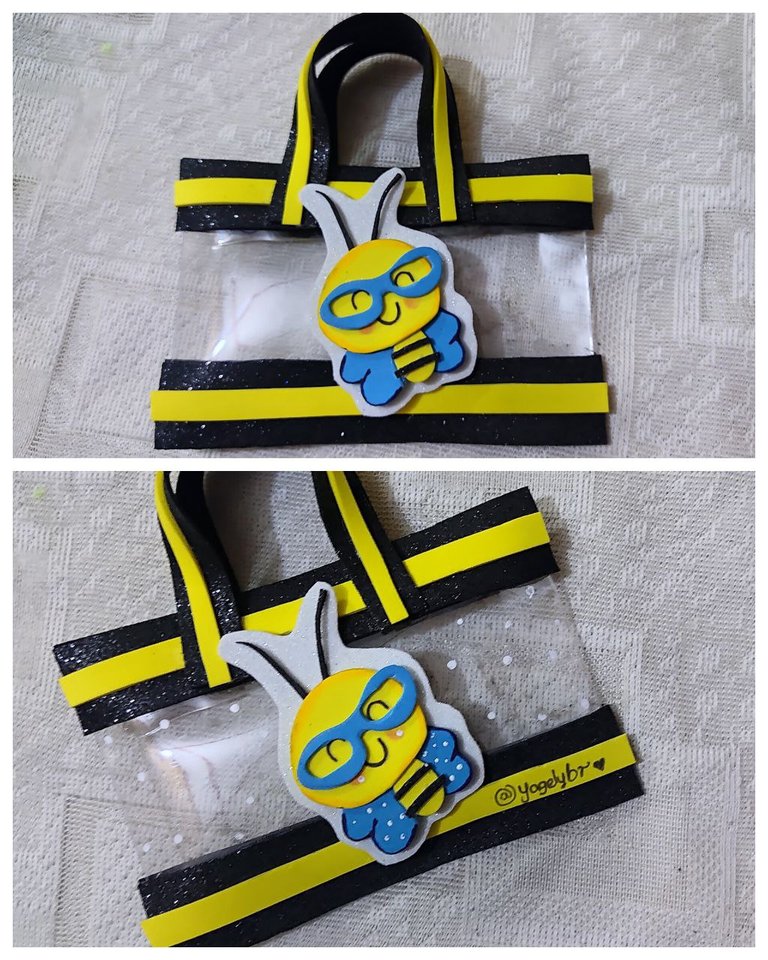
Para el agarradero realice el mismo decorado anterior, en este caso las tiras negras miden 20cm de largo con un ancho de 2cm y en cuanto a la amarilla lo mismo de largo, con un ancho de 0,50cm. Realice dos tiras una en casa cara del cotillón para ello forme una U y pegue cada extremo.
For the handle make the same decoration as above, in this case the black strips are 20cm long with a width of 2cm and the yellow strip is the same length, with a width of 0.50cm. Make two strips, one on each side of the cotillion, form a U shape and glue each end.
🍯 Paso 6 / Step 6
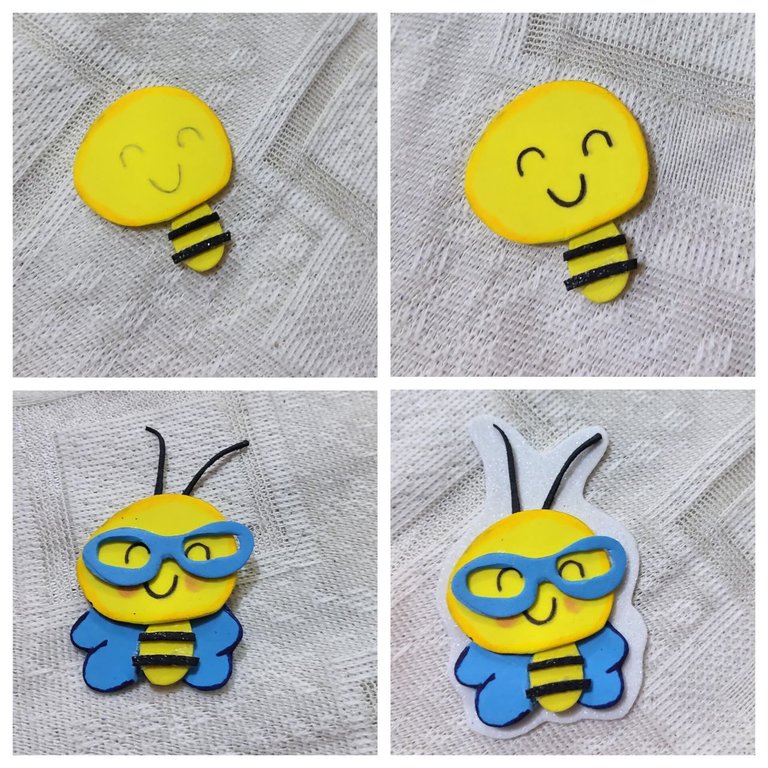
Como la decoración es la abeja, procedí a realizar en foami una pequeña abejita usando foami amarillo, negro y azul también quise decorarla usando unos lentes o gafas porque me pareció muy cuchi.
As the decoration is the bee, I proceeded to make in foami a little bee using yellow, black and blue foami and I also wanted to decorate it using glasses because I thought it was very cute.
🐝 Paso 7 / Step 7
Realice con marcador un borde en la cara y con color rojo un sombreado en las mejillas. Lista la abeja la pegue sobre un foami color blanco y así resaltar un poco más dejando un pequeño borde al momento que lo recorte.
Make with marker a border on the face and with red color a shading on the cheeks. Ready the bee glue it on a white foami and thus highlight a little more leaving a small border at the time of cutting it out.
🍯 Paso 8 / Step 8
Lo siguiente que hice fue pegar la abeja antes realizada en el centro y algo en diagonal del cotillón, por último para decorar el espacio realice pequeños puntos en pintura al frío color blanco.
The next thing I did was to glue the bee in the center and some diagonally of the cotillion, finally to decorate the space I made small dots in cold white paint.
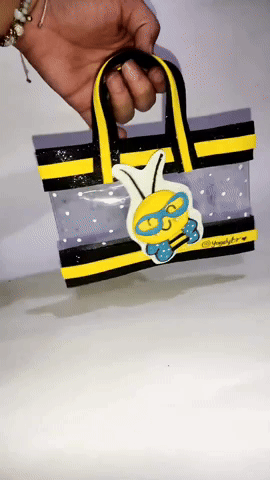
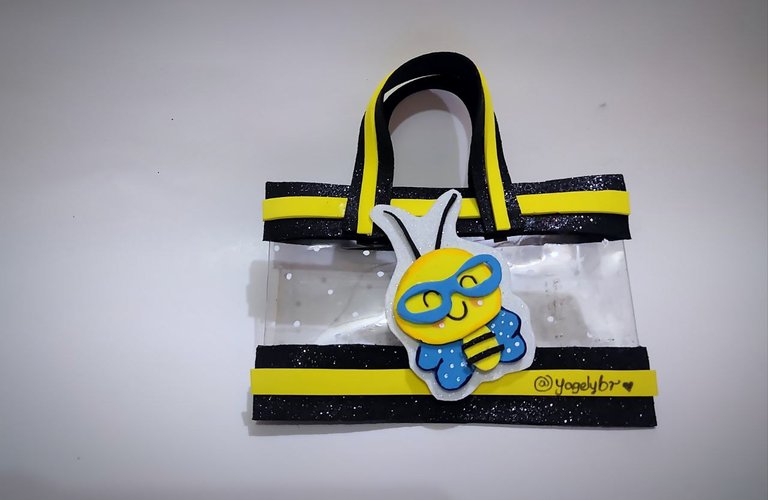
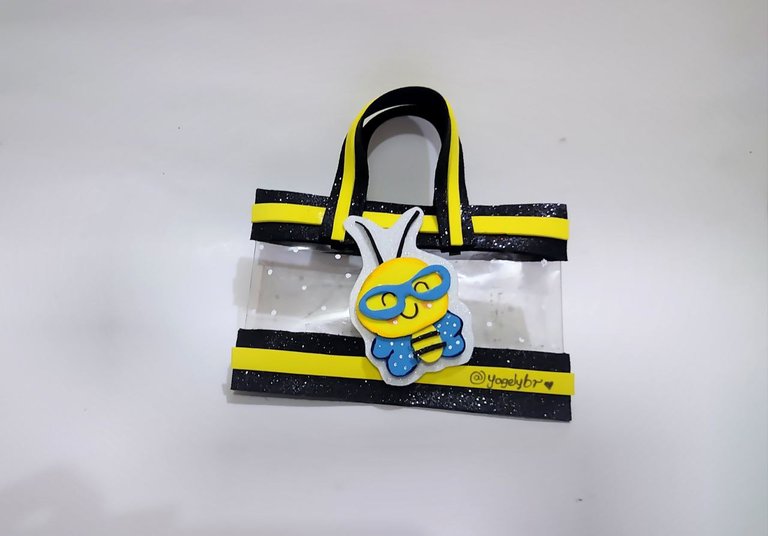
Creación finalizada / Creation completed⬇️
¡Y de esta forma obtuve un hermoso cotillón a base de un material reciclado!🐝🍯.
And in this way I obtained a beautiful cotillion based on a recycled material!🐝🍯.
The process was very easy and the best part was that the material was cheap to get, personally I liked it a lot being a different way to give cotillions, besides it can be used as a bag for the little ones in the house. It's just a matter of letting your imagination fly and customize it with the theme you want✨.
See you in a new creation👩🎨


Mil gracias por leerme una vez
Nos vemos en una próxima publicación.
Muchas bendiciones y abrazos digitales🤗
Thank you very much for reading me once
See you in an upcoming post.
Many blessings and digital hugs🤗
👩🏼💻 Edición: Inshot y Canva / Edition: Inshot and Canva
✨ Traducción: DeepL.com / Translation: DeepL.com

0
0
0.000
Thank you for your support!
🤗
Hermosuraaaa 🥰 Te quedó muy cucho ese cotillón ami 😍
Muchas gracias ami bella❤️✨
So beautiful and unique. Your interpretation of the Bee contest is amazing, good job!
Thank you very much, I'm glad you like it. I really appreciate the comment.
🤗
Wow, what a nice creative work, I love it, you did great to participate in the contest, good luck dear.
Thank you very much, I really appreciate that you liked my work in this contest.
Your comment is very important to me thanks for stopping by!
Regards ❤️❤️
This is absolutely beautiful and amazing
Thank you
🤗🤗🤗
Quedo espectacular amiga, felicidades!
Muchas gracias linda❤️
Te quedó muy bonito, y no sabía de este concurso gracias por compartir!!
Gracias Aliz❤️
Hola amiga te quedó muy hermoso ese cotillón, gracias por tu invitación ya estoy preparando mis materiales para participar
Hola amiga muchas gracias, seguro crearás algo increíble🤗❤️
Te quedó muy bonito Yage! Me gusta la idea con la botella plástica y te quedó súper tierna la abejita para decorar ami 💕
Gracias mi valen❤️
A lovely craft my dear friend, your creativity is really outstanding and extraordinary beautiful ❤️😍. I love it and honestly speaking I would love to have one just like that, have a nice day and nice job.
I'm so glad you liked my work, I really appreciate it. Thanks for stopping by.
Regards
🤗❤️
I so much love this bag, it's so gorgeous 🥰
Thanks for stopping by, glad you liked it.
❤️🤗
Precioso te quedó! Me encantó 😍
Gracias eve hermosa❤️
Hola @yagelybr, q
Hola @yagelybr, quelindo cotillón, la idea de usar la botella me gustó, le da resistencia y durabilidad a la bolsa, es el obsequio perfecto para los niños en los cumpleaños estarán felices de recibir su linda bolsa con dulces de miel; una gran idea para reciclar y darle un nuevo uso a la botella. Éxito en el concurso! 🤗❤️🐝🐝
Saludos!
Hola @belkyscabrera, por alguna razón no había pensado eso, pero tienes razón está bolsa tendrá mucha durabilidad por el plástico usado. Me alegro mucho que te guste, gracias por pasar y comentar❤️🤗