Creando hermoso atrapasueños
Muy lindo día a todos los amigos creativos, espero que se encuentren genial y hayan pasado un adorable fin de semana. Por mi parte todo bien, agradeciendo a Dios cada día de vida y que mi familia esté bien.
Very nice day to all creative friends, I hope you are doing great and have had a lovely weekend. For my part, everything is good, thanking God for each day of life and that my family is well.
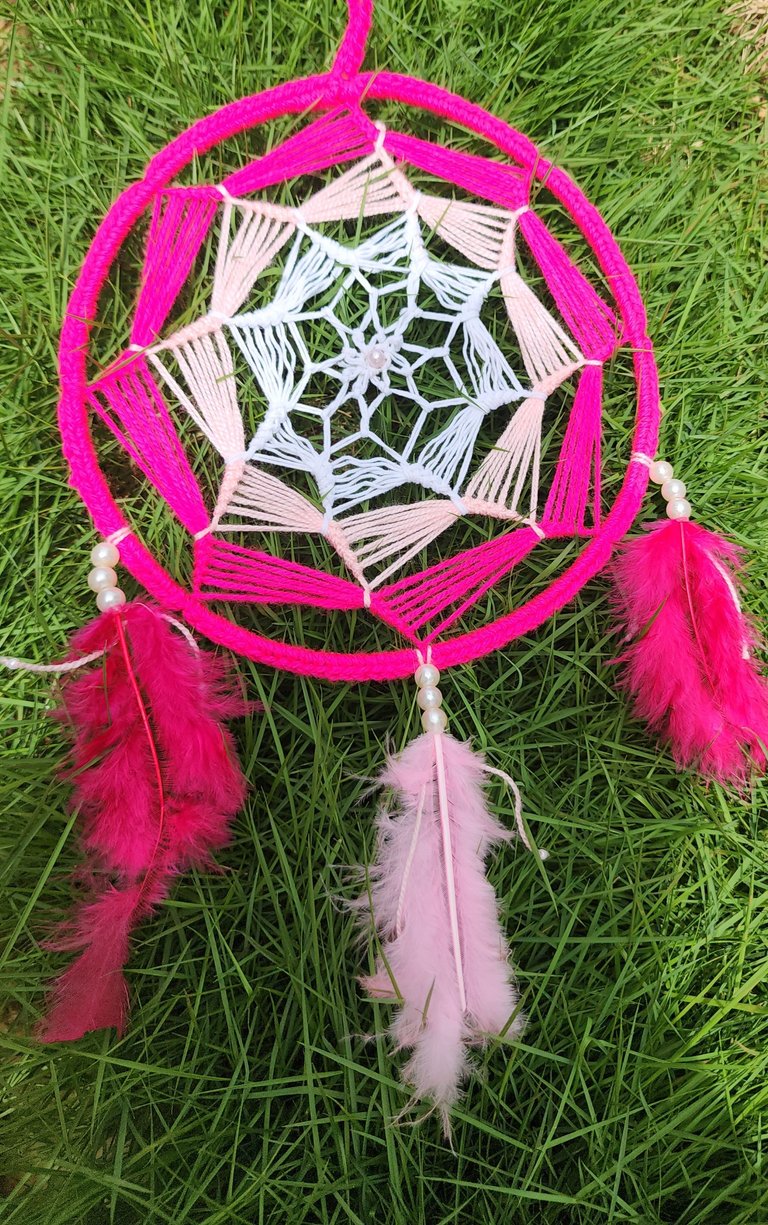
Me encantan los atrapasueños, no solo por la magia que tienen, sino también por lo ideal y hermosos que son para adornar cualquier lugar. Siempre me gusta hacerlos con colores vivos o llamativos, siento que así tiene que mirarlo quien pase jajajá.
Hoy quiero compartir con ustedes como realicé este bello atrapasueños con unos de mis colores favoritos. Así que sin más preámbulos les enseño el paso a paso.
I love dreamcatchers, not only for the magic they possess, but also for how ideal and beautiful they are to decorate any space. I always like to make them with bright or eye-catching colors, I feel that is how anyone passing by should see it hahaha.
Today I want to share with you how I made this beautiful dreamcatcher using one of my favorite colors. So without further ado, I show you the step by step.
✨️Empecemos✨️
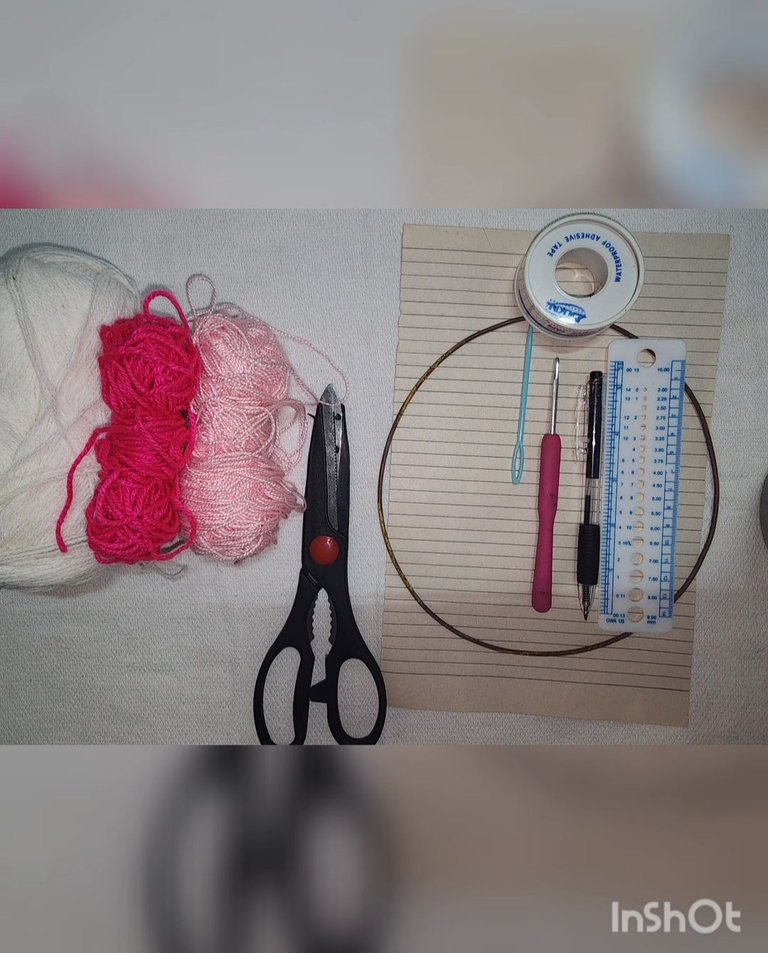
Materiales que utilicé
- Aro redondo
-Teipe
-Regla
-Lapicero
-Una hoja de papel
-Agujeta
-Aguja lanera
-Tijera
-Lana de tres tonos de color
-Plumas
-Perlas
✨️Let's start✨️
Materials I used:
- Round hoop
- Tape
- Ruler
- Pencil
- Lace
- Darning needle
- Scissors
- Yarn in three different colors
- Feathers
- Beads
Paso a paso/ Step by step:
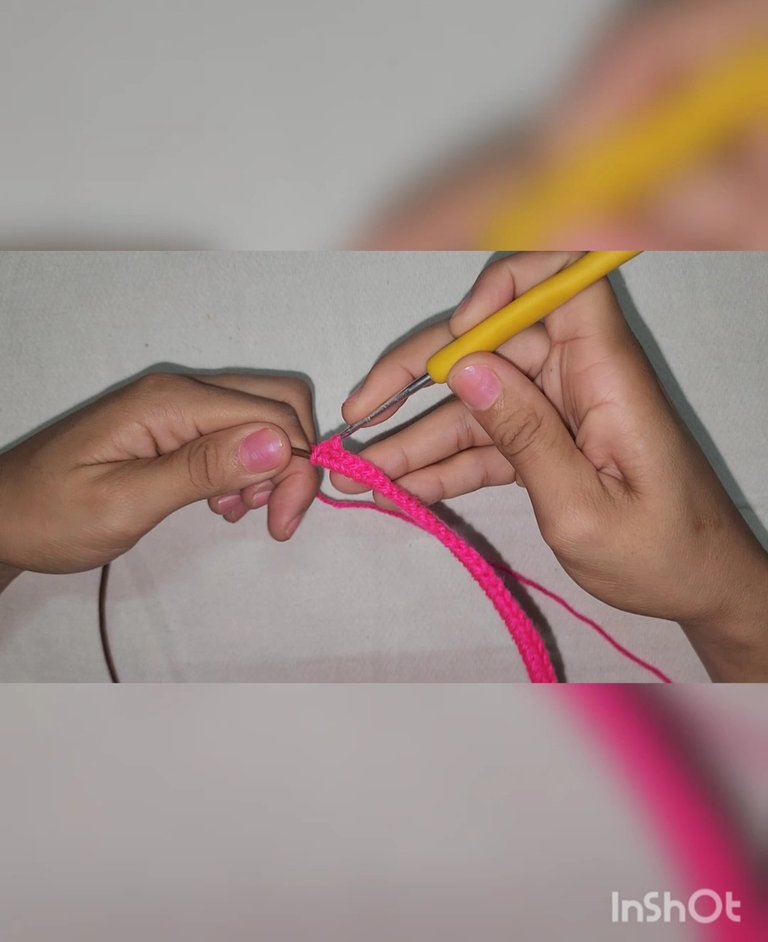
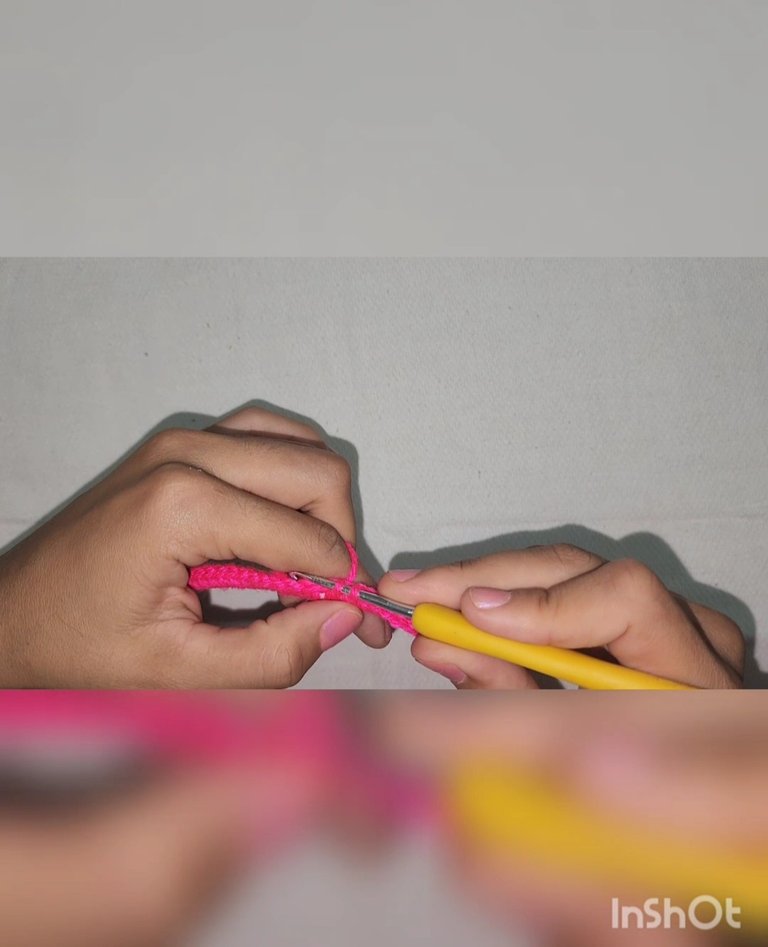
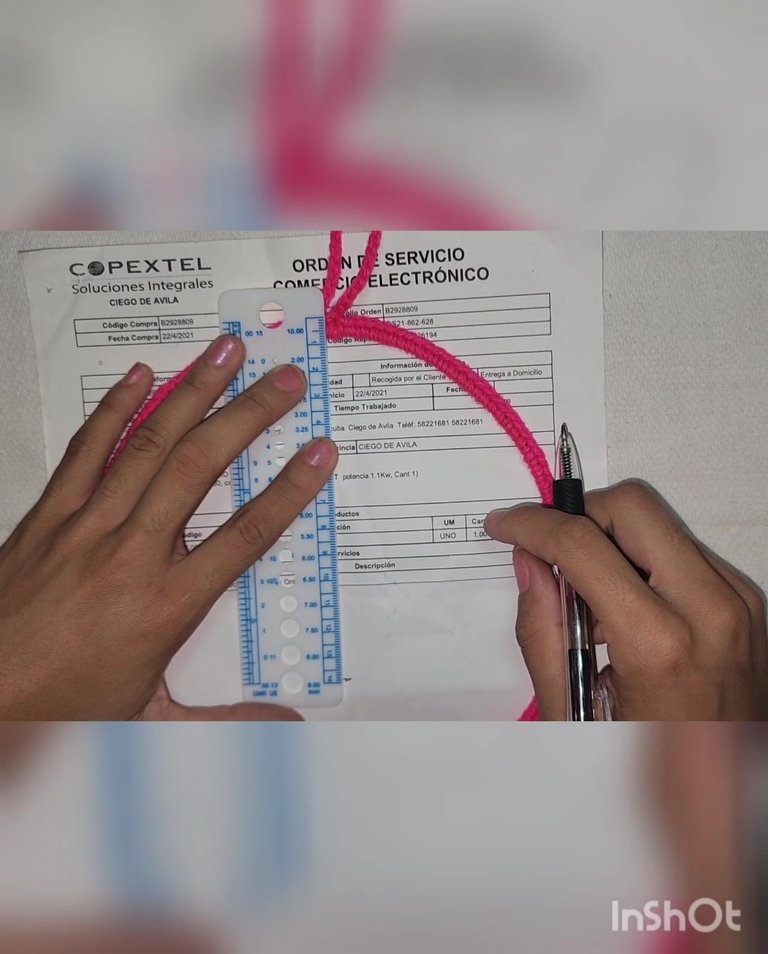
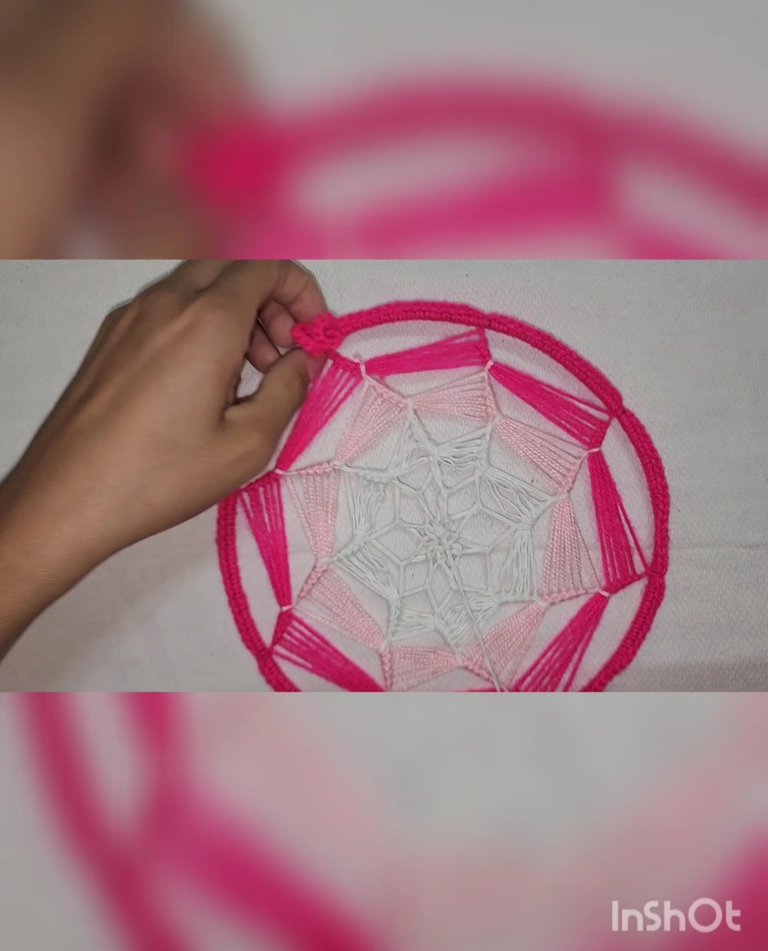
1- Primeramente seré la abertura del aro con teipe.
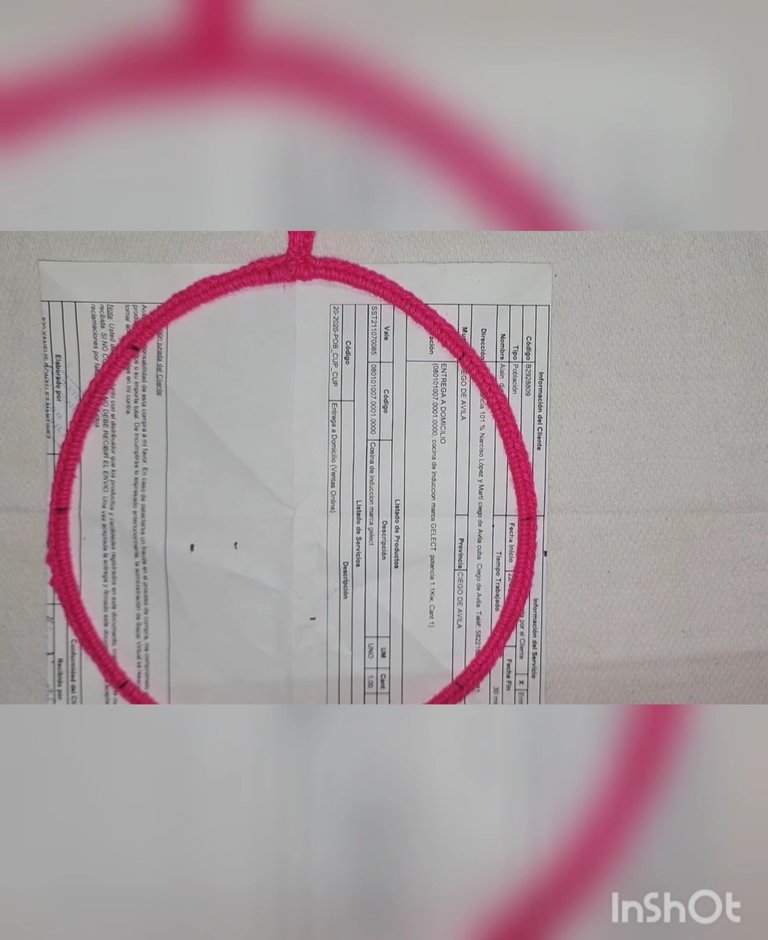
2- Adorné todo el aro con punto bajo con lana de color rosa fuerte
1- First, I will cover the hoop opening with tape.
2- I decorated the entire hoop with single crochet using bright pink yarn.
3- Medí la longitud del Aro.
4- Corte el papel en un cuadrado con esa longitud.
3- I measured the length of the hoop.
4- I cut paper into a square with that length.
5- Doble el papel a la mitad, lo volví a doblar a la mitad y lo volví a doblar por tercera vez como triángulo.
5- I folded the paper in half, then folded it in half again, and folded it a third time into a triangle.

6- Abrí el papel y marqué los 8 lados con las marcas de las dobladuras, para que quedaran extremadamente parejas.
6- I unfolded the paper and marked 8 sides with the crease marks, to make them extremely even.
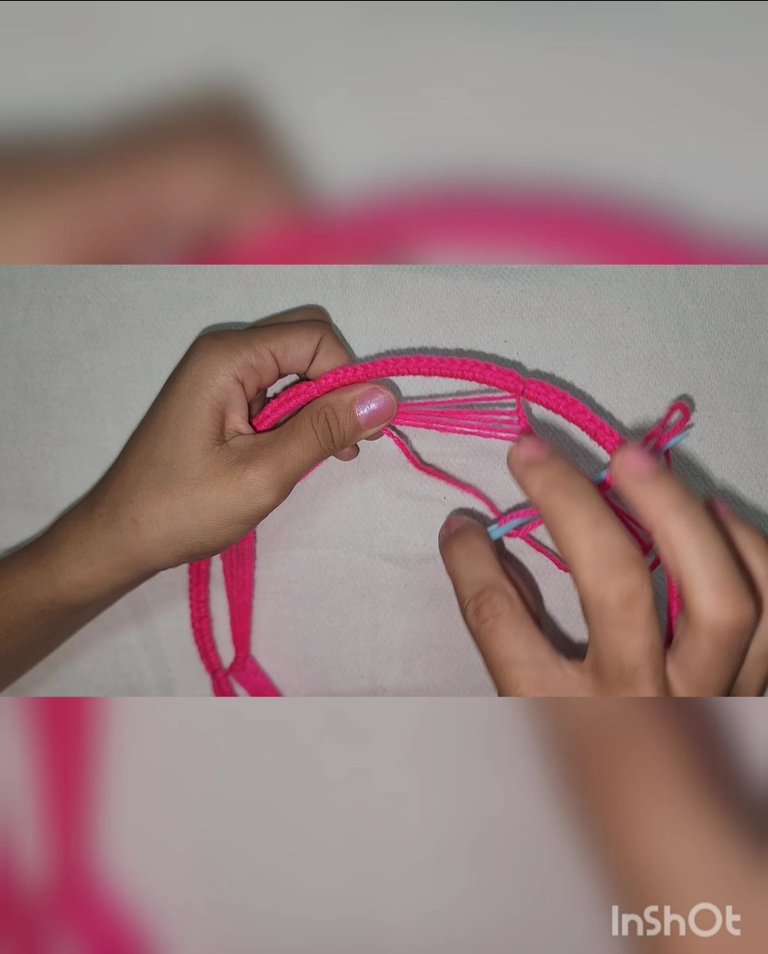
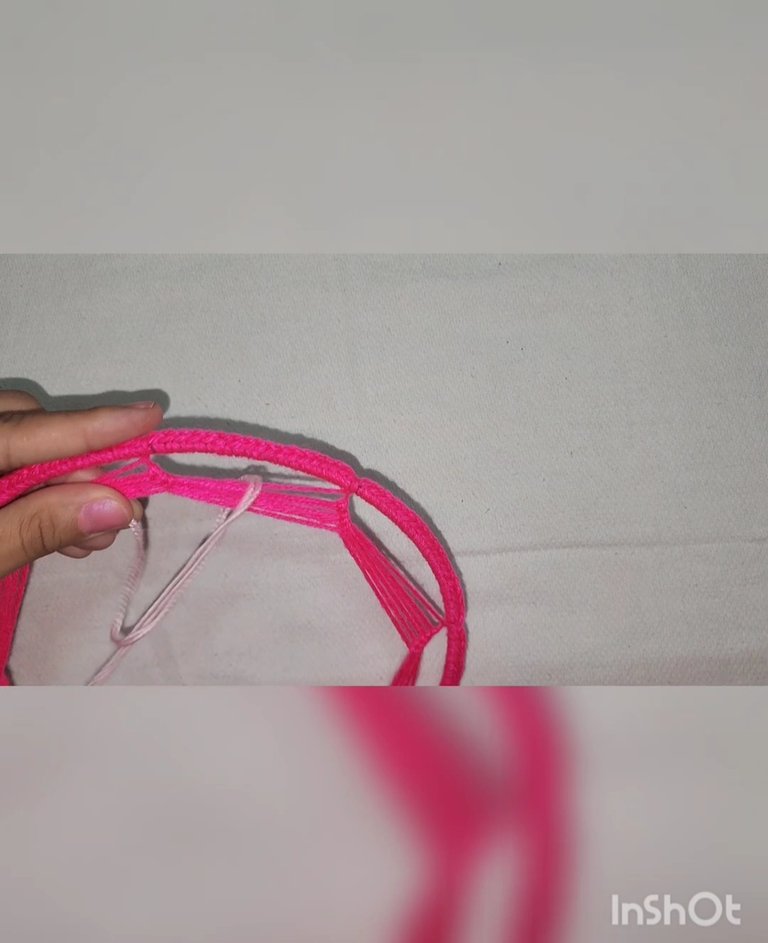
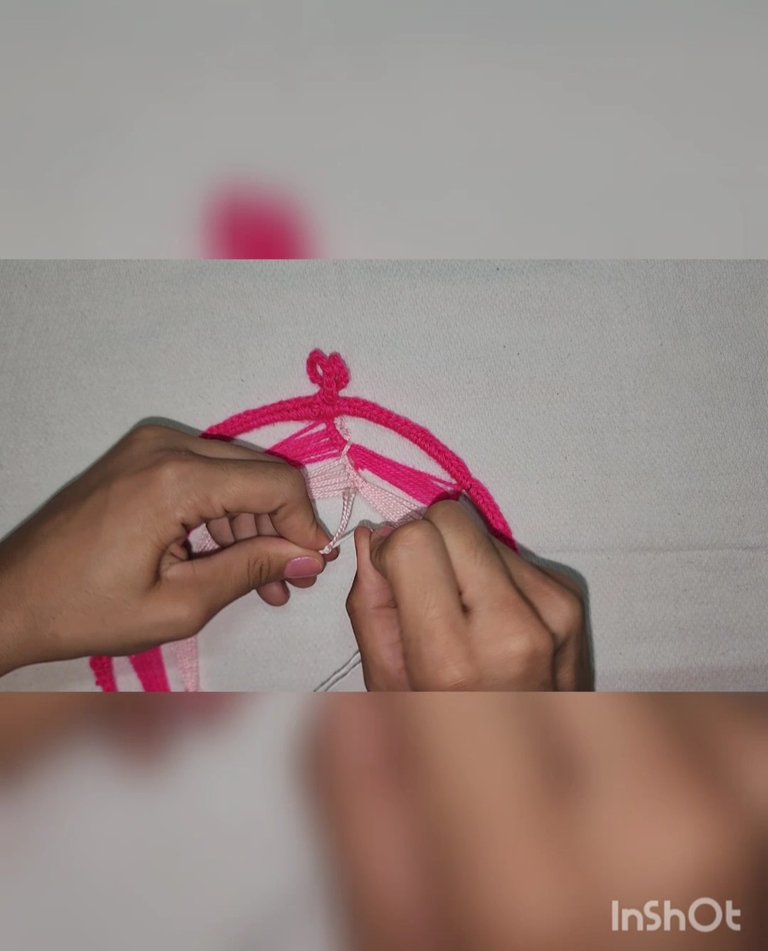
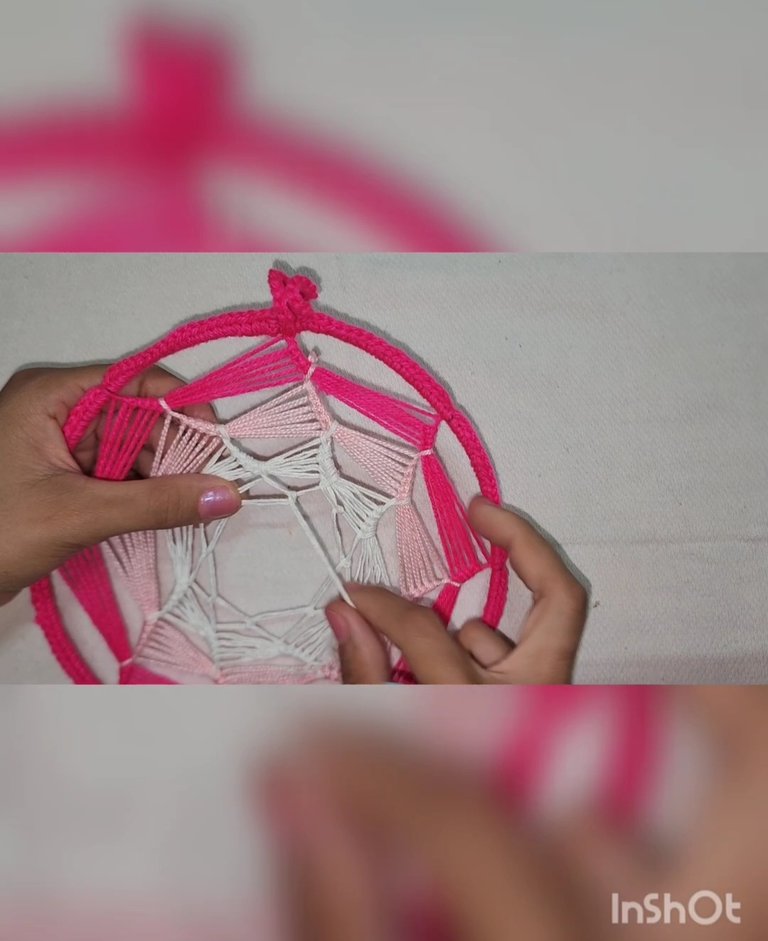
7- Tomé la aguja lanera y en cada marca pasé la lana rosa fuerte de afuera hacia adentro hasta llegar al final de la vuelta.
7- I took the darning needle and passed the bright pink yarn from the outside to the inside at each mark until reaching the end of the round.
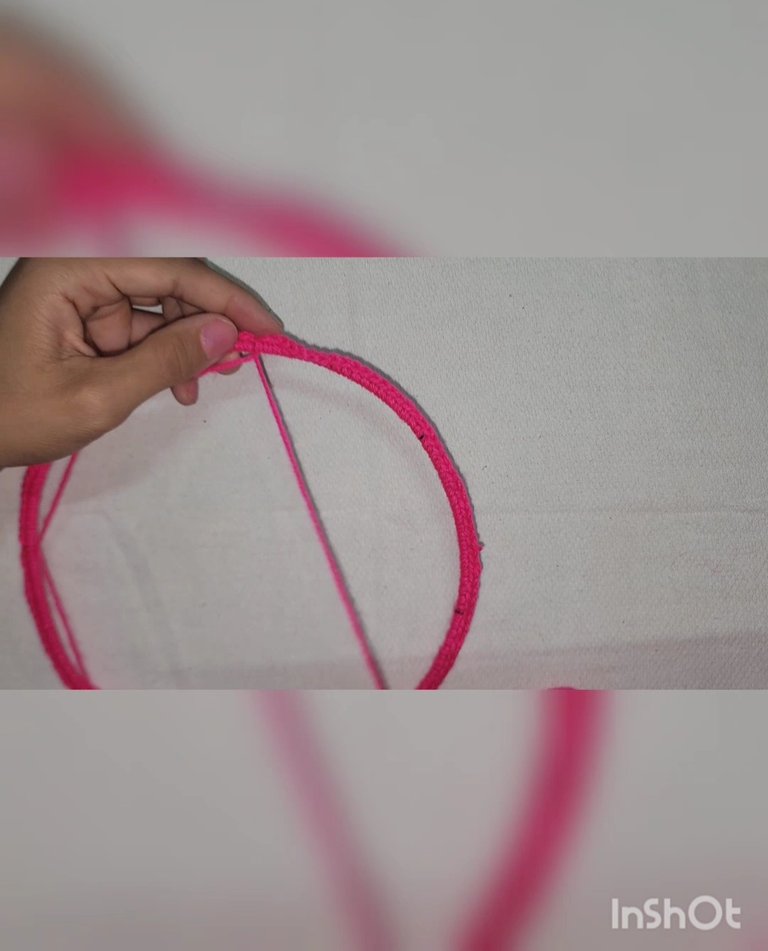
8- Pasé la aguja lanera esta vez por el hilo que ya estaba pasado, de afuera hacia adentro, pasando por delante del otro hilo que cruza hasta el final de la vuelta.
8- I passed the darning needle through the yarn previously passed from outside to inside, passing in front of the other yarn crossing to the end of the round.

9- Repetimos esto por 6 veces.
9- I repeated this process 6 times.
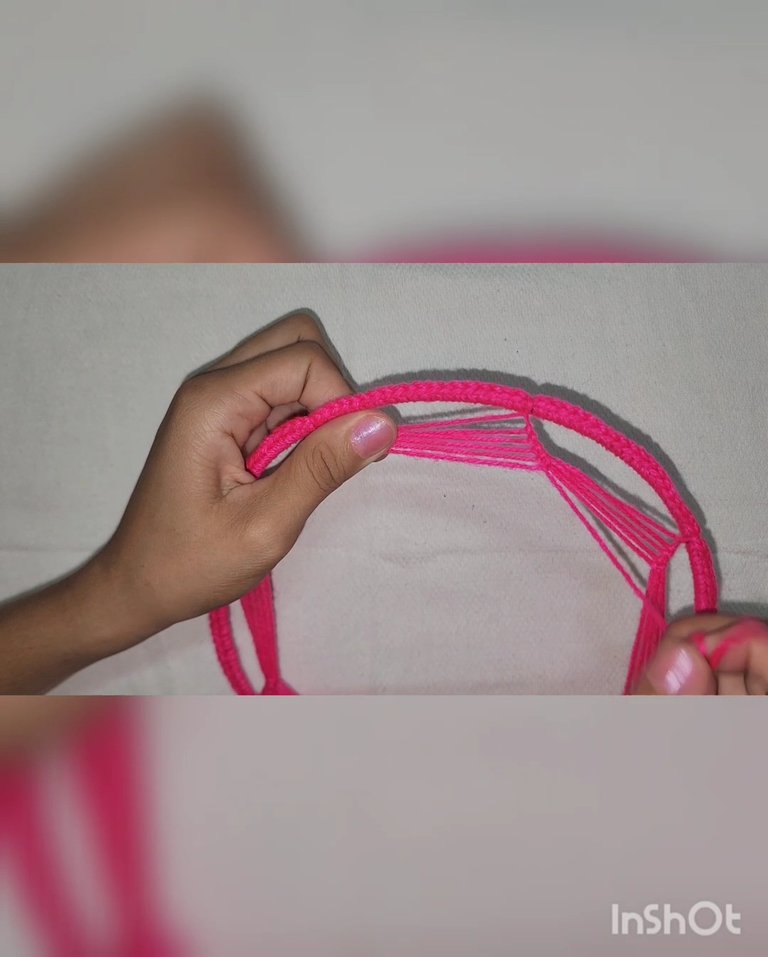
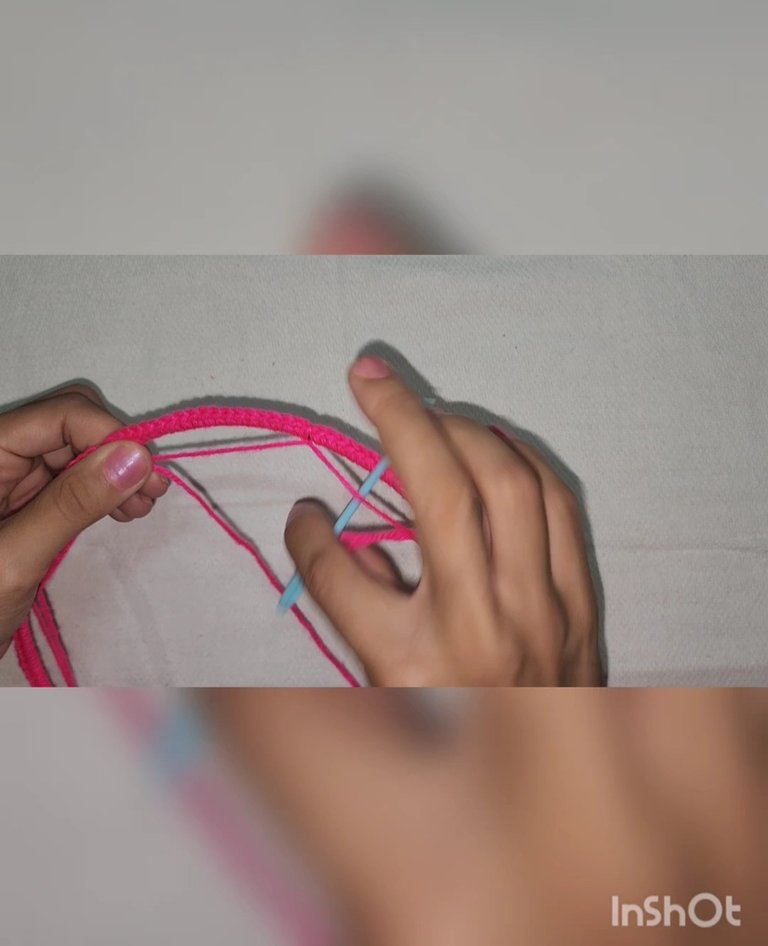
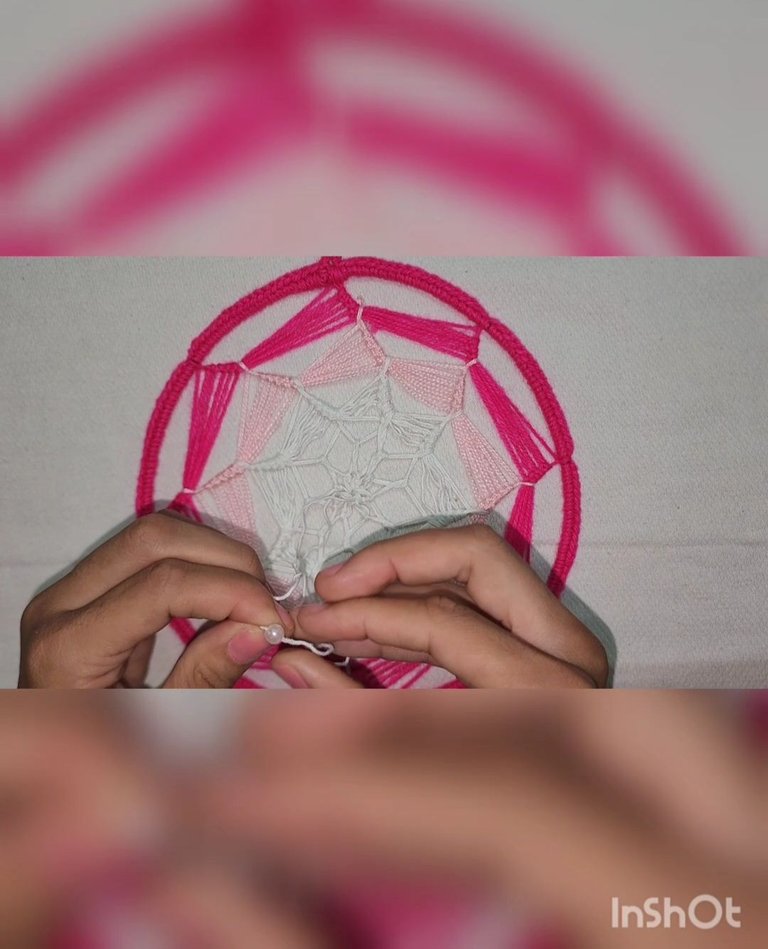
10- Cuando estuve en el penúltimo espacio de la vuelta 6, medí hasta donde necesitaba el rosa fuerte y ahí uní el rosa claro con un nudito al rosa fuerte.
10- When I reached the penultimate space of round 6, I measured where I needed the bright pink yarn to end, and then joined the light pink yarn with a knot to the bright pink yarn.
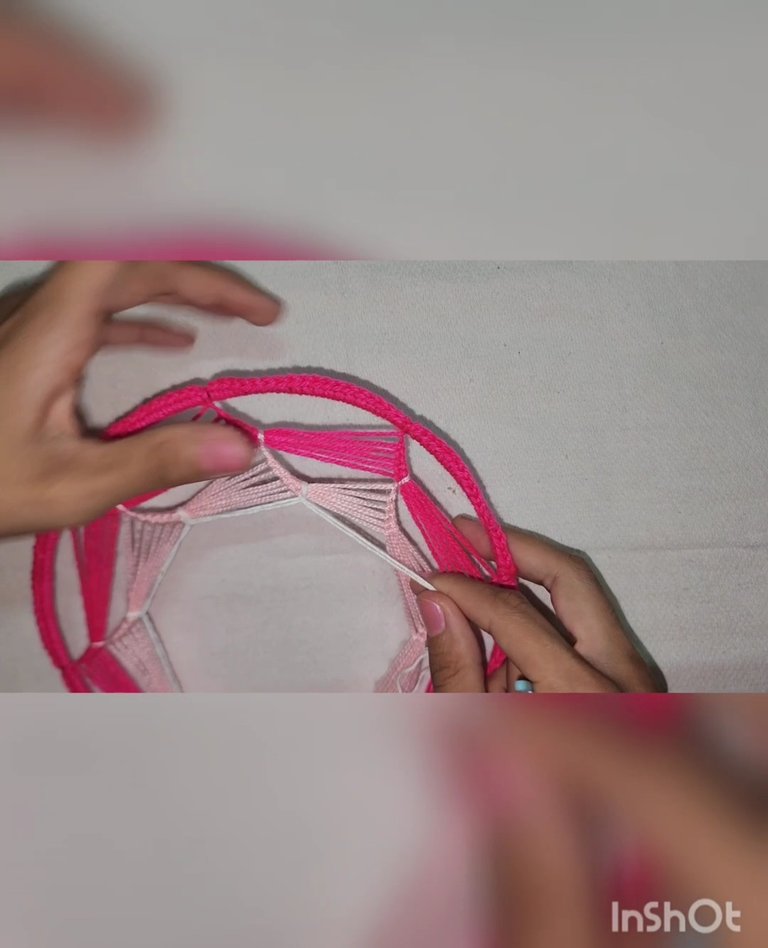
11- Y continué haciendo lo mismo pero con rosa claro, solo la primera vuelta del rosa claro.
11- I continued the same process but with light pink yarn, only for the first round of light pink yarn.

12- La segunda vuelta del rosa claro continué haciéndola igual, pero esta vez solo cogí por ese hilo del rosa claro y así hice las otras 4 vueltas. Quedando en total 6 vueltas de rosa claro también.
12- I continued the second round of light pink yarn the same way, but this time only picking up the light pink yarn, and continued in this manner for the remaining 4 rounds. A total of 6 rounds of light pink yarn.
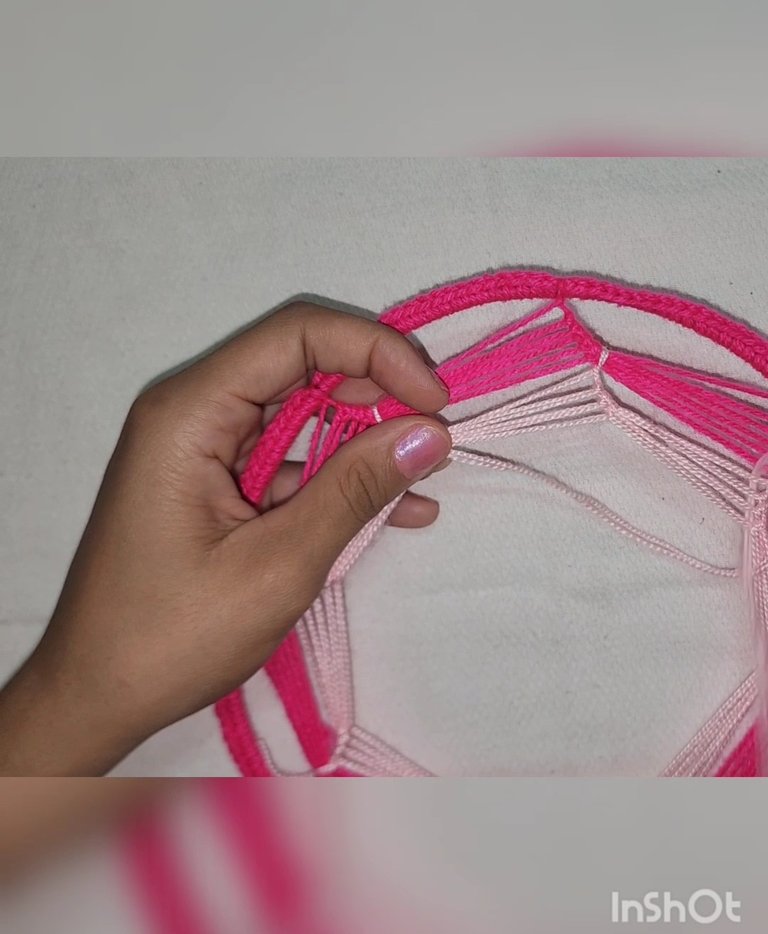
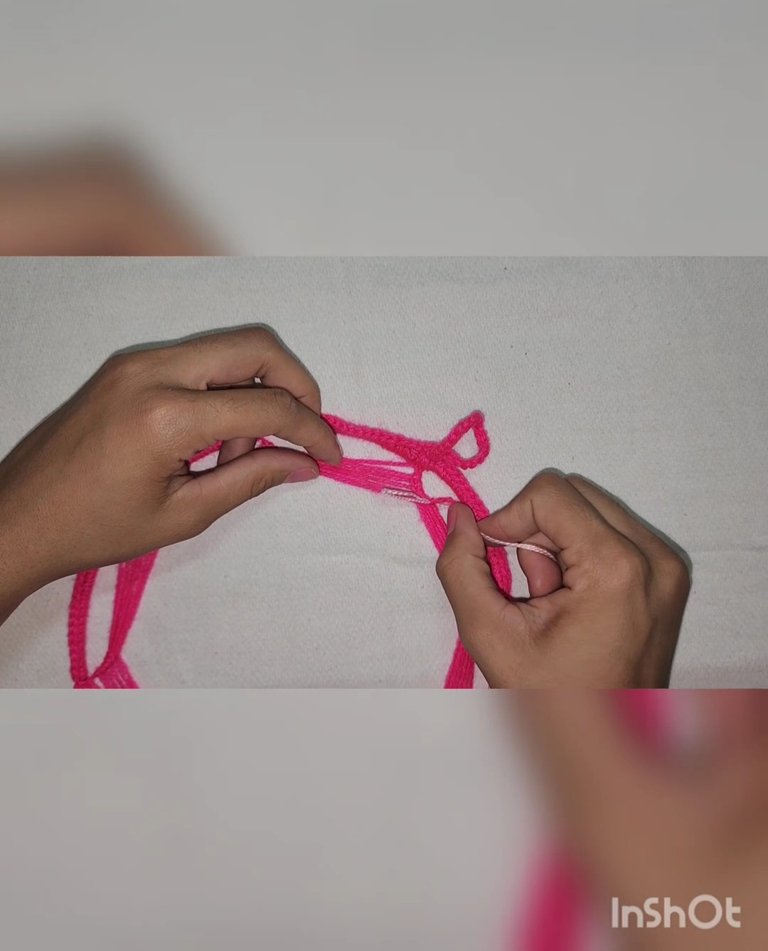
13- En el penúltimo espacio de la vuelta 6 del color rosa claro, repetí lo mismo que había hecho antes, medí la lana rosa claro que necesité, y uní esta vez la lana blanca con un nudito a la lana rosa claro.
13- In the penultimate space of round 6 of light pink yarn, I repeated what I had done before, measuring the light pink yarn needed, and joined this time the white yarn with a knot to the light pink yarn.
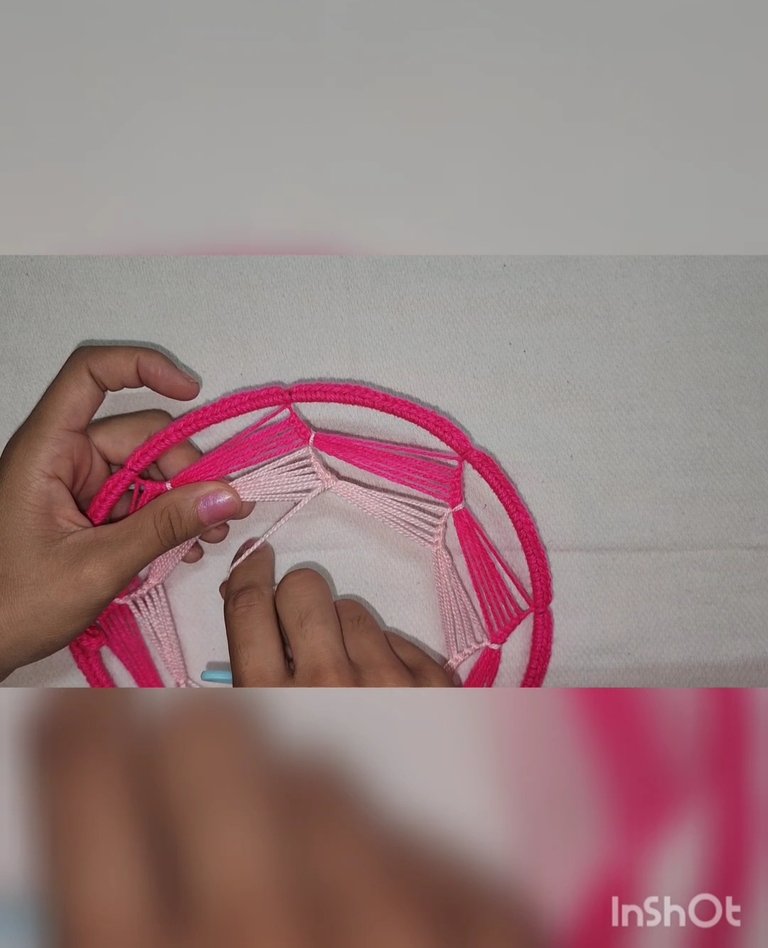
14- En la primera vuelta de la lana blanca lo hice igual a la anterior, solo cambió el color de la lana.
14- In the first round of white yarn I did the same as before, only changing the color of yarn.
15- En la segunda vuelta de la lana blanca cogí continué igual lo que esta vez cogiendo solo por la hebra de lana blanca y así continué hasta la vuelta 6.
15- In the second round of white yarn, I continued in the same manner, but this time only picking up the white yarn, and continued in this way until round 6.
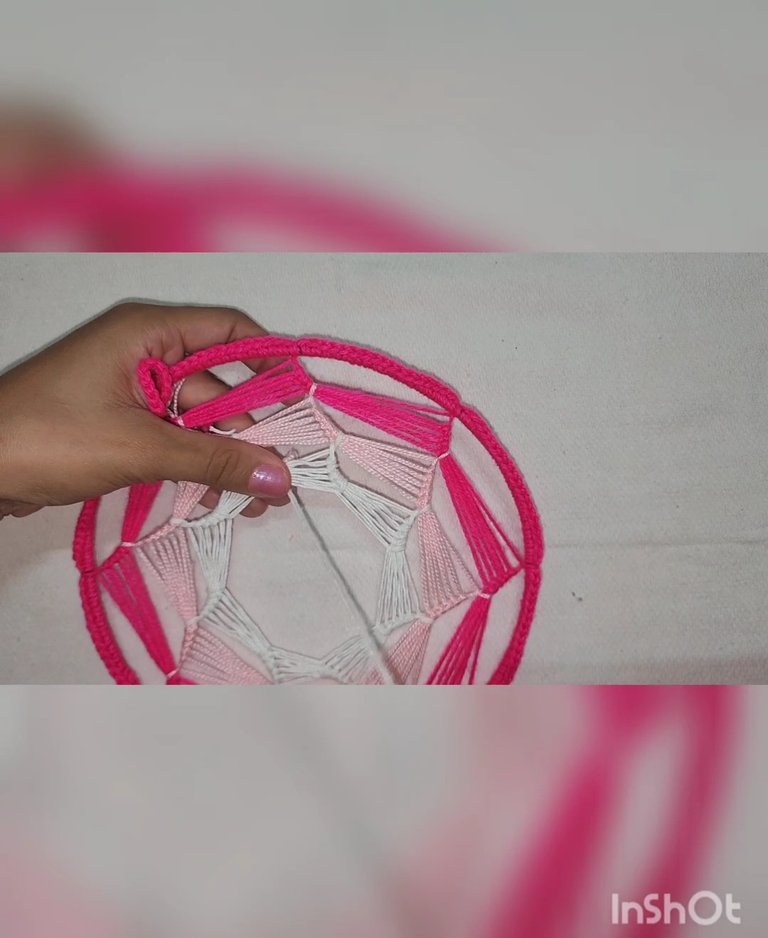
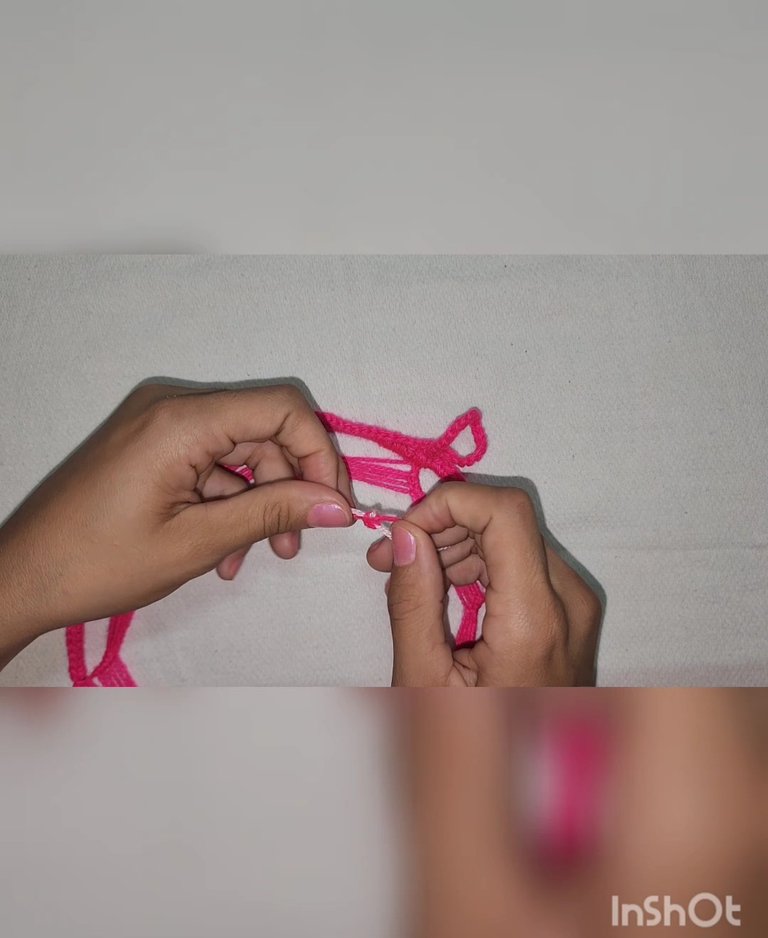
16- Cuando llegué a la vuelta 6 continué esta vez cogiendo por la última hebra blanca y deslizando el hilo hasta la parte media de cada espacio, esto lo hice por dos vueltas.
16- When I reached round 6, I continued this time picking up the last white strand and sliding the thread to the middle part of each space, I did this for two rounds.
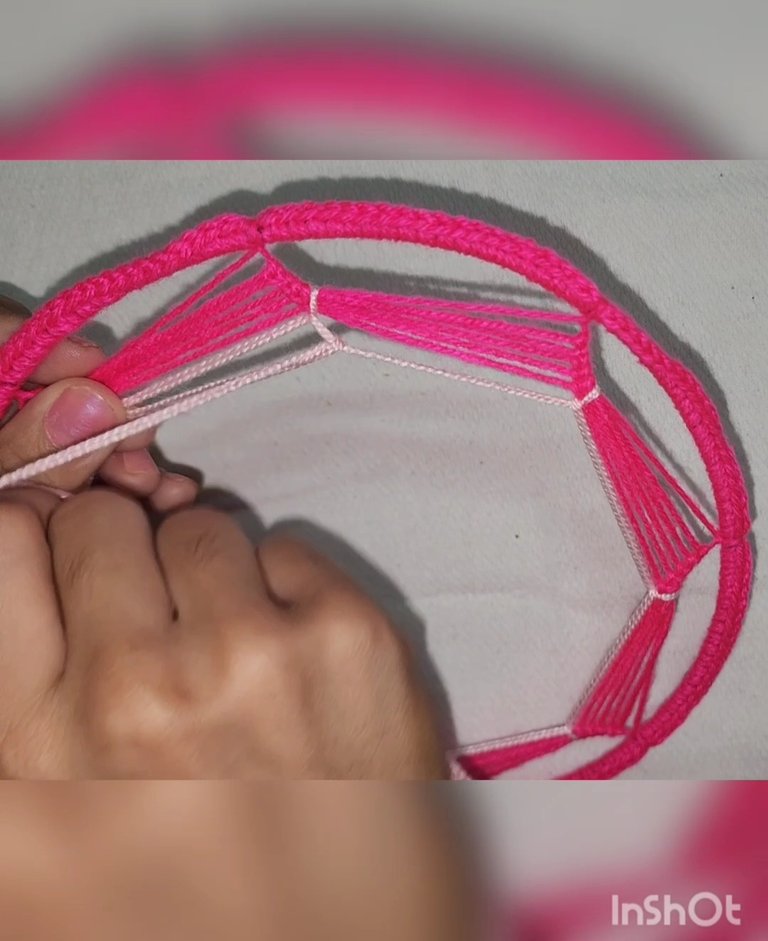
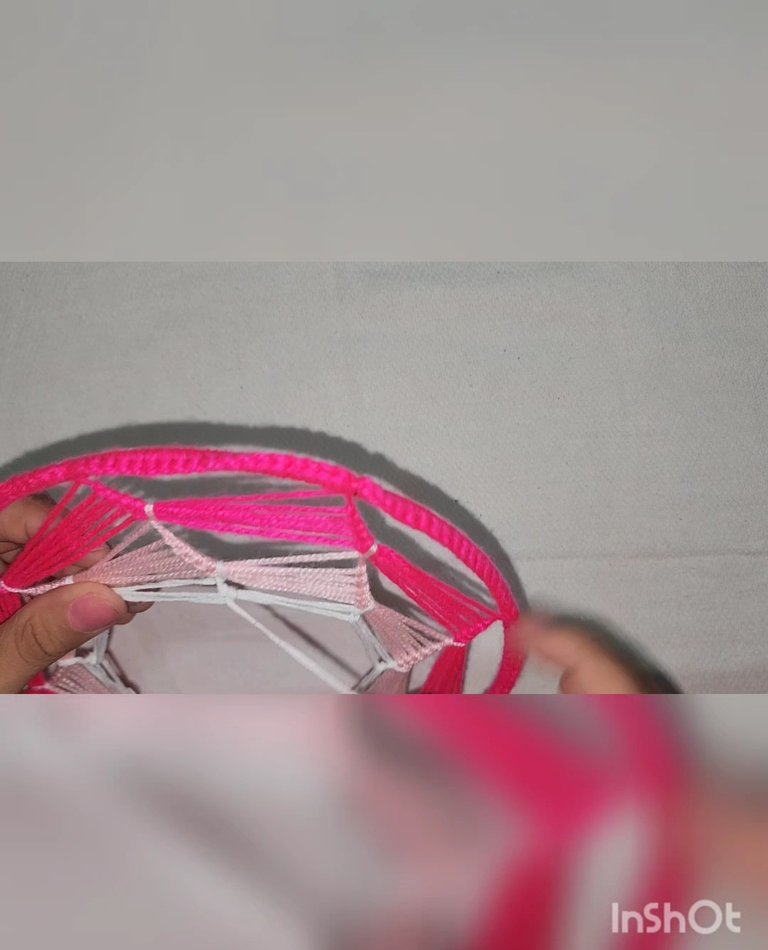
17- En la tercera vuelta continué cogiendo por la parte media, pero esta vez la aguja comienza el recorrido dentro y termina fuera, esto hasta el final de la vuelta.
17- In the third round, I continued picking up from the middle part, but this time the needle starts the journey inside and ends outside, this until the end of the round.
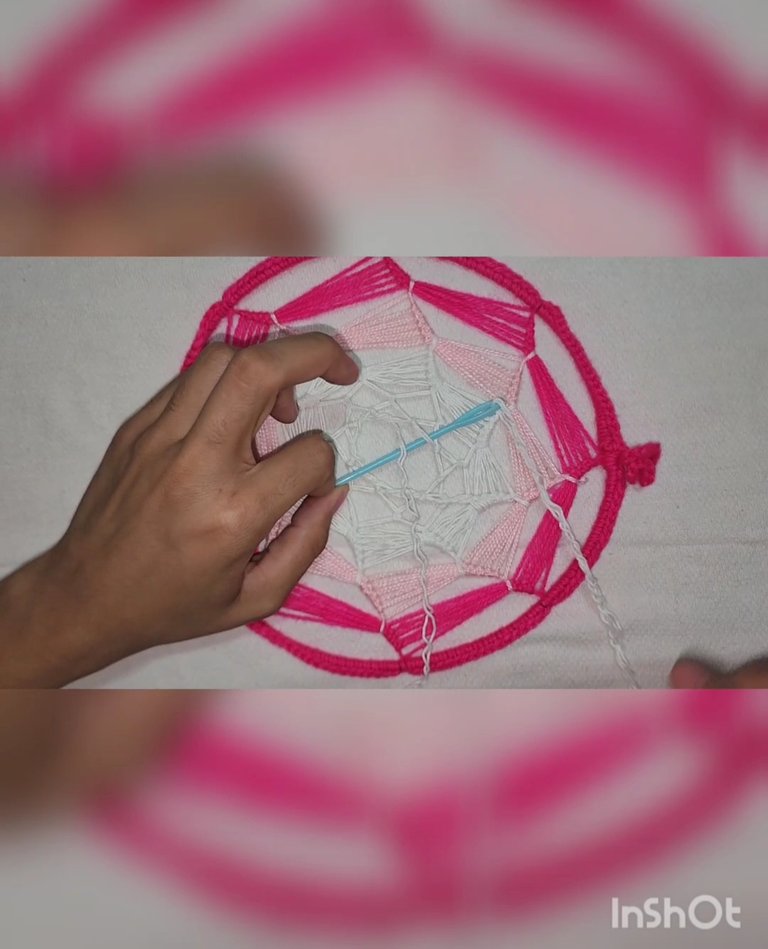
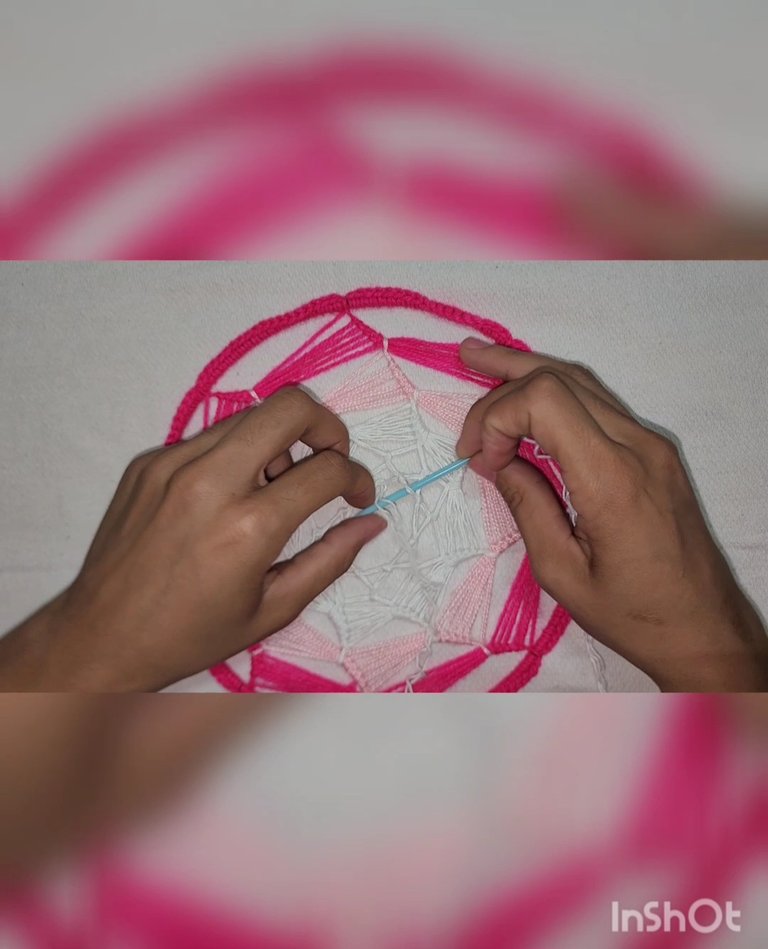
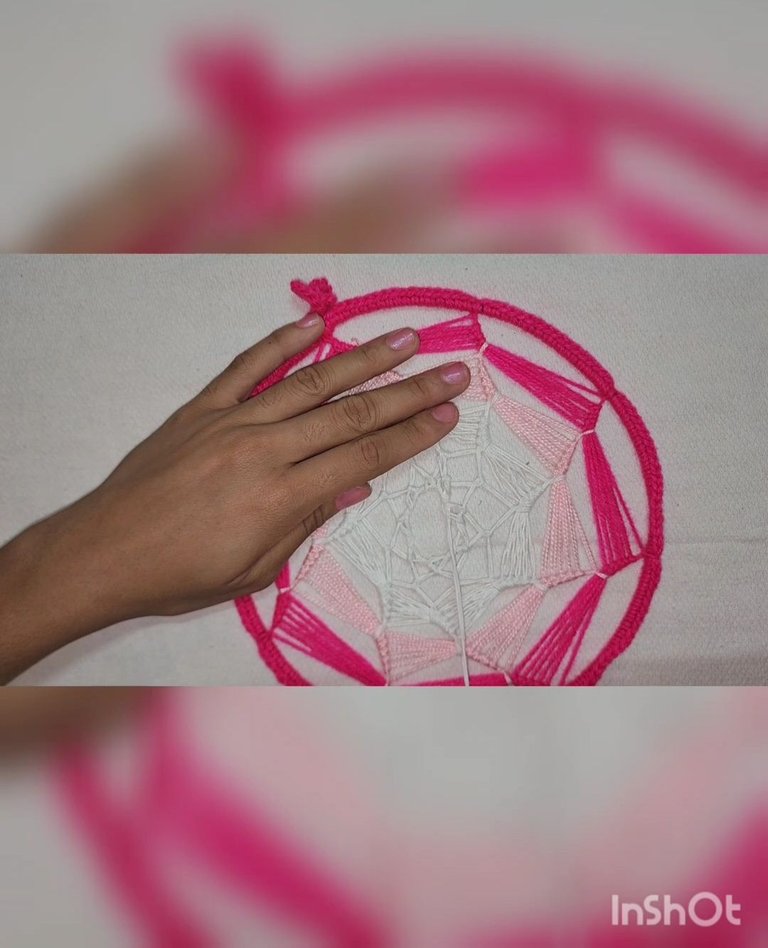
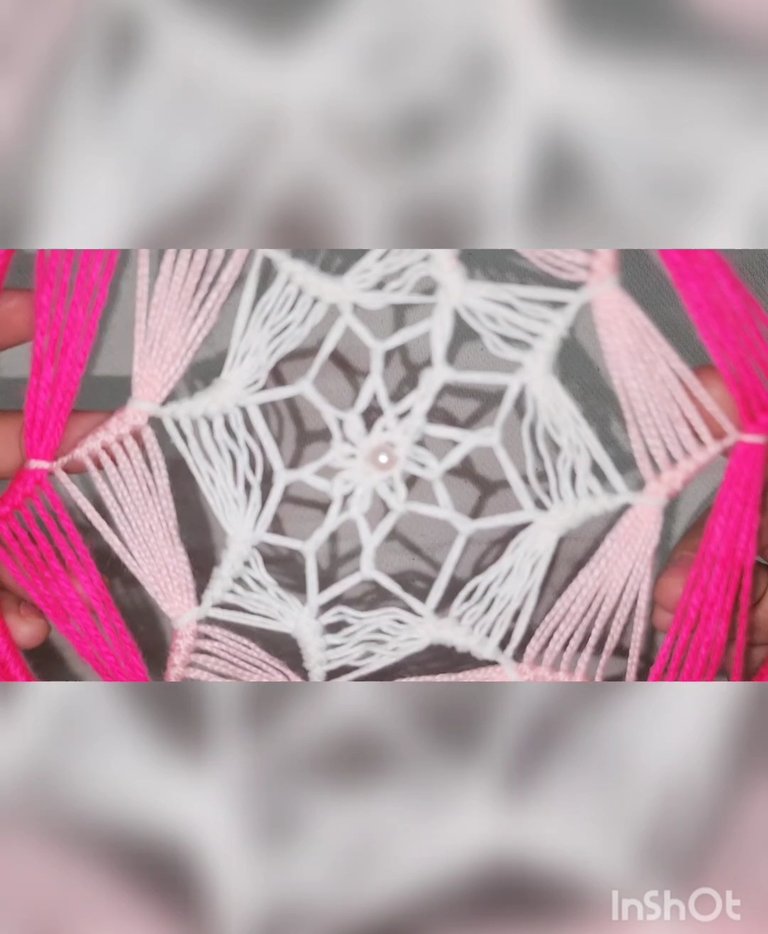
18- Cuando llegué al final solo alé la lana haciendo que cerrara el tejido y formara una estrella pequeña.
18- When I reached the end, I pulled the yarn, making the weave close and form a small star.
19- Corté la lana dejándole un largo de más menos 6 cm, introduje una perlita y por la parte trasera le hice un nudito.
19- I cut the yarn leaving a length of about 6 cm, inserted a bead and made a knot on the back.
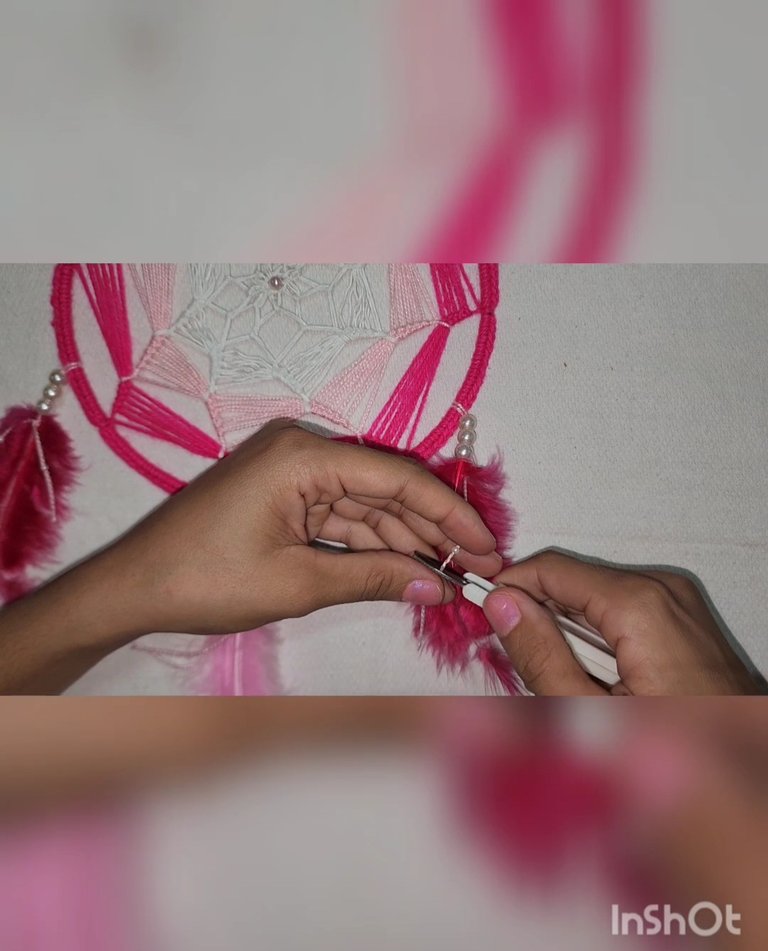
20- Agregué tres hebras de lanas, con unas perlitas y les coloqué las plumillas.
20- I added three strands of yarn, with some beads and attached the feathers.
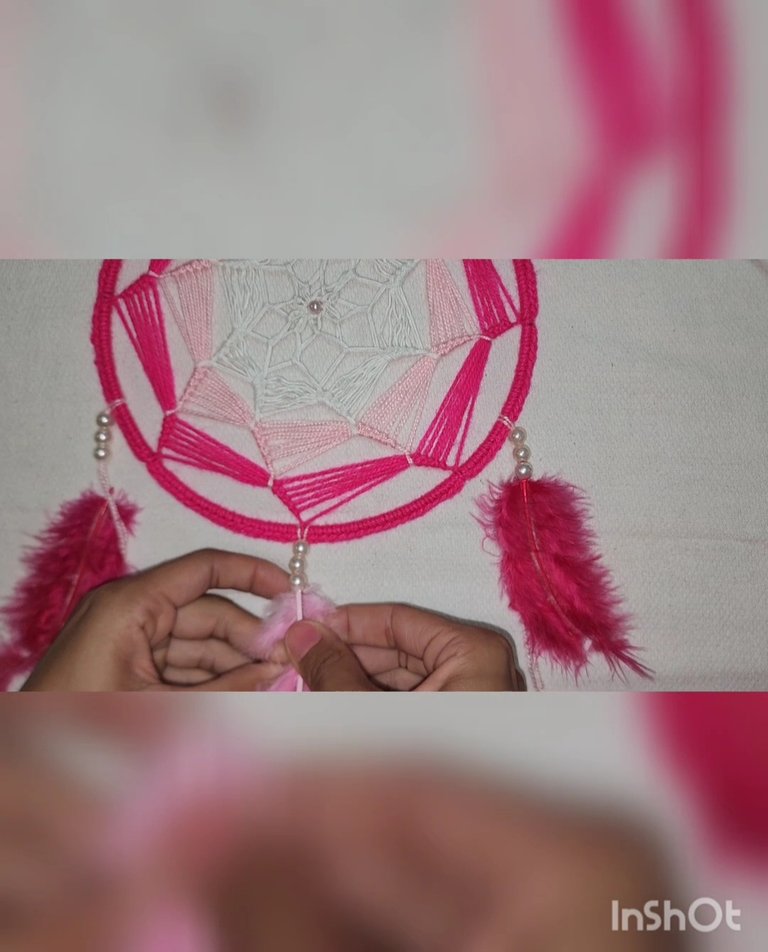
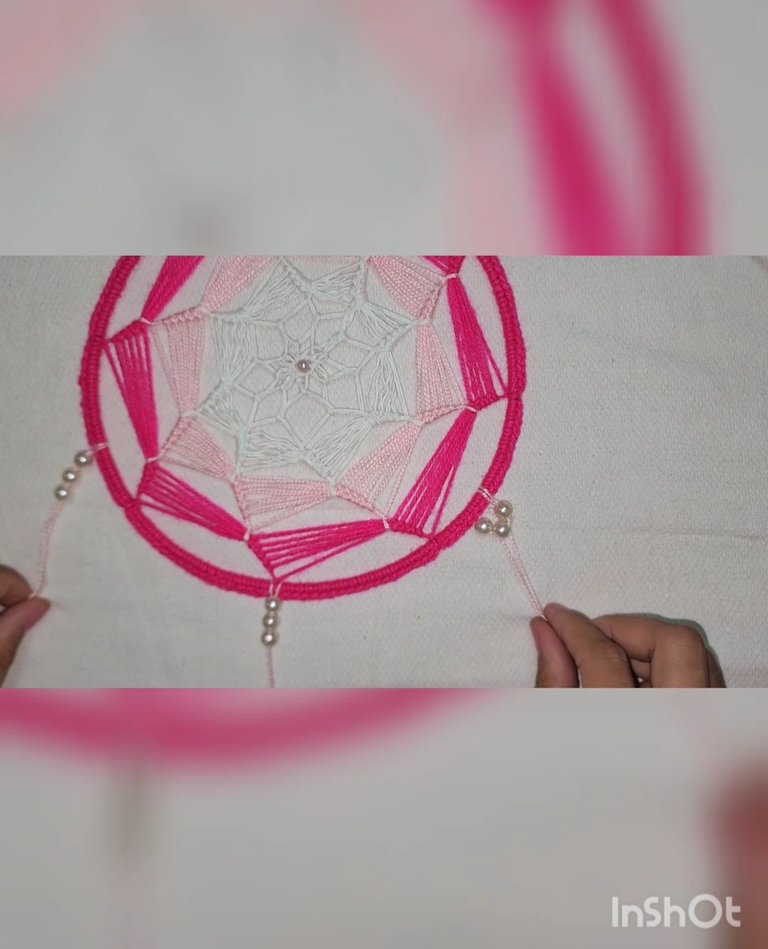
21- Les hice un nudito a cada una, les agregué una perlita en cada punta y corté.
21- I knotted each one, added a bead at each end, and then cut.
Y listo, así quedó terminado este bello atrapasueños, decorado con todo mi amor y con colores tan sencillos y femeninos como el rosa fuerte, el rosa claro y el blanco.
Espero les haya gustado, yo feliz de mostrarles lo que me gusta hacer.
Muchos besos y abrazos virtuales y hasta una nueva publicación.
And there you have it, this lovely dreamcatcher is finished, decorated with all my love and in simple and feminine colors such as bright pink, light pink, and white.
I hope you liked it, I am happy to show you what I like to do.
Many virtual kisses and hugs, until the next post.
Recursos empleados
| RECURSO / RESOURCE | FUENTE / SOURCE |
|---|---|
| Edición / Edition: | @yunacrochet |
| Imágenes / Pictures: | Samsung Galaxy s22 Ultra / Inshot |
| Translated / Traducción: | Hive Translator by @noakmilo |
Thank you very much.
Thank you.
Un hermoso atrapasueños. 😲😍
Muchas gracias amiga. Bendiciones 😘😘
!discovery 35
Thanks you.
This post was shared and voted inside the discord by the curators team of discovery-it
Join our Community and follow our Curation Trail
Discovery-it is also a Witness, vote for us here
Delegate to us for passive income. Check our 80% fee-back Program
Thanks you very much for such a beautiful gesture.
Beautiful crochet work, a very nice decorative dreamcatcher to give as a gift or to place in any space. Thank you for sharing your creative process with us
I feel very happy and grateful.
Thanks you very much for such a beautiful gesture.
¡Felicidades! Esta publicación obtuvo upvote y fue compartido por @la-colmena, un proyecto de Curación Manual para la comunidad hispana de Hive que cuenta con el respaldo de @curie.
Si te gusta el trabajo que hacemos, te invitamos a darle tu voto a este comentario y a votar como testigo por La Colmena.
Si quieres saber más sobre nuestro proyecto, te invitamos a acompañarnos en nuestro servidor de Discord.
Thanks you very much.
Congratulations @yunacrochet! You have completed the following achievement on the Hive blockchain And have been rewarded with New badge(s)
Your next target is to reach 1500 upvotes.
You can view your badges on your board and compare yourself to others in the Ranking
If you no longer want to receive notifications, reply to this comment with the word
STOPCheck out our last posts:
Thanks you very much,I feel very happy and blessed.
You're welcome @yunacrochet! Have a nice day 😊👍
https://x.com/hivediy47901/status/1807680709072445452
Thsnks you very much.
Keep up the good work. 👏🎵
Dear beloved Hive creator,
Coding poet Gudasol here to support you sharing your art + life on Hive.
As a fellow creator, I know how hard it is to get the word out there.
I built cXc.world to help creators like us get more support from the blockchain community + beyond.
Share your music on cXc.world, and copy the Markdown for a easy post includes embedded players for Spotify, Youtube, Soundcloud.
That way, you can earn HIVE + stack streams on centralized platforms, as they do still matter.
Not a music creator? No problem. You can still use cXc.world to find + share music you love.
What's next?
Preview the next evolution of cXc, Tetra.earth.
Expose local music from your area!
We're helping grassroots musicians, and you can too by adding their music (no sign up or WAX account required).
Join our community 🐬
Find fellow music lovers in cXc's Discord
Bad news: Saying see you later to Hive! 👋
We didn't get the needed support to continue cXc.world on Hive, as our DHF proposal lacked votes, but [Good News Everyone] cXc.world will add a Markdown copy button, allowing you to easily share your music + music you find on Hive.
For now, we're on WAX, with tools you can use to mint your own Music/Media NFT collection.
Curious about the future of Earth + ET relations? New economic systems?
Find more apps + art from Gudasol
Want to build tools like I used to share this?
I'd love to show you some tips on AI Code generation