(Esp/Eng) Diy concurso Navidad, Bello Zarcillo de perla en forma de Muñeco de Nieve// Diy Christmas contest, Beautiful pearl earring in the shape of Snowman.
Mi versión española.
¡Bienvenido a mi blog!

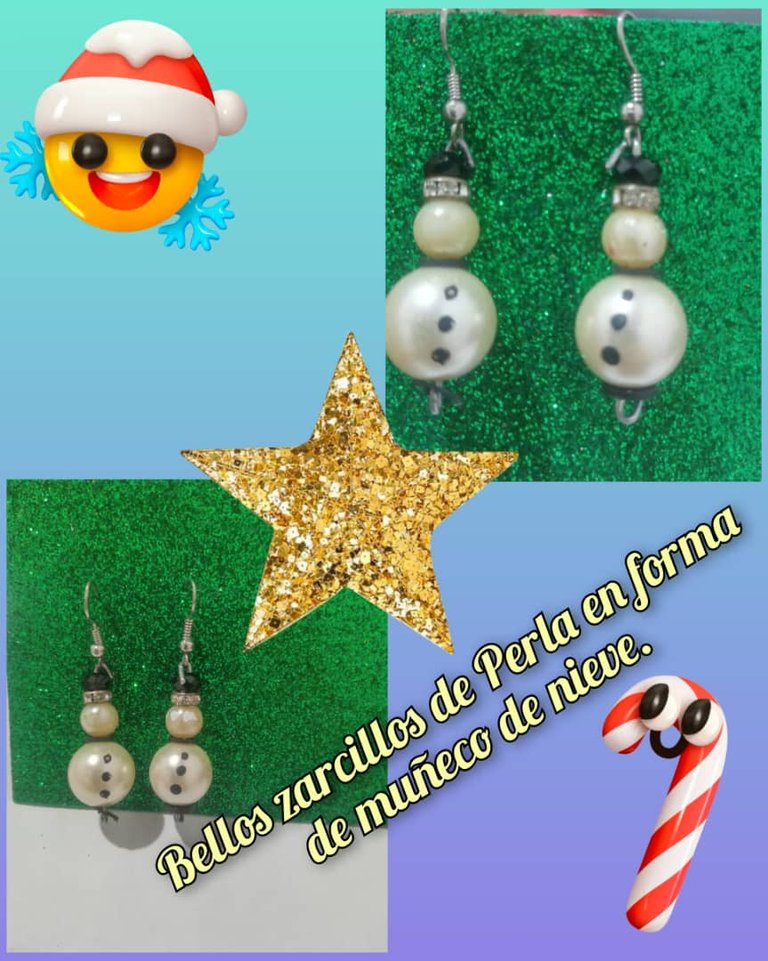
Hola a toda mi gente de esta comunidad, @DIYHub, es un placer regresar a esta linda comunidad, hoy vengo a participar en el concurso mensual de la comunidad, en esta oportunidad le hacemos horno a la temática de la Navidad, sabiendo que es una época de amistad, reconciliación con tus seres queridos de compartir en familia, en esta ocasión le diseñe un bello zarcillo de perla en forma de muñeco de nieve para usar en la Navidad, son detalle para regalar o ponerte en la víspera de Navidad, espero que le guste.

Materiales.
- 15 centímetros de alambre de bisutería.
- 2 cuentas de perla grande.
- 2 cuentas de perla mediana.
- 4 cuentas de color negra plana.
- 2 cuentas de color negra.
- 2 anzuelos de zarcillo.
- 2 piedras preciosas.
- 1 pinza.

Paso.
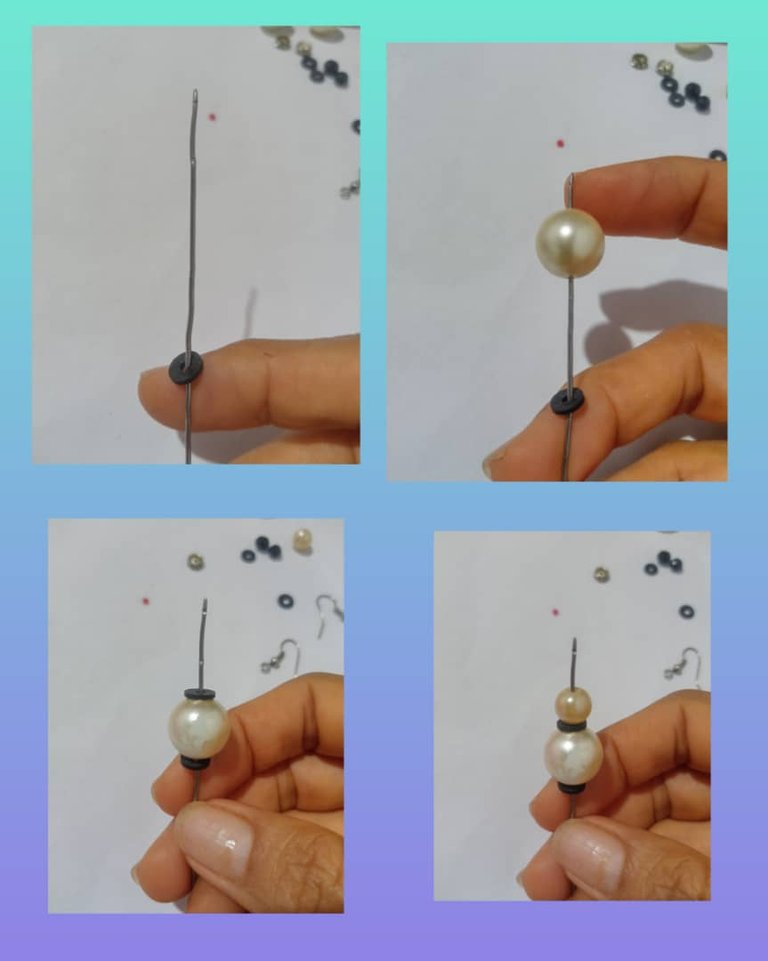
Primero tomo el alambre y medimos 4 centímetros, comienzo introduciendo una cuenta de color negra plana que va a hacer la base del muñeco de nieve.
Luego introducimos la perla grande que y la llevo al final donde esté el muñeco que va a formar parte del cuerpo del muñeco de nieve.
Introducimos la cuentas de color negra que formara la bufanda del muñeco en esta ocasión, no disponía de cuenta roja, le coloque negra queda bien.
Por último, introducimos la perla mediana que va a hacer la cabeza del muñeco de nieve. Vea que va quedando muy lindo.

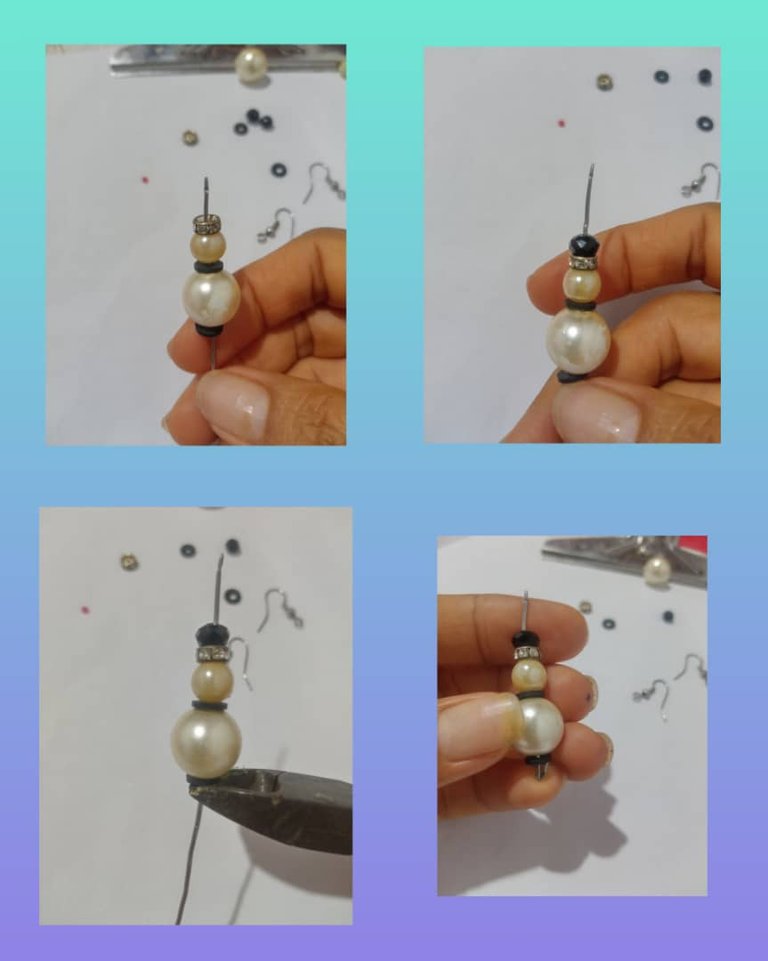
Ahora introduzco la piedra preciosa que es la base del sombrero.
Seguidamente, la cuenta de color negra la colocamos en la parte de arriba de la base del sobrero, vea que se formó el muñeco de nieve. Con la ayuda de la pinza cortamos el alambre que sobra y lo doblamos con la misma pinza que no quede bien adjuntado.
En la parte de arriba lo doblamos con la ayuda de la pinza e introducimos el anzuelo del zarcillo y tengo mi zarcillo listo de muñeco de nieve, le coloco unos bellos botones para que resalte más.


Ahora hacemos el segundo zarcillo, aplicamos el mismo procedimiento, tomo el alambre y medimos 4 centímetros de largo, introducimos la cuenta de color negra plana que va a hacer la base del muñeco de nieve.
Seguidamente, le introduzco la perla grande, luego introducimos la cuenta negra plana que es la corbata del muñeco de nieve, después la perla mediana que es la cabeza.
Seguimos con la base del sobrero que es la piedra preciosa y la cuenta de color negra.
Tengo mi segundo zarcillo listo en forma de muñeco de nieve. Vea como quedaron el par muy lindo, a mí me encantaron para ponérmelo en Navidad.


Vea el proceso final, de mi zarcillo de perla en forma de muñeco de nieve, muy sencillo para disfrutarlo en esta época de diciembre, a mí amigas le encantaron.

Tenga un feliz días y bendecidos para todos, muchas gracias por leer mi post.

Las fotos son mías, tomadas con teléfono, Alcatel, editadas con incollage y traducidas con DeepL.
Mi versión inglesa.
¡Bienvenido a mi blog!

Hello to all my people of this community, @DIYHub, it is a pleasure to return to this nice community, today I come to participate in the monthly contest of the community, this time we do oven to the theme of Christmas, knowing that it is a time of friendship, reconciliation with your loved ones to share in family, this time I design a beautiful pearl tendril in the shape of snowman to use at Christmas, are detail to give or wear on Christmas Eve, I hope you like it.

Materials.
- 15 centimeters of bijouterie wire.
- 2 large pearl beads.
- 2 medium pearl beads.
- 4 flat black beads.
- 2 black beads.
- 2 tendril hooks.
- 2 precious stones.
- 1 clip.

Step.
First I take the wire and we measure 4 centimeters, I start by inserting a flat black colored bead that is going to make the base of the snowman.
Then we introduce the big bead that and I take it to the end where the doll is that is going to be part of the body of the snowman.
We introduce the black beads that will form the scarf of the snowman in this occasion, I didn't have red beads, I put the black one, it looks good.
Finally, we introduce the medium bead that will make the snowman's head. See that it is getting very nice.

Now I insert the gemstone that is the base of the hat.
Next, we place the black bead on the top of the base of the hat, see that the snowman was formed. With the help of the pliers we cut the wire that is left over and we bend it with the same pliers so that it is not well attached.
At the top we bend it with the help of the pliers and introduce the hook of the tendril and I have my snowman tendril ready, I place some beautiful buttons to make it stand out more.


Now we make the second tendril, we apply the same procedure, I take the wire and we measure 4 centimeters long, we introduce the flat black color bead that is going to make the base of the snowman.
Next, I introduce the big bead, then we introduce the flat black bead which is the tie of the snowman, then the medium bead which is the head.
We continue with the base of the hat which is the precious stone and the black bead.
I have my second tendril ready in the shape of a snowman. See how cute the pair turned out, I loved them for Christmas.


See the final process, of my pearl tendril in the shape of snowman very simple to enjoy in this time of December, my friends loved them.

Have a happy day and blessed to all, thank you very much for reading my post.

Las fotos son mías, tomadas con teléfono, Alcatel, editadas con incollage y traducidas con DeepL.
Posted Using InLeo Alpha
Glad to have you back in our community. Your pearl earrings are beautiful and they look like mini snowmen. Great work.
Gracias me alegra que le guste, sí estoy de nuevo de regreso estoy de vacaciones escolar le dedicaré más tiempo a la comunidad. Saludos
You've done a painstaking job.
Gracias por tu visita, si me alegra trabajar para la comunidad. Saludos.